• stem+node ceramics
  • HOME
  • Food Recipes
  • About
  • Contact
Menu

The Lovely Crazy

Street Address
City, State, Zip
Phone Number

Your Custom Text Here

The Lovely Crazy

  • stem+node ceramics
  • HOME
  • Food Recipes
  • About
  • Contact

Apple Strawberry Granitas

May 30, 2020 Colleen Stem
IMG_8297.jpg
IMG_8250.jpg

Ever since schools have been canceled and we have turned to homeschooling, the school systems around my parts have been dropping lunches off to all the littles. Both my sisters with littles have been getting food every day and it is great and amazing and makes me less worried about all the kids that really depend on school for food. Thank you school systems for being awesome!

The thing with the food is that you get what you get. Just about everyday, packed with the lunches,are either applesauce cups or strawberry puree cups.

The little shits, well none of them eat them. I don’t know if they just don’t like them or are sick of them but yeah, they are really starting to pile up. And so sisters have been sending apple and strawberry cups my way and now I have shit ton too.

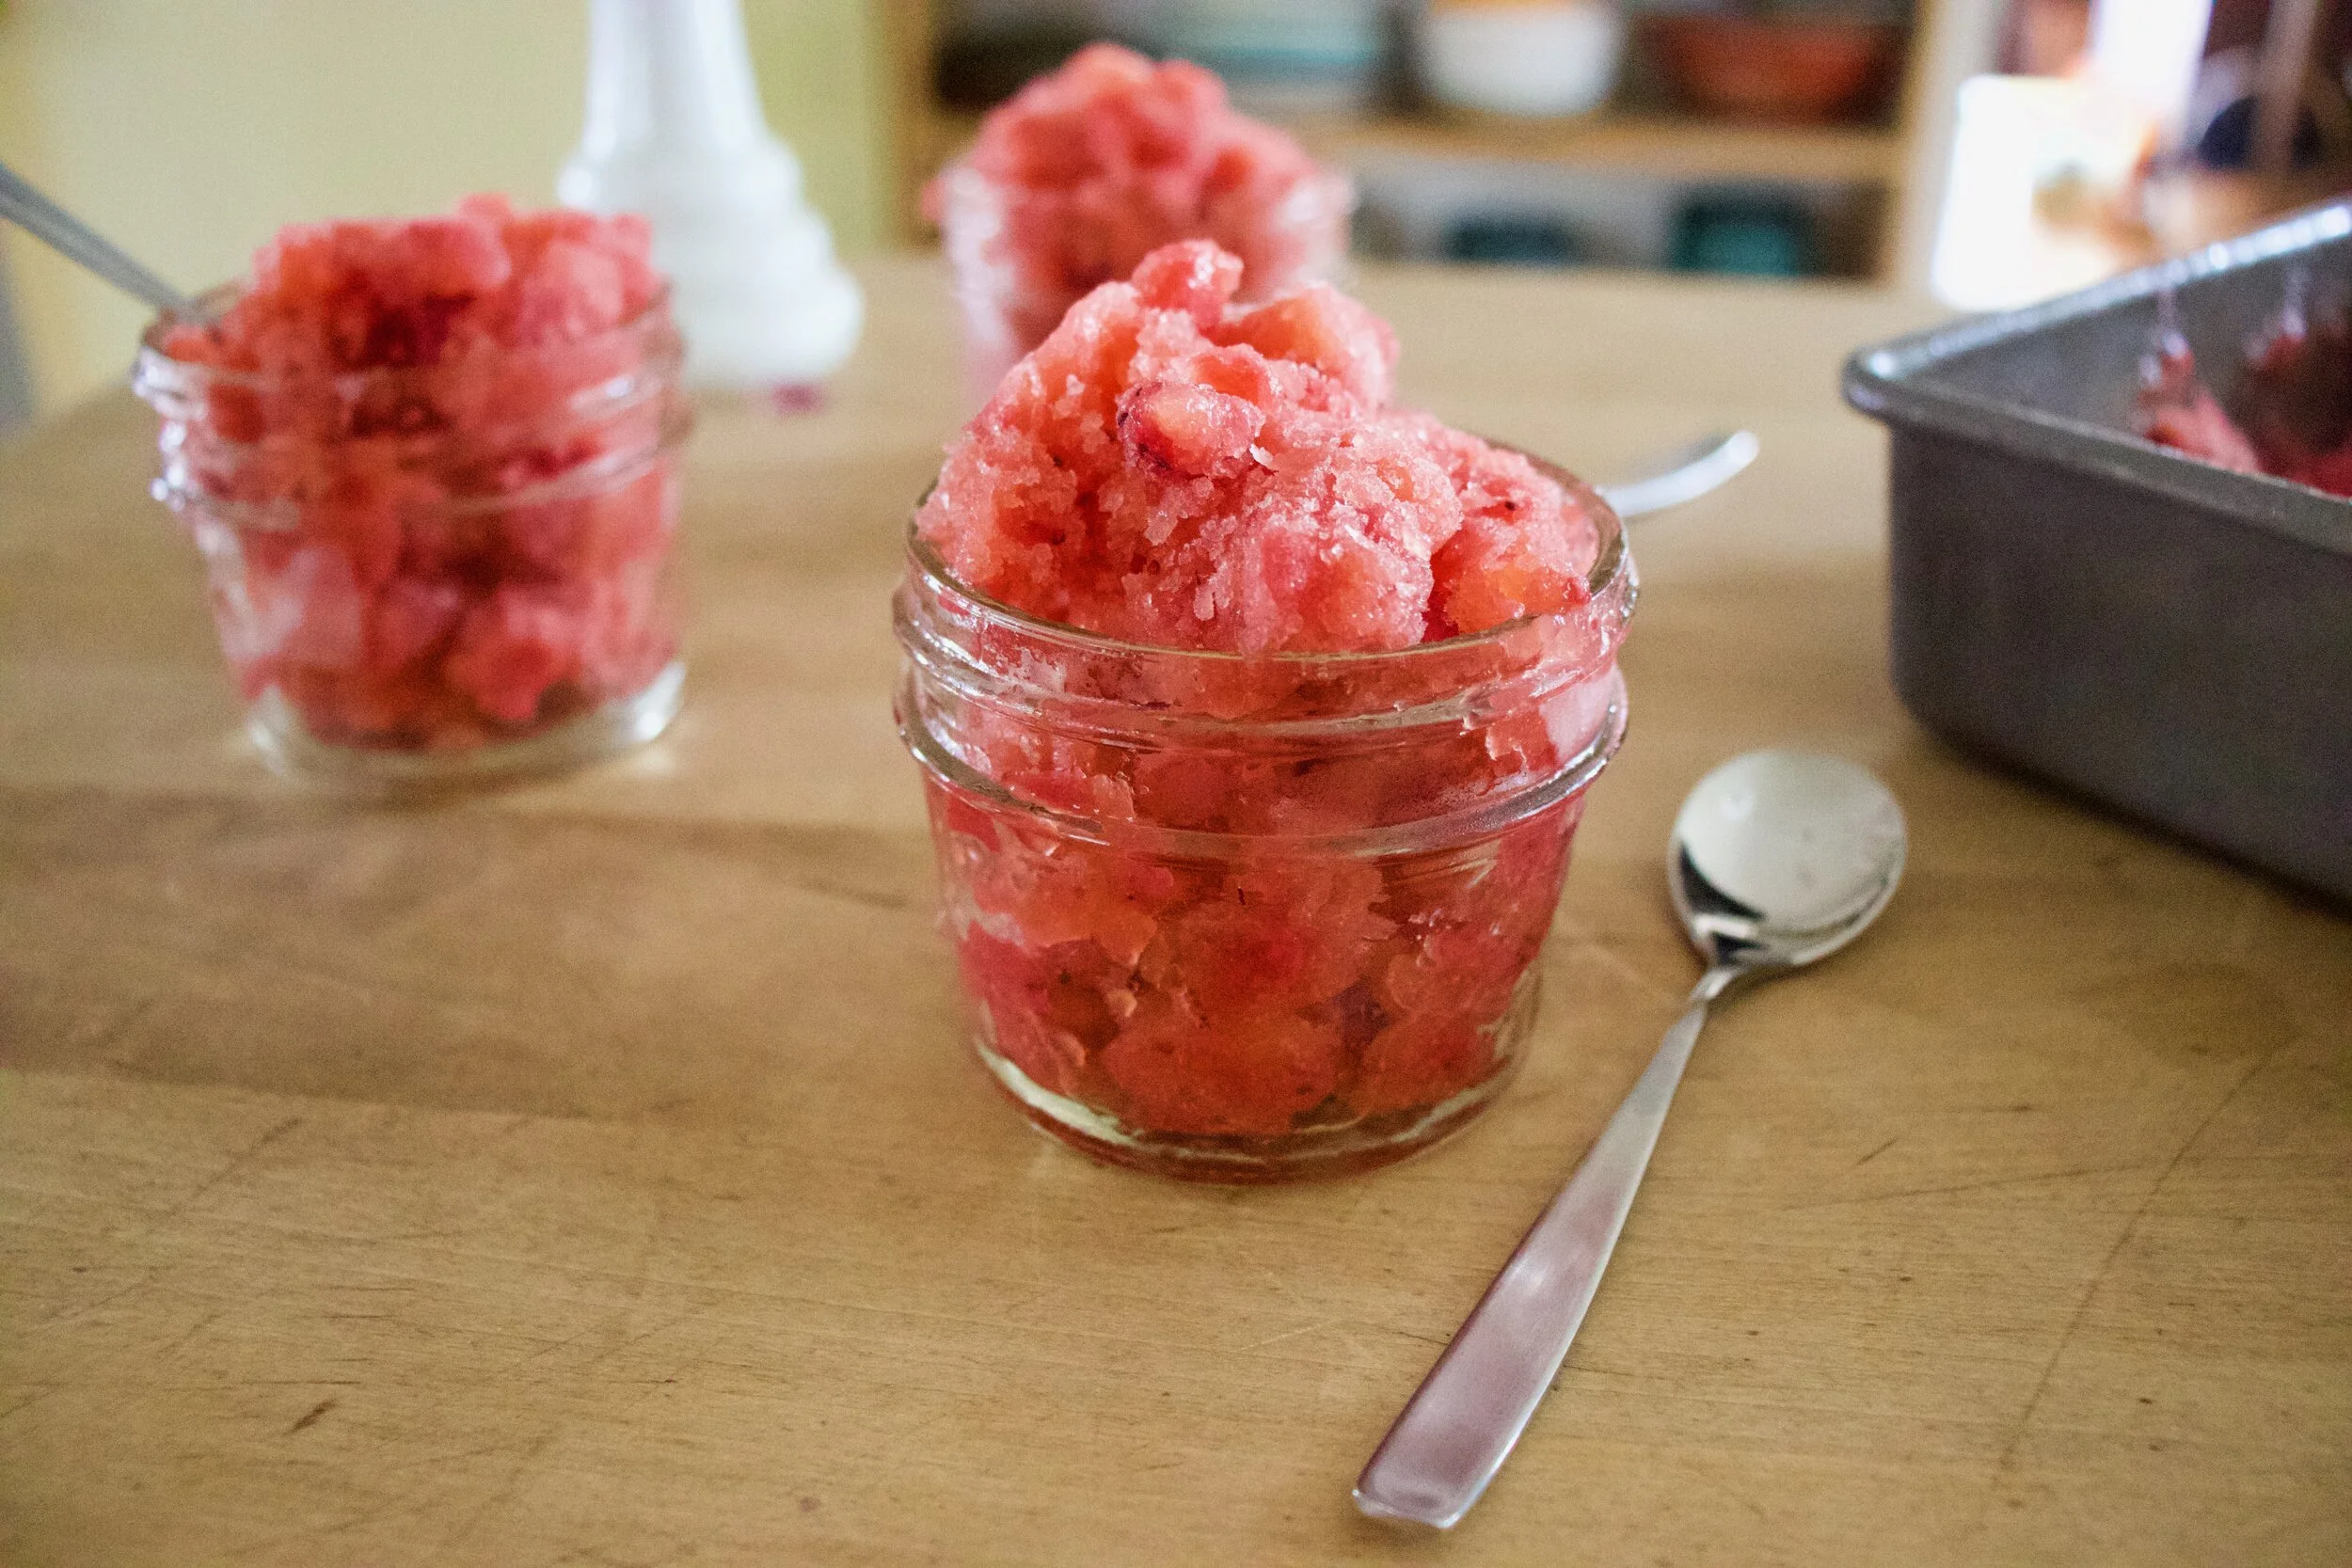
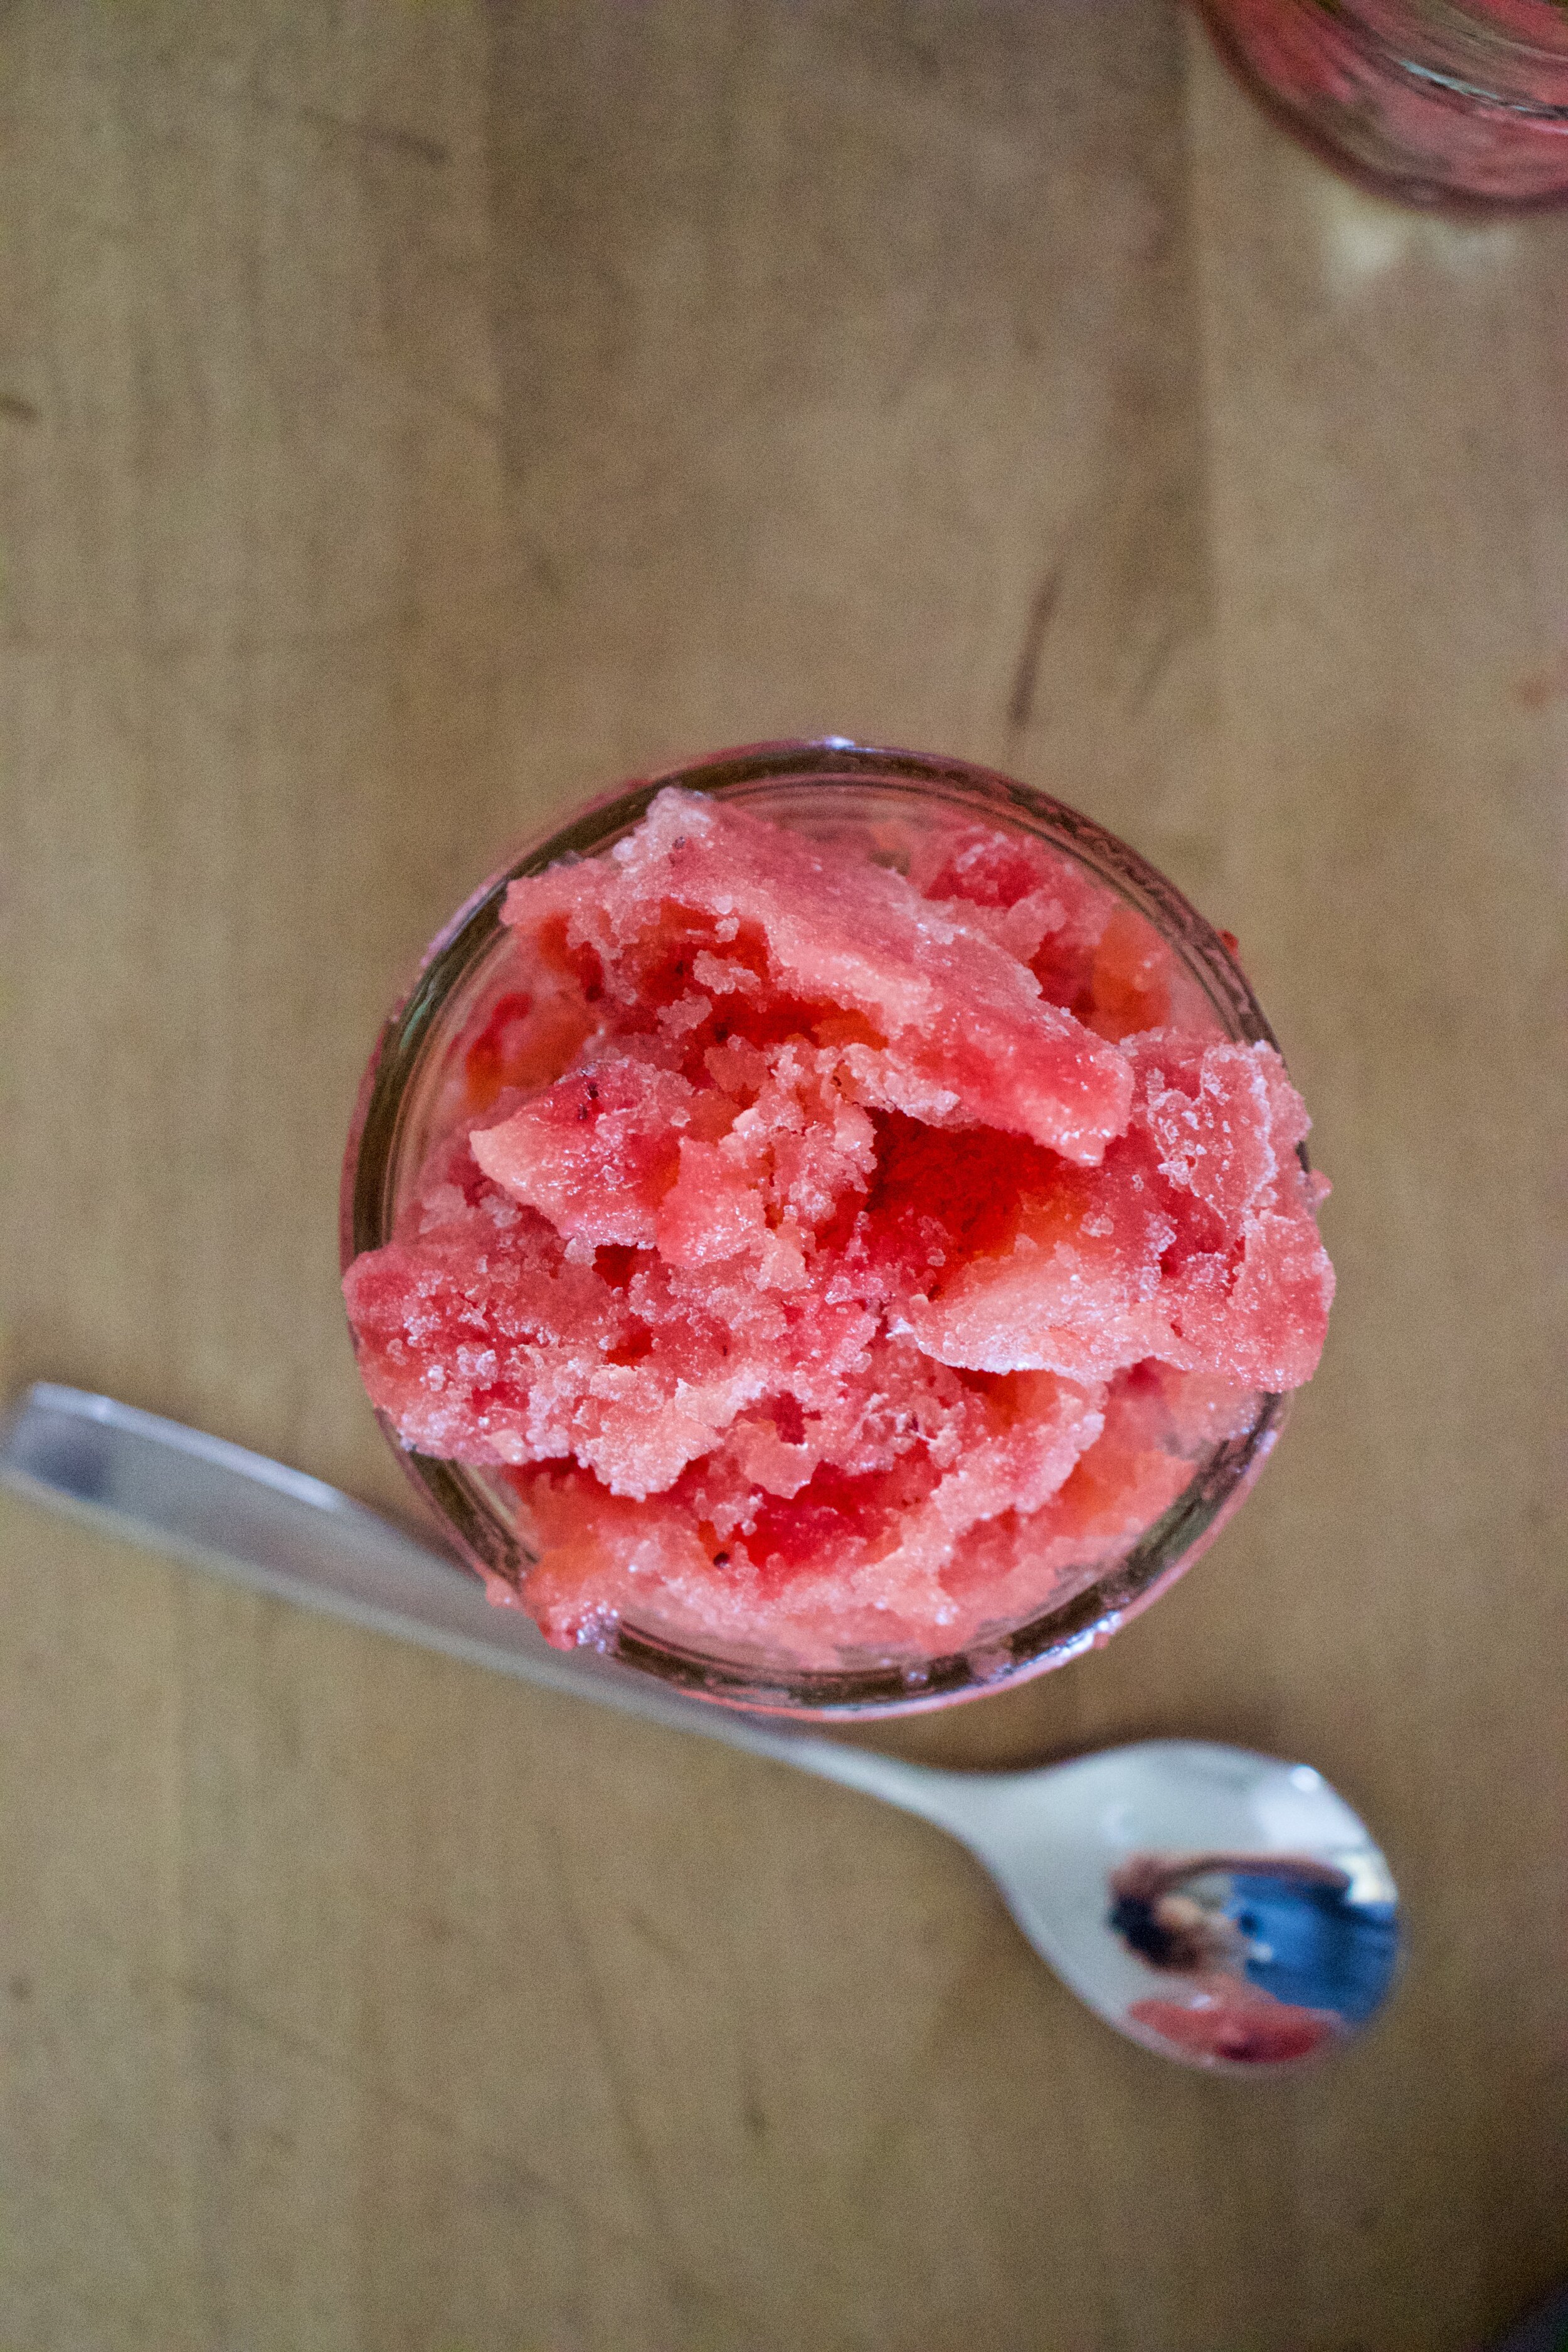
I figured I would just bake with them and that is what I have been doing, but I still have so many and it is way to hot to be baking all the time. What to do with an excess of fruit puree cups? Freeze them. And make them into granitas. Whats a granita? A granita is flaked frozen fruit, kind of like a slushy you eat with a spoon. And wouldn’t you know, once the applesauce and strawberry cups were frozen and called something else, the littles were all over them. I am a genius.

It also helped that is was like a 95 degrees out and when it is that gross, no one wants to eat anything that isn’t frozen. Blah. Too hot way too early!

So if you find yourself with an excess amount of fruit cups or just want to make a healthy and delicious cold treat for your littles or yourself, do this.

Now to the apple strawberry granitias!

The stuff. Applesauce cups and strawberry puree cups. If you don’t have the actually cups, you can use applesauce from a jar or homemade and make your own strawberry puree by tossing fresh or frozen strawberries into a blender. Easy peasy.

The apple and strawberry purees into a bowl

IMG_8217.jpg

Mix together. Have a taste, it is delicious.

IMG_8223.jpg

Dump mixture into a baking sheet or pan, preferably a metal one, and place in freezer.

IMG_8236.jpg
IMG_8239.jpg

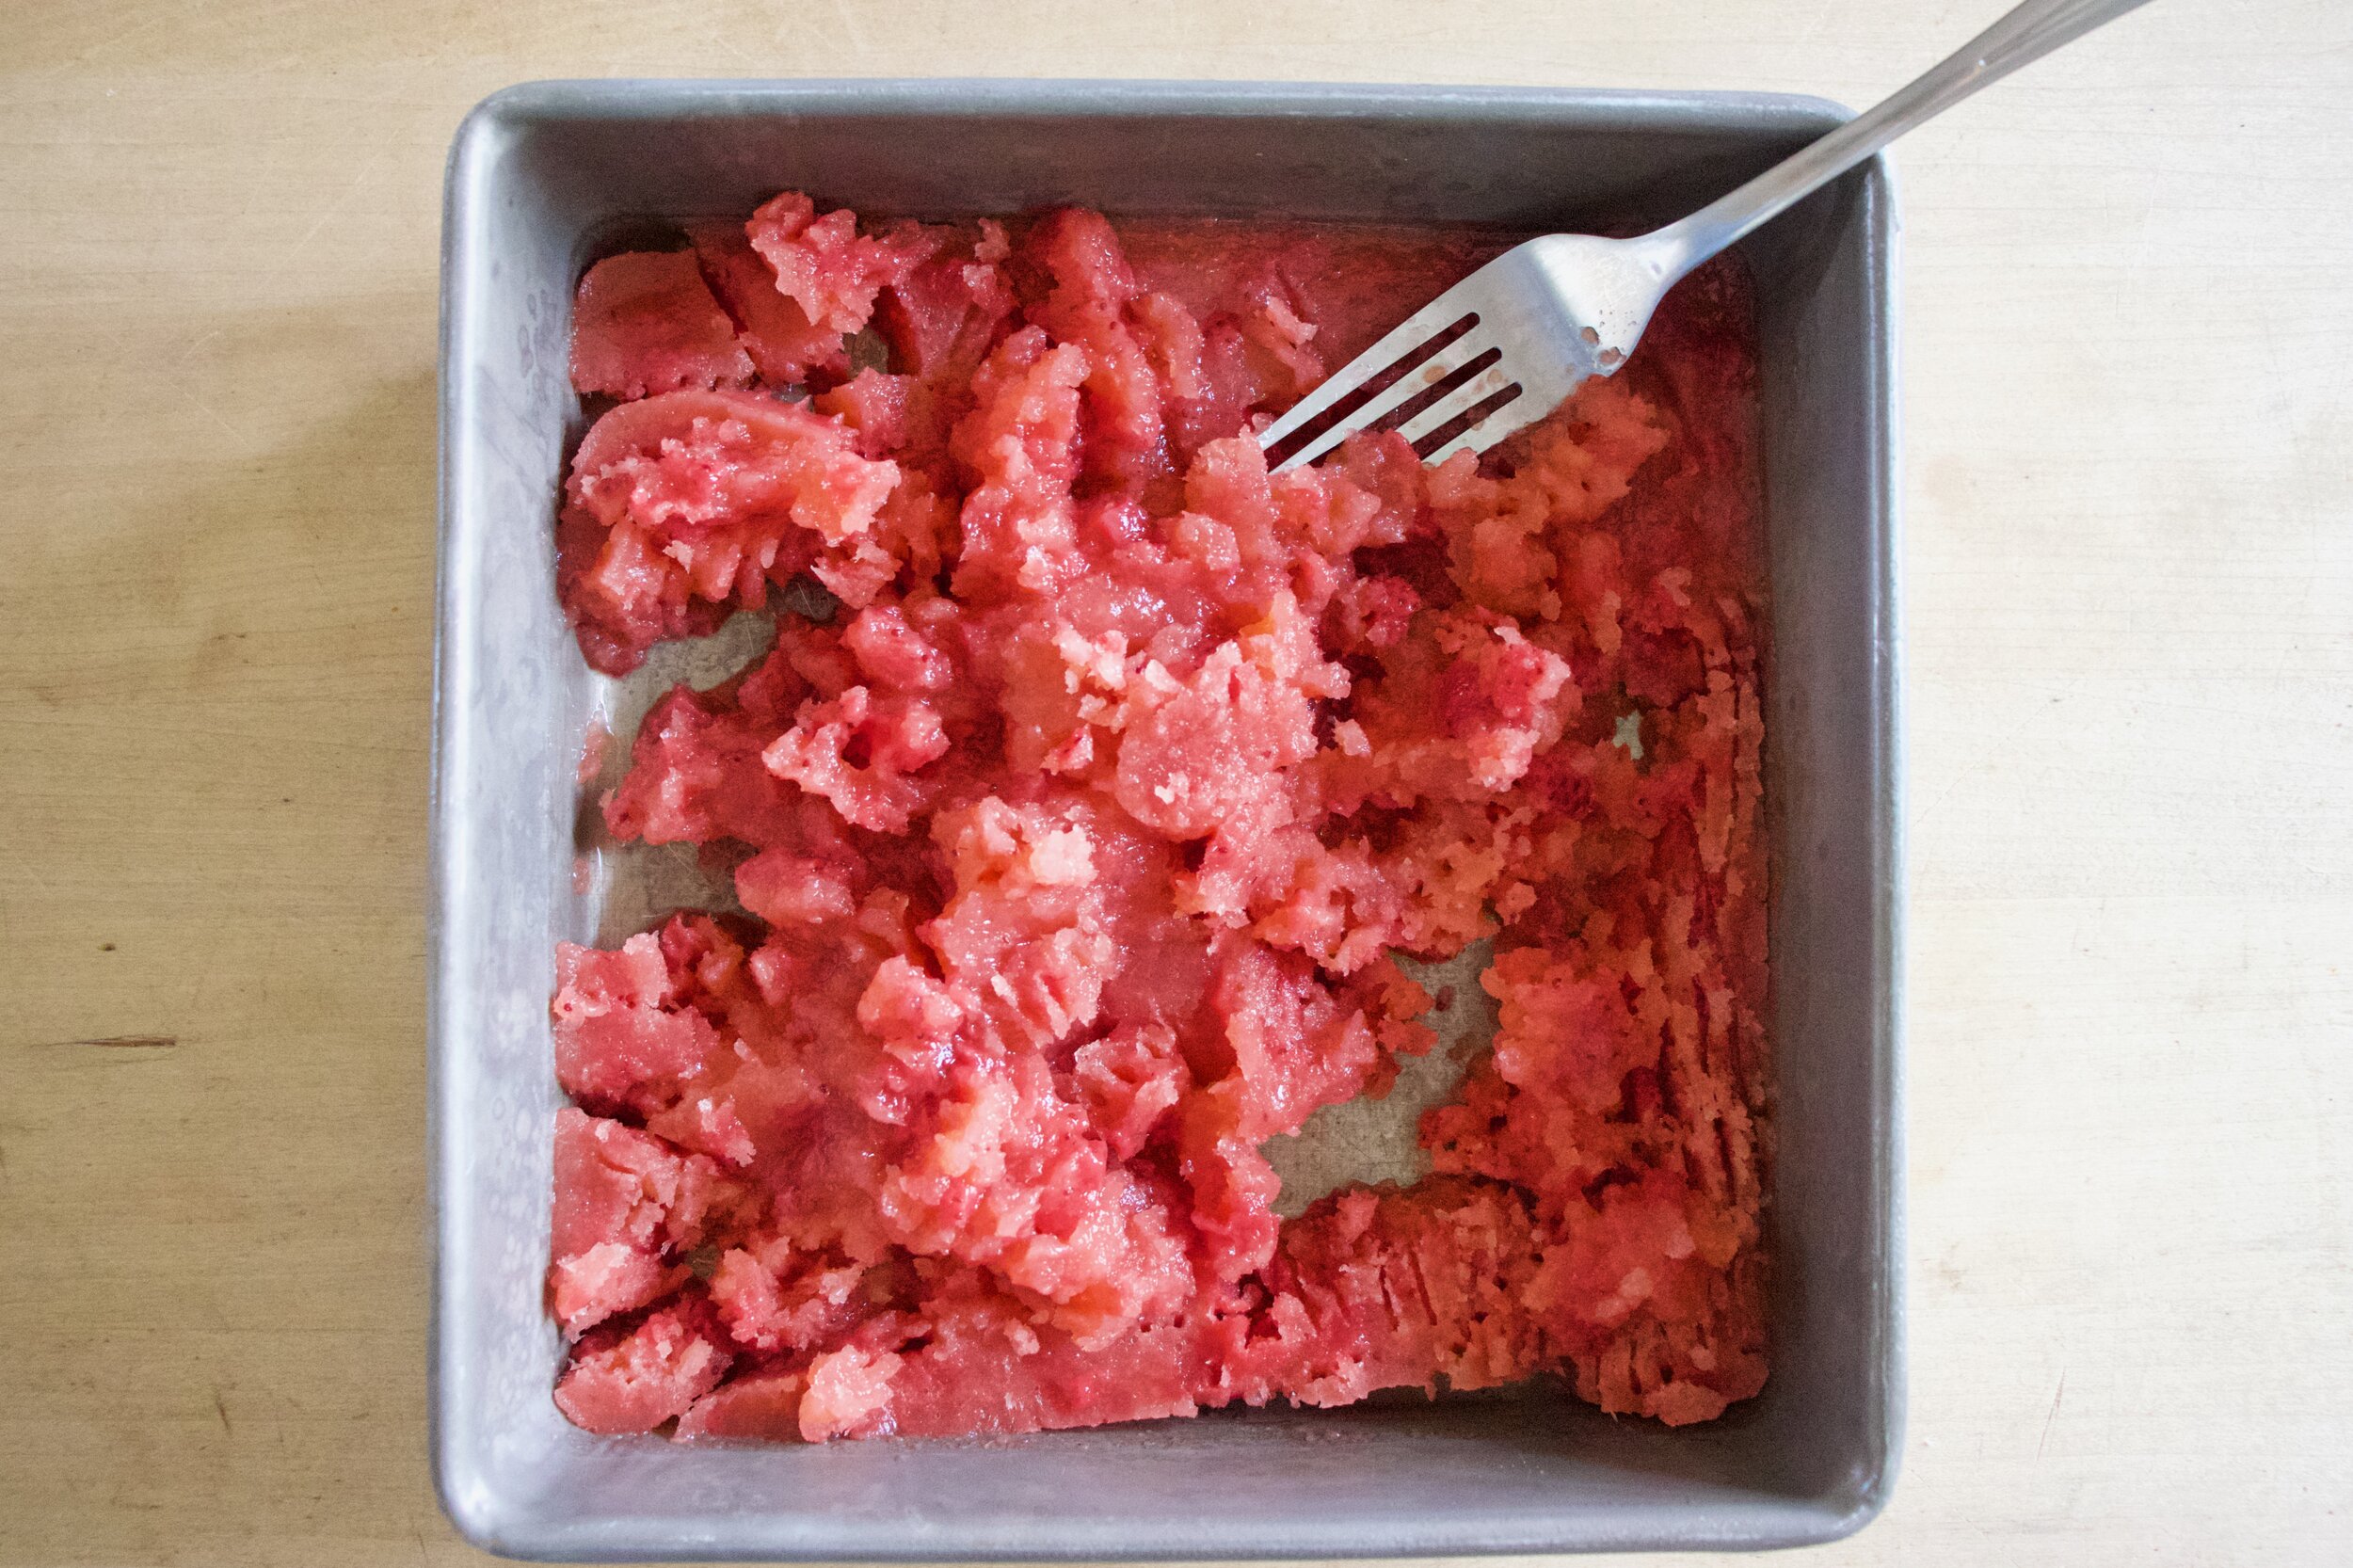
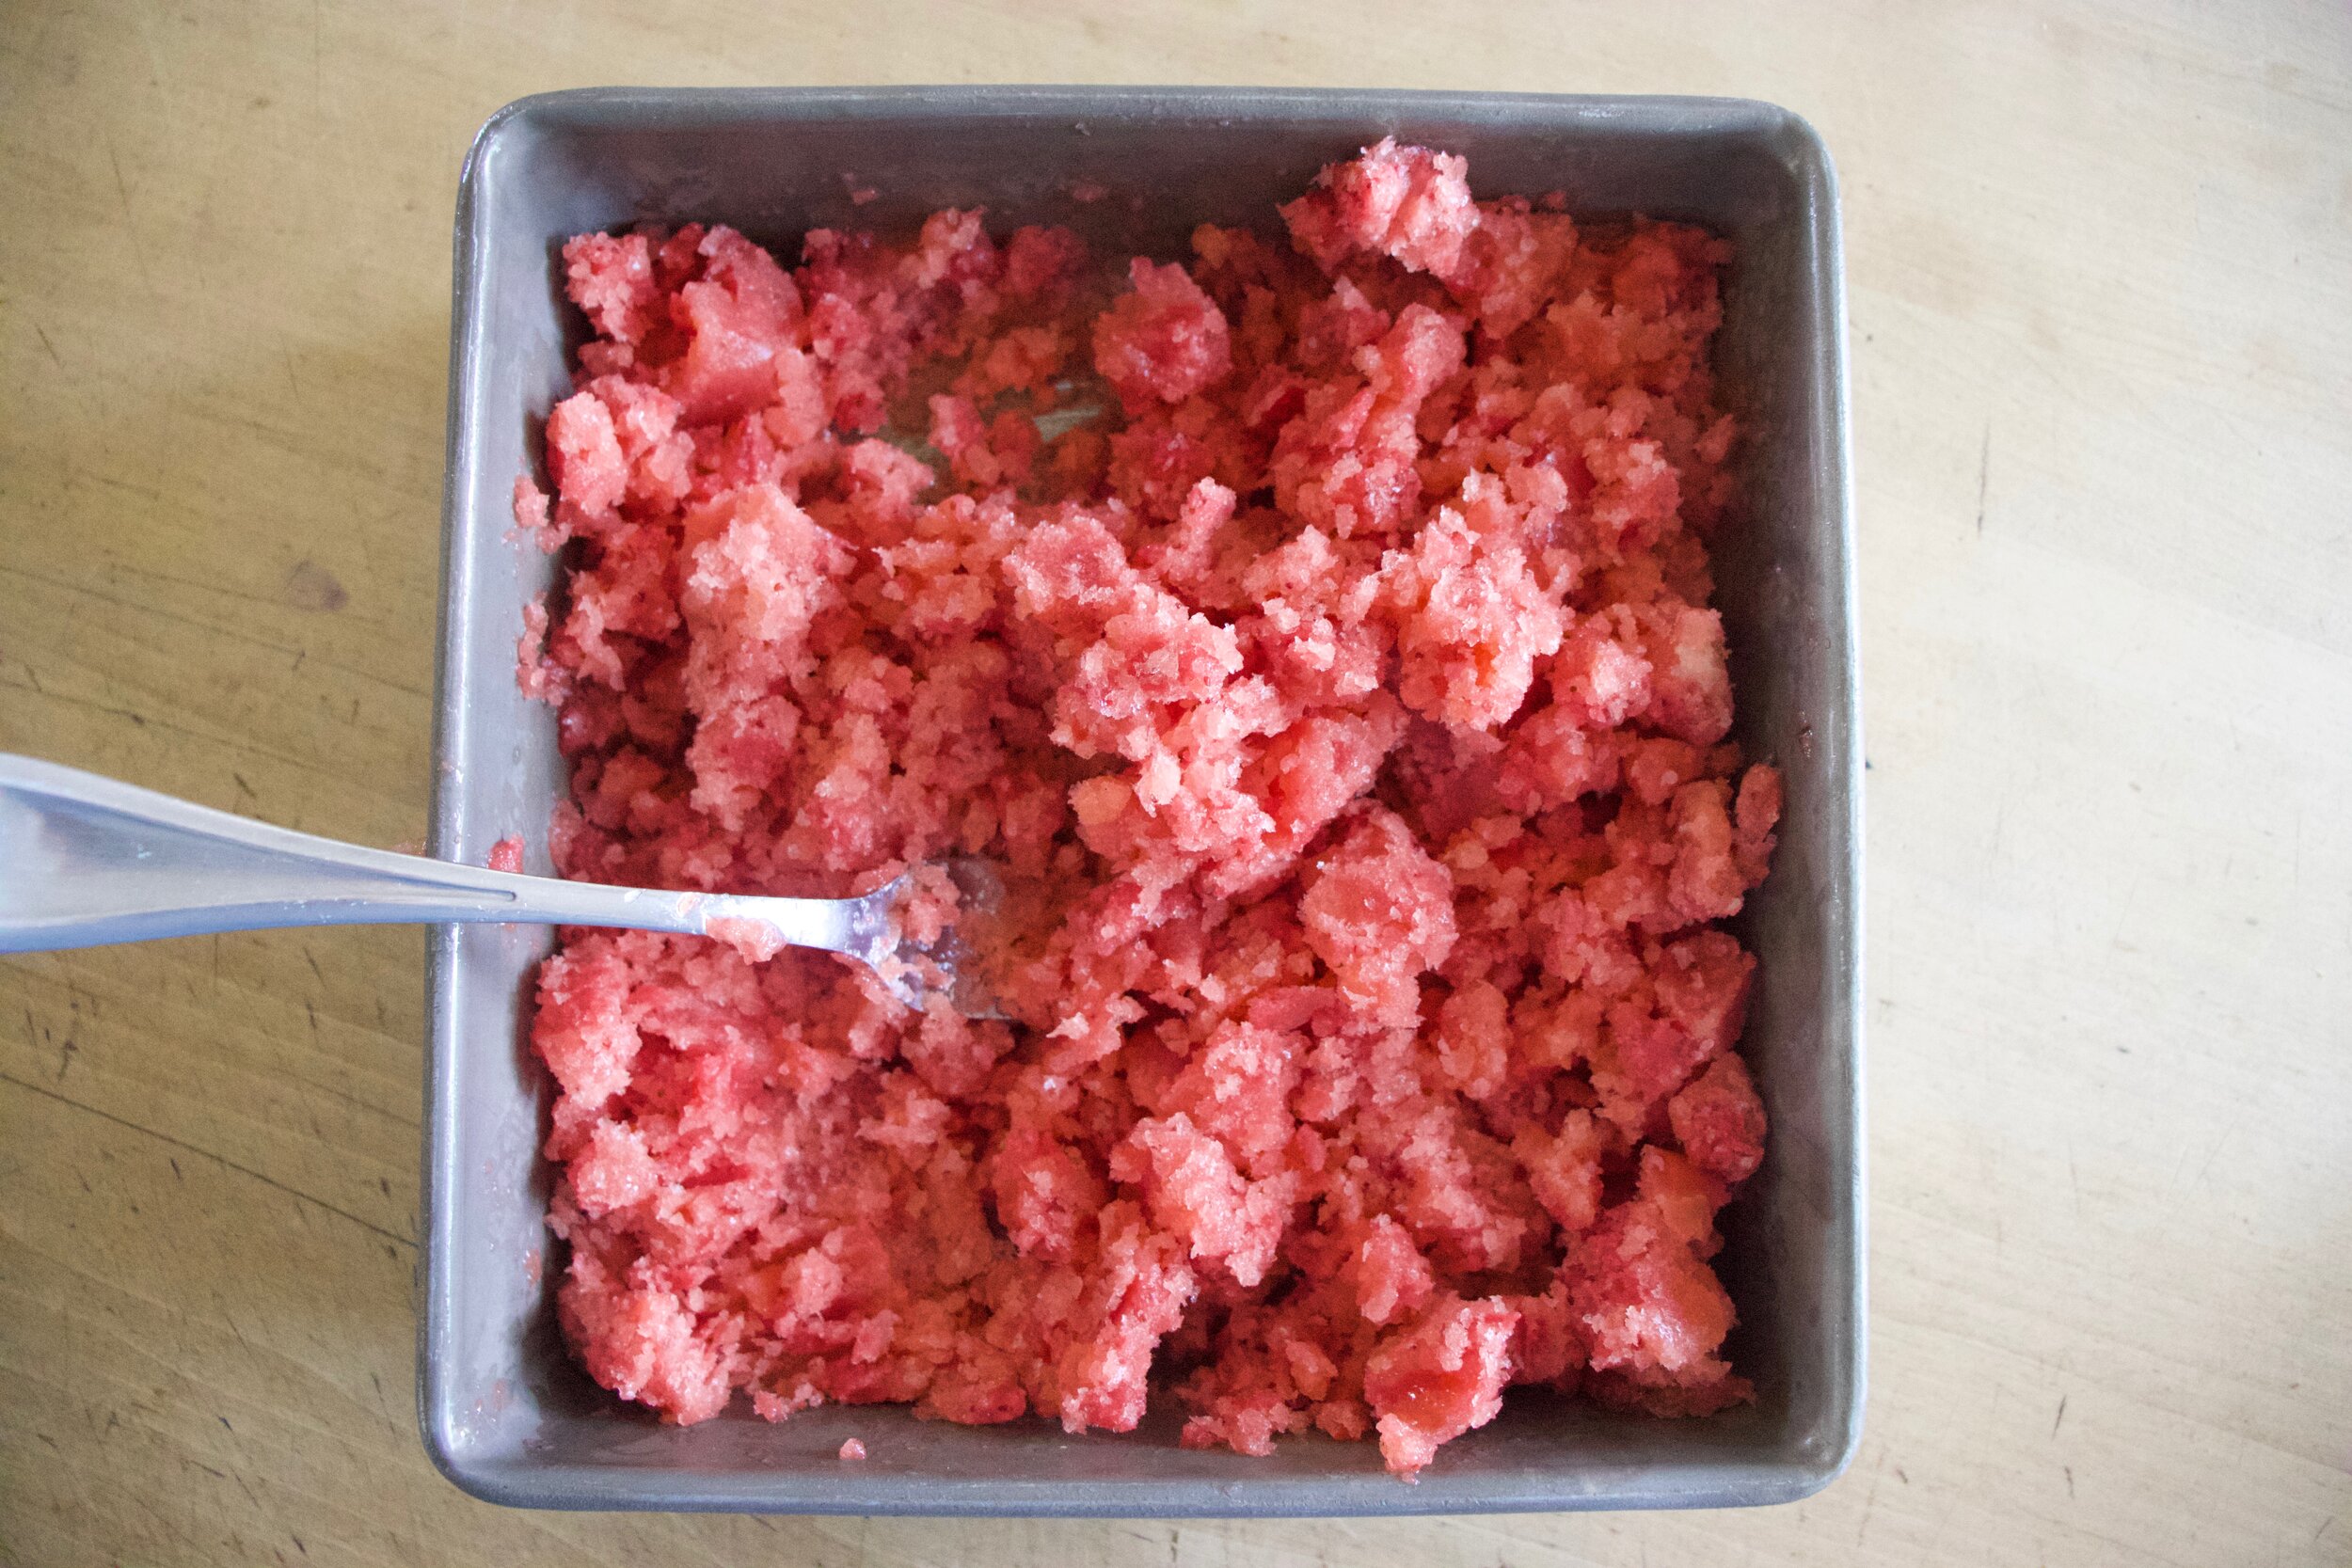
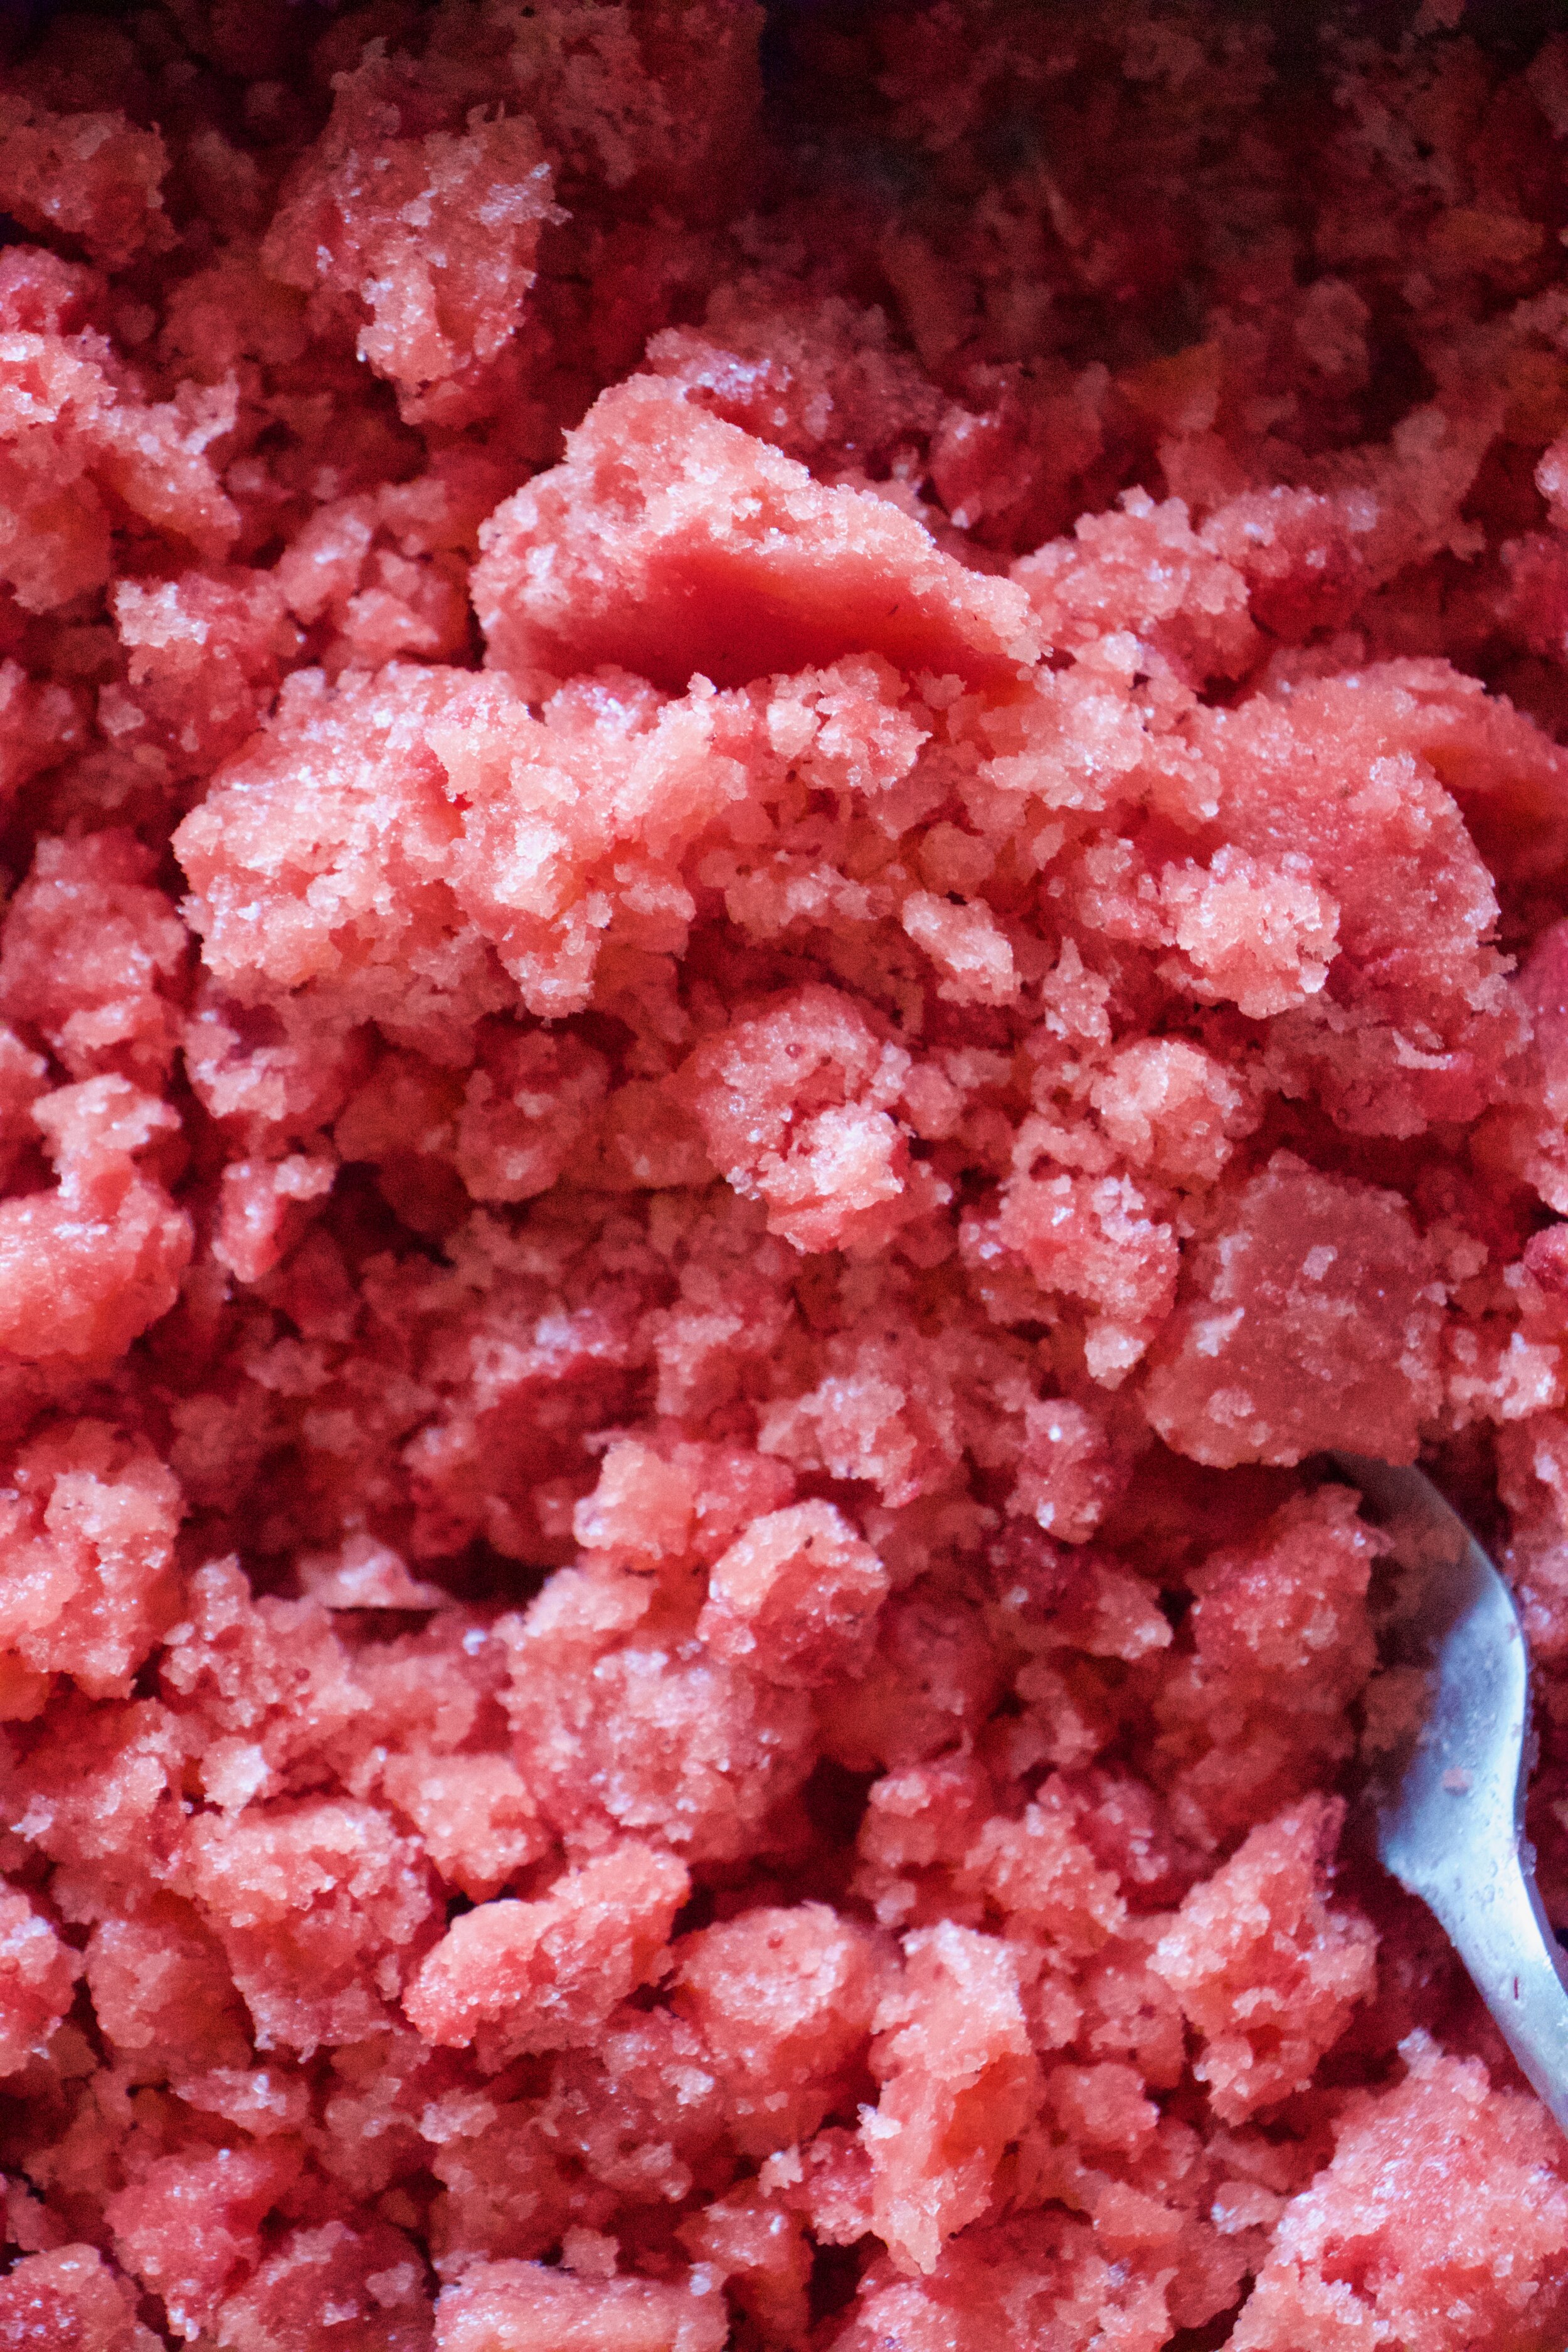
After about and hour, once it is slightly frozen, remove from freezer. Grab a fork and scrape the puree to kind of fluff it up. Place back into freezer for another hour and repeat one or two more time until the texture is nice and fluffy. Once you like texture, place in freezer for another 1/2 to really freeze up.

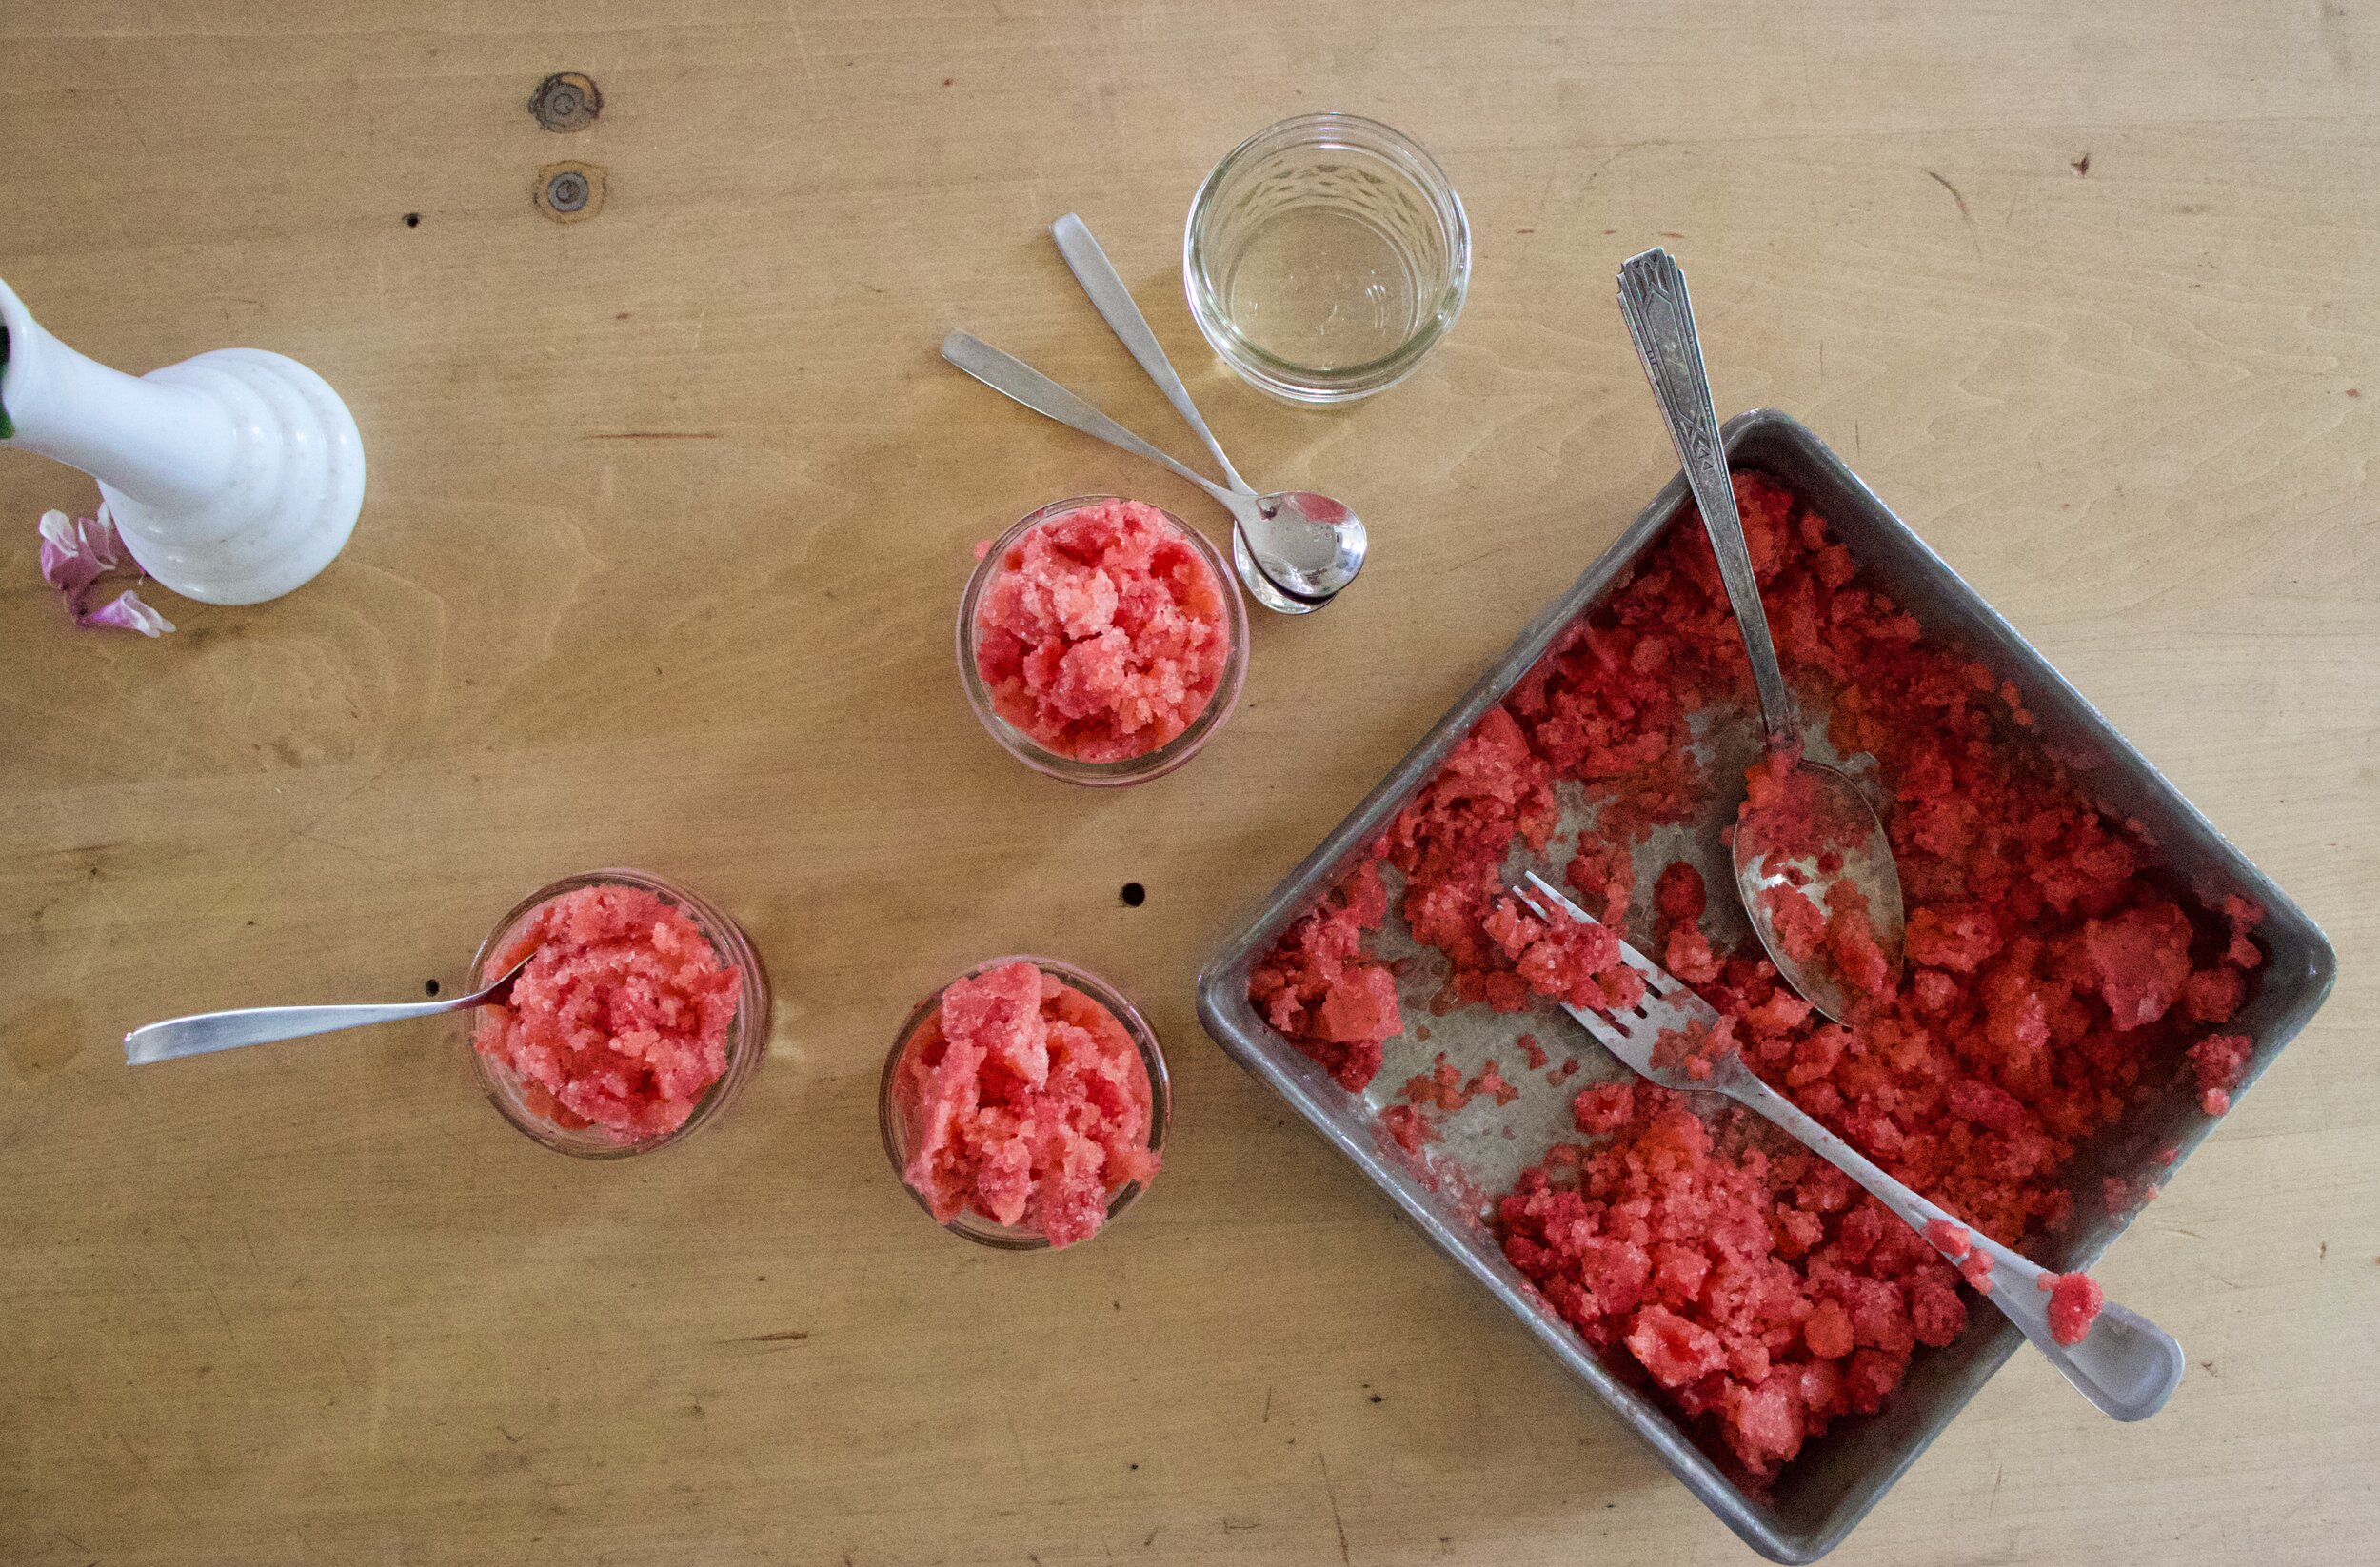
When you are ready to eat, scoop and serve.

Once scooped, eat. Right away because frozen things don’t stay frozen for long!

-C


Apple Strawberry Granitas

makes about 4 servings

  • 2 applesauce cups (or 2 cups applesauce)

  • 2 strawberry cups (or 2 cups strawberries pureed)

  • 1 tablespoon sugar (optional)

Dump the applesauce and strawberry puree into a bowl. Mix together and taste. If you think it could use a little sugar, mix it in. Remember, once frozen, it won’t taste quite as sweet.

Dump mixture into a baking pan or sheet, preferable a metal one, and place in freezer. After about an hour, or once it has frozen a bit, remove from freezer, grab a fork, and scrape the puree to losses it up. Place back in freezer for another hour. Repeat with the fork one or two more times until the texture is that of fluffy ice. After the last scrape, keep in freezer for another 1/2 hour or so to get it really frozen again then when you are ready, scoop out into bowl and eat.

Any that doesn’t get eaten right away, keep in freezer. You can transfer to a smaller container with a lid.

In 5 ingerdients or less, frozen, fruit Tags frozen, fruit, dairy free, food, vegan, dessert, apple strawberry granita, granita, applesauce, fresh, homemade, fruit cups, school lunches, summer
Comment

Tomato-y Roasted Red Cabbage

February 29, 2020 Colleen Stem
IMG_6295.jpg
IMG_6329.jpg

Most people who know me and know my eating habits think that I eat more carrots the anything else. Well it might be true that yes, I eat an excessive amount of carrots but what I probably eat even more of is cabbage. Yup, me and cabbage. Not shitting you, I eat at least a head a day. Why? Because it really is one of my favorite foods ever and the possibilities of how to eat it are endless. Sure most of the time I just eat it raw, toss with other veggies and mustard, but have you ever roasted cabbage? Oh man, roasted cabbage is A-MAZ-ING!!!!

Also, if you know me, I rarely make a dish other than salad that I am not planning on sharing. The other day I was home all by my lonesome, the mr wasn’t coming home for lunch so I decided that, what the hell, I should make something fancy for myself. This is that something.

Tender and crispy roasted cabbage with onions all up in a tomato sauces that gets nice and dark and delicious. I mean, come on. Doesn’t that sound amazing? This dish is so simple and yet so freaking fantastically good. It was the best thing I ate all week. And yes, it is a whole head of cabbage and I ate it all to my face. Didn't think about sharing with anyone. 😁

To the cabbage!

IMG_6235.jpg

The stuff. A head of red cabbage, an onion, a lemon, a couple cloves or garlic, crushed tomatoes, and salt and pepper.

IMG_6239.jpg
IMG_6255 2.jpg

Mince or press the garlic (I just found a garlic press and decided to use it…. not bad) and slice the onion into thin rings .

Next cut cabbage into wedges about an inch thick. And don’t remove the core because you eat the core. It gets tender and delicious.

IMG_6243 2.jpg
IMG_6249.jpg
IMG_6257.jpg

Grab a oven safe skillet and toss in the garlic and a good splash of water and start to heat on stove. Once the water evaporates, add in half of the crushed tomatoes. Stir around and bring to a soft bubble then add in half the onions.

IMG_6259.jpg

Now layer in the cabbage wedges and sprinkle with salt and pepper.

IMG_6266.jpg

On goes the rest of the onions and the rest of the tomatoes plus about a 1/3 cup of water. Sprinkle with a little more salt and pepper and toss the skillet into the oven.

IMG_6297.jpg

An hour later, after flipping the wedges mid roast, you pull out the skillet of the most tender and crispy cabbage.

Now grab the lemon and squeeze on some of that juice!

IMG_6340.jpg

Scoop onto a plate (pile it high) and squeeze more lemon if you want.

Now get on to eating.

-C


Tomato-y Roasted Red Cabbage

serves 1(as a meal) to about 4 as a side

  • 1 small head of red cabbage

  • 1 onion

  • 3 cups crushed tomatoes (or 28 oz can)

  • 2-3 cloves garlic

  • a lemon

  • salt and pepper

Preheat oven to 400

Grab cabbage and cut into inch thick wedges. Don’t bother with removing the core, it is delicious and you should eat it. Mince or garlic press garlic and slice onion into thin rings. Place garlic into a oven oven safe skillet, add about 1/4 cup of water, and place on stove on medium heat. Once water evaporates add in half of the crushed tomatoes and a good pinch of salt and pepper and cook until nice and hot. Then add in half of the cut onion rings and nestle in all the cabbage wedges. Sprinkle with a little more salt, dump the rest of the tomatoes on top and the rest of the onion rings. Also pour about 1/3 cup of water over the whole shebang then pop it into the oven. Bake for about 30 minutes, carefully remove skillet and flip the cabbage wedges over. Place back into oven for another 30 minutes.

Once top is crispy and delicious looking remove from oven, squeeze on the juice of a lemon, and then eat it. Straight From pan if you can’t wait, or serves on a plate alone or along side something that might not be as delicious as this.

Left overs are freaking amazing cold too.

In Vegetables, Vegan, 5 ingerdients or less Tags Tomato-y Roasted Red Cabbage, red cabbage, cabbage, tomato, vegan, vegetable, side dish, snack, dinner, gluten free, dairy free, grain free, plant based, healthy, delicious, roasted
2 Comments

Waffle Iron Hash Browns

December 7, 2019 Colleen Stem
IMG_4109.jpg
IMG_4075.jpg

I don’t think I can ever eat potatoes any other way ever again.

It started with me, doing my weekly pantry cleaning, you know, when I wipe down ever surface, count all the beans and lentils in the jars to make sure I am not running low, and inspect every squash for soft spots. I was just going about my thing when I looked over at my waffle iron. Poor, sad, underused. And it hit me. When was the last time I waffled anything? I remember how excited I was when I found it a few years back at a thrift store. Such a cutie little iron. When I brought it home, I used it a bunch of times for maybe a week or two. And then it was put away and I think I have busted it out like 3 times in the past 2 years. So not cool.

I also noticed I had a shit load of potatoes left from thanksgiving.

And there I had it, a reason to use the waffle iron and a way to use up the potatoes. And now, now I am a potato on the waffle iron addict, which is weird because I am not a overly potatoy person in general. But now with this new waffled hash brown thing, well I might just be eating potatoes all day, every day. (At least until I get sick of them or I run out of potatoes.) They come out soft and fluffy inside, super crispy in ever little nook and cranny, outside. Evenly, perfectly cooked. It’s hard to explain, but they are just, ugh, so good, especially dipped in mustard for a fantastic hash brown snack. (Yes mustard, no not ketchup. Let me do me, you do you.) Or smothered in refried black beans topped with salsa and avocado (that was the dinner version). These hash browns. Just make some and you will see.

And no matter what happens with my hash brown phase, I will be damned if I ever let the waffle iron go so long without use. It deserves better then that.

To the best hash browns EVER!

IMG_4038.jpg

The stuff. Potatoes, salt and pepper, and a little oil.

Shred potatoes. Simple, easy.

IMG_4048.jpg
IMG_4054.jpg

Place the shredded potatoes into a clean dish towel (avoid paper towels because paper towels are the devil) and squeeze as much of the liquid out as you can.

Dump the squeezed out shredded taters back into the bowl and sprinkle with salt and pepper and mix it around.

IMG_4064.jpg

Oil your hot iron and pile on the potatoes. Then close it and press it down. It’s a bit dependent on your iron how long they will need to cook fully, mine took about 9 minutes on high. But maybe just stand close by and check yours after 7ish minutes but expect maybe 10 or so.

Deep golden brown and crispy all over.

IMG_4077 2.jpg

I mean, really look. Every surface browned and crispy. It is freaking perfection!

And then like any good waffled food, you plate it, and eat it. Me, with horseradish mustard and a big stupid smile.

Thank you waffle iron. You done good.

-C


Waffle Iron Hash Browns

makes 2-3 servings

  • 2-3 small to medium sized starchy potatoes (Russet or Yukon Gold)

  • couple teaspoons olive oil

  • teaspoon each of salt and pepper

Preheat your waffle iron to high

Shred potatoes on a box grater. Once shredded, gather in a clean kitchen towel and squeeze as much of the liquid as you can from the potatoes. Place potatoes back into bowl and add in about a teaspoon of each salt and pepper and mix around.

Open iron and brush with oil. Place shredded potatoes on the iron, kind of pack together, and close. If it locks, lock it shut, if it doesn’t push it down. And let cook, for about 10 minutes, checking after 7ish (you iron might have more power the mine does). Once the potatoes are a deep golden crispy brown, remove from iron.

Then eat. Any way you want. Plain, with mustard or ketchup. Next to some scramble something or another. Piled high with some black beans and salsa. Whatever. Just eat them and be happy for the waffle iron.

In 5 ingerdients or less, breakfast, dinner, Gluten Free, Potato, quick and easy, Vegan Tags Waffle Iron Hash Browns, Waffle iron, hash browns, vegan, gluten free, grain free, plant based, food, simple, easy, fast, starch, breakfast, dinner, potatoes
4 Comments

Beet Chips

August 31, 2019 Colleen Stem
IMG_1570.jpg
IMG_1518 2.jpg

When your sister drops off 50 lbs of beets, on top of the 50 lbs that you have to harvest that are growing in your garden, what do you do?

Well chips of course.

Yeah, chips. That’s right. When I got home from camping on Monday and there was a humongous pile of beets sitting next to my front door, I am not going to lie, I was a little shocked. I mean there wasn't just a few little ones. These beets were freaking huge, like the size of my arm, and so many. But pretty much right after my initial shock I knew what needed to be done. First, eat a few roasted, second, roast extra to freeze for later, and lastly, make a few bunches of chips.

Have you ever had beet chip? They are amazing. Crispy, crunchy, tasty as all heck. If you like beets, even in the slightest, you will love these. If you hate beets, well maybe don’t? Either way, beet chips are the best chip. Wha't’s not to love? Pink, and chippy. Sweet, and salty. And then you add the fact that making beets into chips is a good way to get your veggies in and that you can eat a whole bowl full and feel zero guilt because you are just eating beets. Plus making beets into chips is a good way to use up any extra beets you might have laying around or that have been dropped off at your front door.

These chips, once they are made, will not last long. So when you do make them, know you will probably be making them again soon there after. Me, I have still have to harvest all my garden beets so beet chips are happening again soon. Real soon (like this afternoon!)

To the beets!

The stuff. Beets (these are Formanova beets but any variety works) salt and pepper ,and oil.

Ok so you need to cut these bad boys reallllllly thin. Like 1/15th a inch. So, what I am saying is, use a mandolin. If you don’t have one, a knife will do, but you are going to have a hard time getting them as thin as you need to and all of them consistent so baking is going to be a little more tricky so maybe you should just go borrow or invest in a mandolin.

Grab baking sheets, oil, and salt and pepper. You can either dump the oil directly onto the pile of sliced beets and really toss to make sure each one has been coasted or do what I did which was I drizzled oil into my hands and rubbed each sliced beet between my oiled hands before placing on the sheet.

After you get them on there, single layered with no overlapping, sprinkle tops with a pinch of salt and pepper.

On the way into the oven.

IMG_1552.jpg

After the oven. Baked for about 18 minutes. You really have to watch after the first 13 or so minutes to make sure you catch them at the perfect time. Crispy, but not burnt.

IMG_1550.jpg

A side by side shot. Crazy shrinking will happen!

IMG_1540.jpg

Oh man, so delicious. And so pretty!.

Let the chips cool before eating, you know, so you don’t burn your tongue. Plus they crisp up a wee bit more.

IMG_1600.jpg

Once cooled, pile them into bowl, and then eat them. And eat them all. They are only beets after all. And you won’t be able to stop yourself anyway. Ha

-C


Beet Chips

Makes enough for an evening of chip eating for 1-2 people

  • 2 Large beets (think softball sized)

  • a tablespoon or two of oil (I used grape seed but really any would work)

  • salt and pepper

Note. Making these without cutting with a mandolin will be a pain in the ass. It can be done, but if you have a mandolin, use it.

Preheat oven to 350

With a mandolin, slice the beets about 1/15 inch thick. (No need to peel the beets unless you want to.) Once beets are all sliced, either drizzle them all with a tablespoon or so of oil and toss until all are coated. OR what I did and found worked really well was drizzled oil into my hands and rubbed each beet between my oiled hands as I was placing them on the baking sheets. Either way.

Now place oiled beets, single layered, without overlapping, on baking sheets. Sprinkle with a pinch of salt and pepper and place into oven. Bake for about 13 minutes without worrying then start to check every minute or so until the beets are a deep golden brown and crispy ,which will be between 15-20 minutes. Also, even though you cut them all the exact same thickness, some might crisp up faster so you should remove done chips as they happen. Once they are done, place on a rack to cool. And then do another batch. And not, they do crisp up a tiny bit more as they cool.

Once chips are cool and crisp, eat.

Store uneaten (how did you not eat them all?) chips in an air tight container. If you notice that they turned a bit chew, just place them back into oven while preheating oven to 300 then turn oven off and let sit in there for a few minutes.

In 5 ingerdients or less, crackers and chips, quick and easy, snack, Vegan, Vegetables Tags Beets, Baked chips, Beet Chips, chips, veggie chips, veggies, plant based, vegan, food, recipe, gluten free, heathy, snack, baked, not fried, simple
Comment

Cucumber Mint Lime Spritzer

June 29, 2019 Colleen Stem
IMG_9781.jpg
IMG_9814.jpg
IMG_9753 2.jpg

It’s hot out and we are thirsty. Water is good, water is great, but sometimes a little somethin’ somethin’ is called for, for you know, being that we need to deal with it being so freaking hot out. and sticky and gross. (BLAH. This past week we have had some temperatures it had make me crankers.)

Anyway, what is more refreshing then cucumber? Not much. And so we blend up cucumber, add some mint and lime juice and stick it into a glass with ice and bubbles. What can be more refreshing then that? Plus look at how pretty it is. Bright ass green. A true summertime drink.

To the Spritzer!

The stuff. A thin skinned cucumber, a lime, a spring of mint, club soda, and if you want, a little simple syrup.

Chunk up the cucumber and into the blender it goes with the juice of the lime and a couple mint leaves.

IMG_9736.jpg

Blend until smooth.

IMG_9745.jpg

Grab a couple glasses, add in some ice, and fill each glass half way with the cucumber juice. (mix in liquid sweetener in now if you want it.)

IMG_9797.jpg

Top off with club soda, a mint leaf and a few slices of cucumber and you are golden cool and fancy free.

Stay cool…..as a cucumber.. HAHA!


Cucumber Mint Lime Spritzer

Makes 2 or 3 drinks

  • 1 cucumber (thin skinned and 6-8 inches long)

  • a lime

  • a few mint leaves

  • club soda or plain seltzer

  • 1-2 teaspoons liquid sweetener (optional)

Take cucumber and place into blender along with the juice of the lime and a couple mint leaves. Blend until smooth. Grab a couple glass, fill each with ice, then fill each glasses half way with cucumber mixture. Add in any liquid sweetener if using and stir. (I recommend trying without sweetness, that is that way I like it, and then add sweetener if you need it.) Top glasses off with club soda. Garnish with sliced cucumber, lime wedges, and or mint leaves if you want.

Drink away.

In 5 ingerdients or less, drinks, Vegetables, Vegan, summer Tags Cucumber Mint Lime Spritzer, Mocktail, cocktail, drinks, summertime, cold drinks, cucumber, lime, mint, vegan, dairy free, alcohol free, green drink, club soda, spritzer
Comment
← Newer Posts Older Posts →
 

https://thelovelycrazy.squarespace.com/config#/|/about/

Me. Food Maker.Food eater. Woo HOO!

STEM+NODE  SMALL BATCH AND ONE OF A KIND POTTERY

stem+node ceramics


____________________

Subscribe

GET NEW POSTS IN YO EMAIL

You are AWESOME!!!


@thelovelycrazy 2014-2021