• stem+node ceramics
  • HOME
  • Food Recipes
  • About
  • Contact
Menu

The Lovely Crazy

Street Address
City, State, Zip
Phone Number

Your Custom Text Here

The Lovely Crazy

  • stem+node ceramics
  • HOME
  • Food Recipes
  • About
  • Contact

Split Peas and Collard Greens with Mustardy Cabbage Slaw

August 10, 2019 Colleen Stem
IMG_0988.jpg
IMG_0944.jpg
IMG_1009.jpg

Spit peas are one of my go to’s when camping. Besides taking up no room at all to pack, they are also super easy to make. Plus they only take about an hour to cook, which is the perfect amount of time to prepare the rest of the food for a meal and sit and chill out before eating. Not to mention that they are damn freaking tasty, especially after a day frolicking through woods and paddling on water. I mean, who doesn’t like split peas? (If you say you don’t, you probably should try again because I bet you would like these)

Constnaly thinking of our next hiking, kayaking, and camping adventure has got me with split peas on the mind. Especially now that the nights are getting a little cooler. Knowing that I am gonna have a hearty, protein pack and filling meal after a day of activity is just the greatest.

And collard greens. A green that gets overlooked a lot. No super popular, well, not around these parts, which is crazy because they are SO good! They have a more pronounced flavor (in a good way) then most greens. More pungent and earthy, and slitghy salty, if that makes sense. And hold up better then any green when cooked making them perfect to toss into pots with things like spit peas . Plus they travel well. I can bring a bunch camping with me and not worry that if I leave them out for to long they will turn into slimy green mush. If it is really hot, sure they might wilt up a bit, but stick the stems in a little water, they will last all day fine. And that is all you need them to do.

So yeah, this dish is perfect for camping, but also perfect for not camping and just making at home too. Again, super easy, fast and is just a great tasting dish.

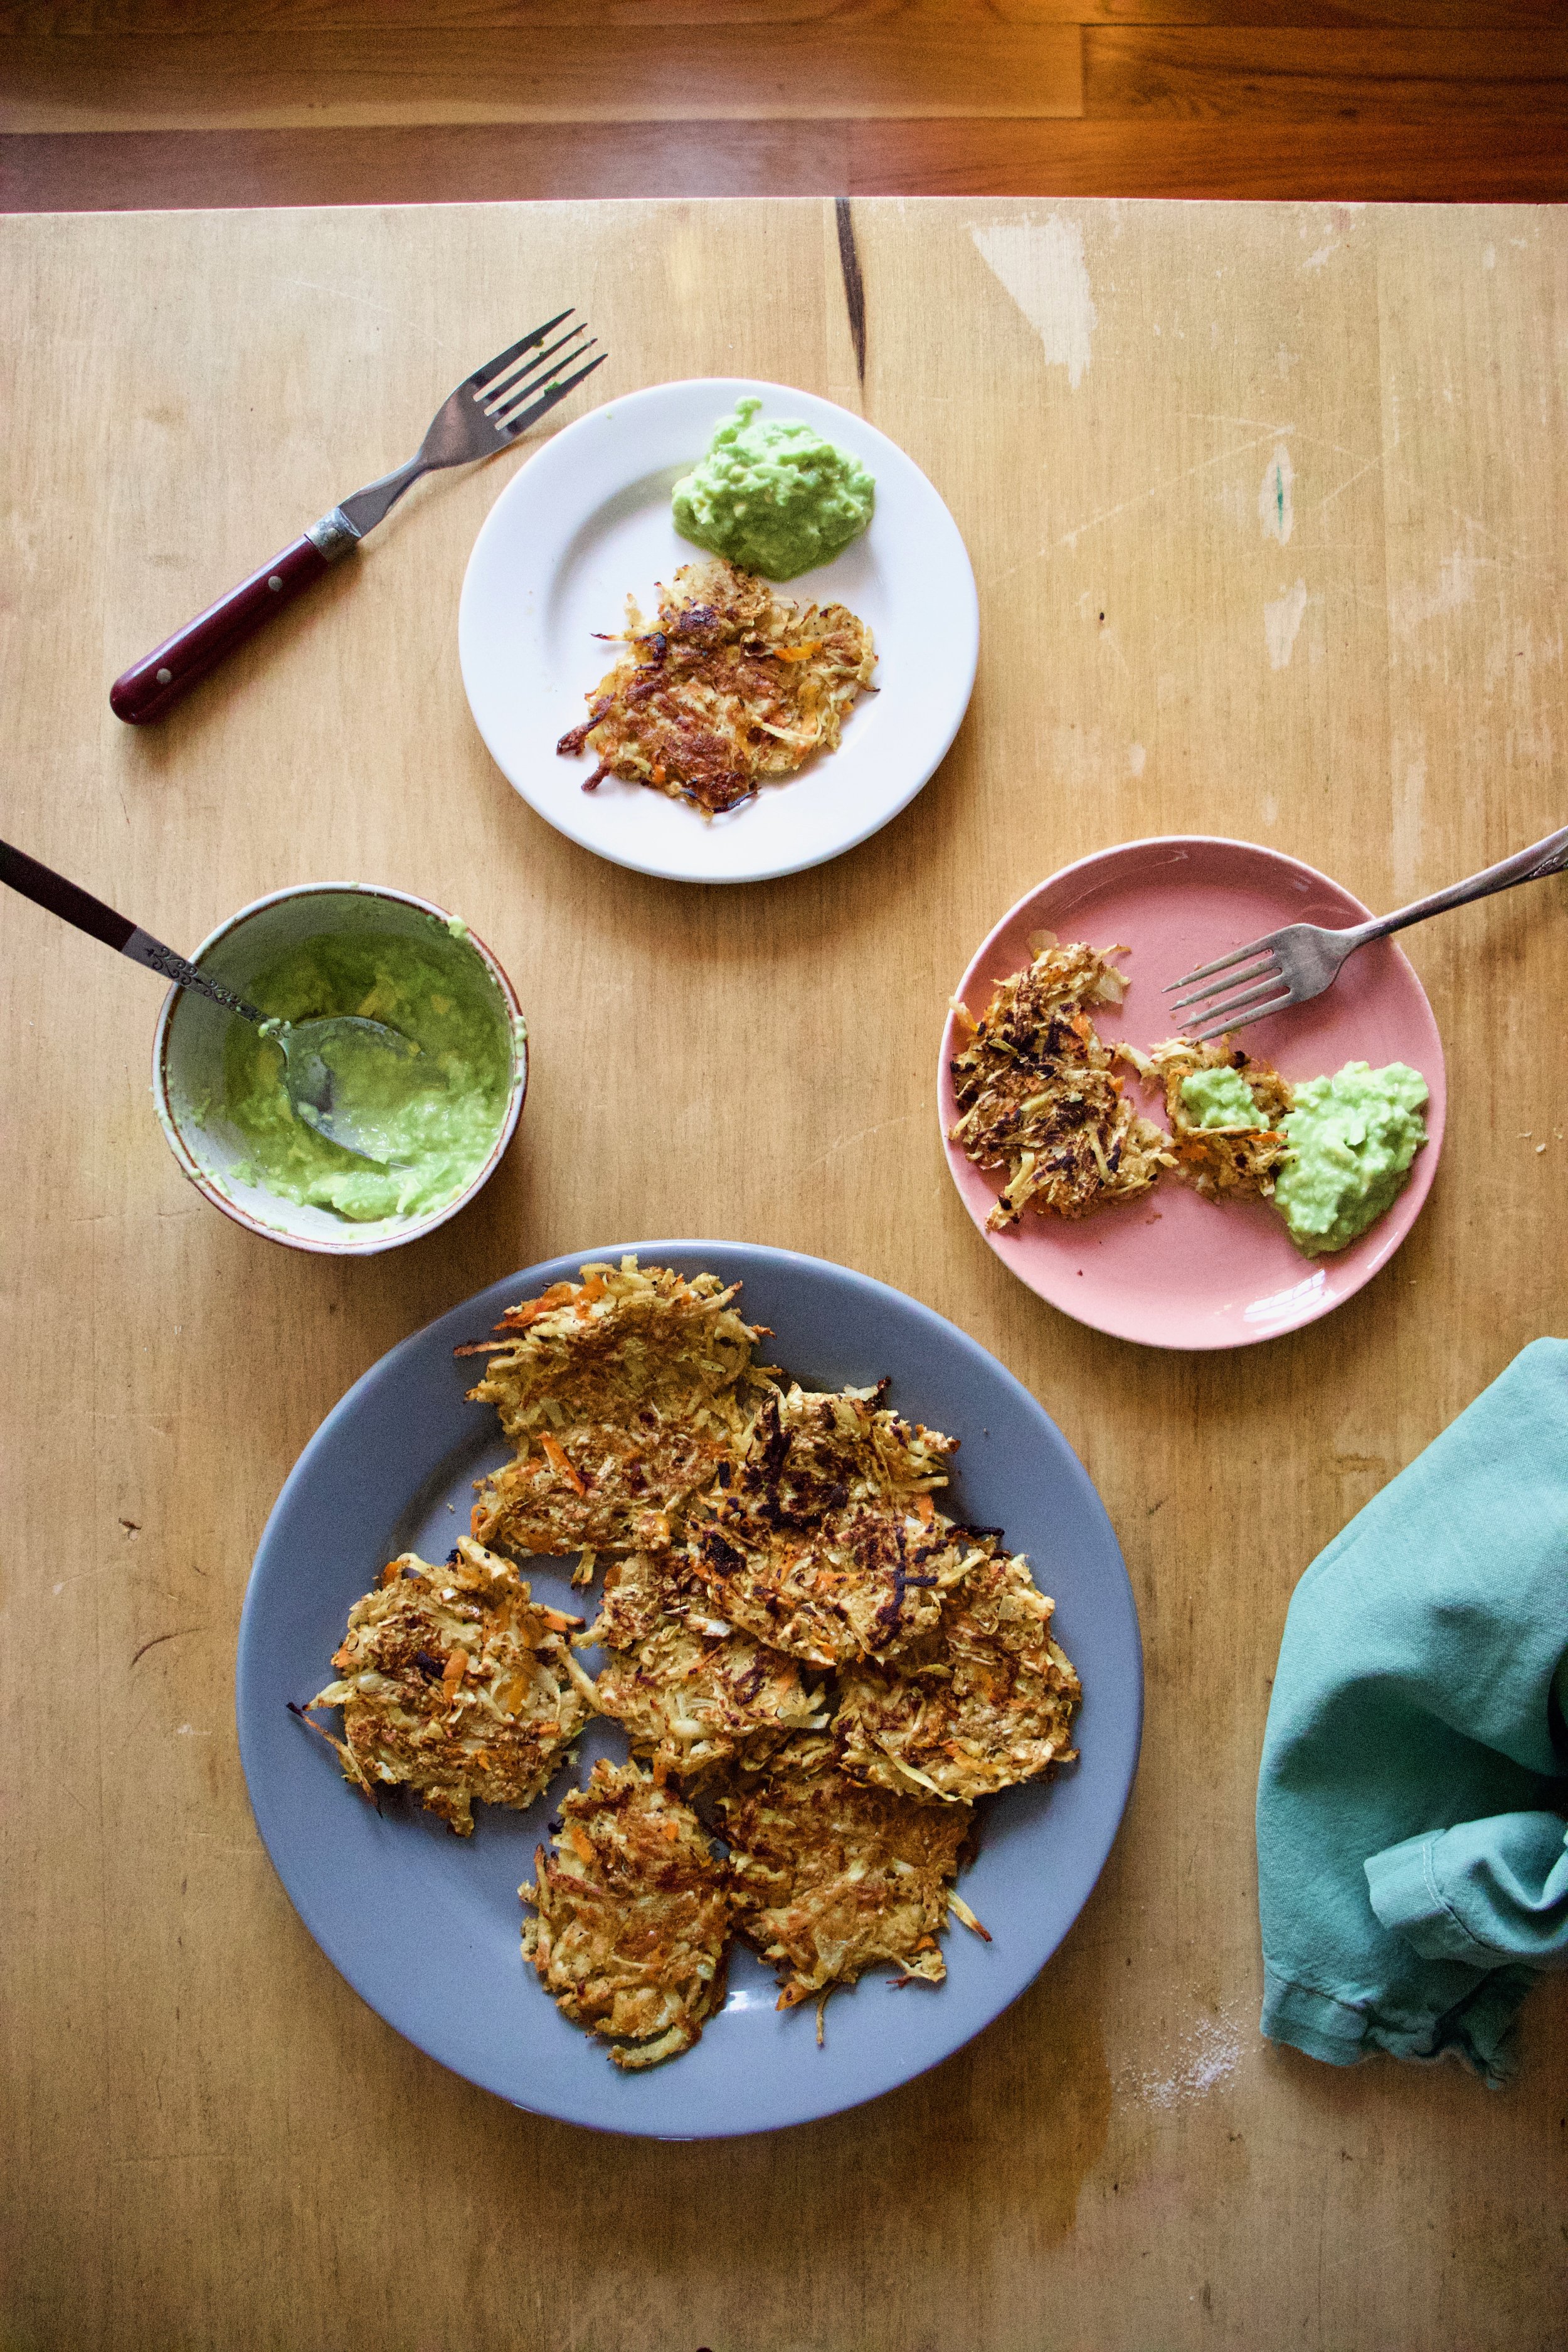
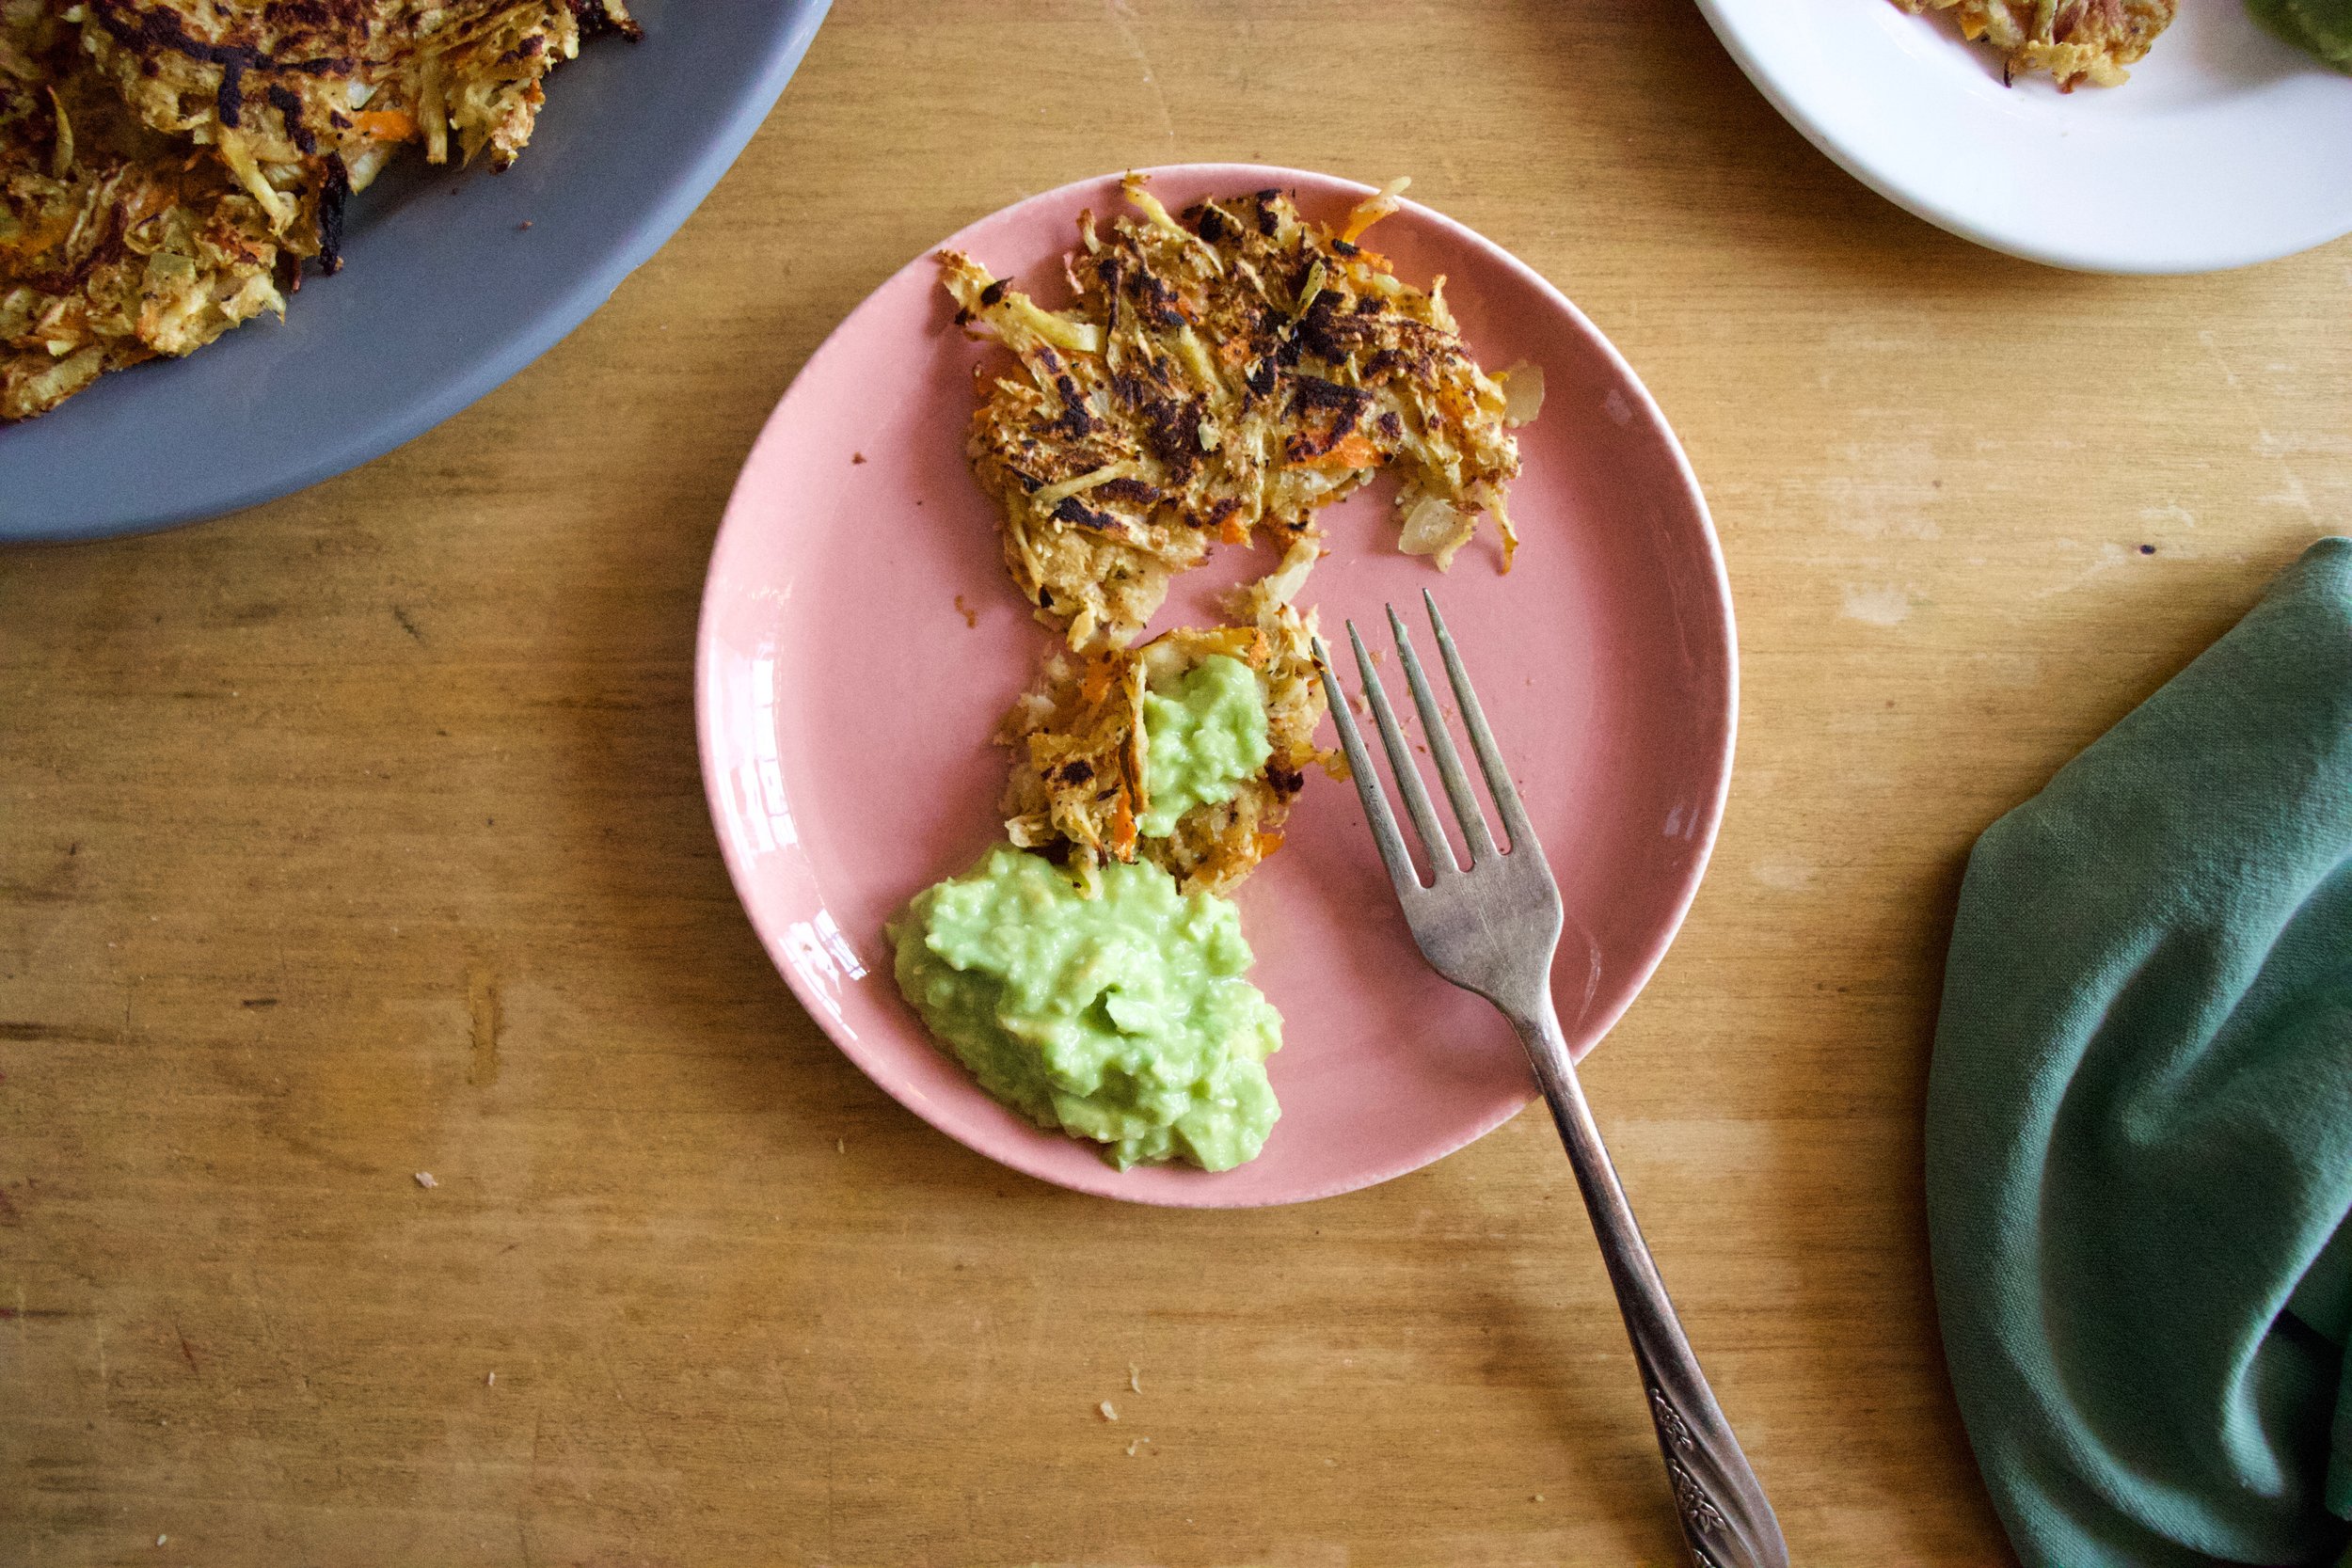
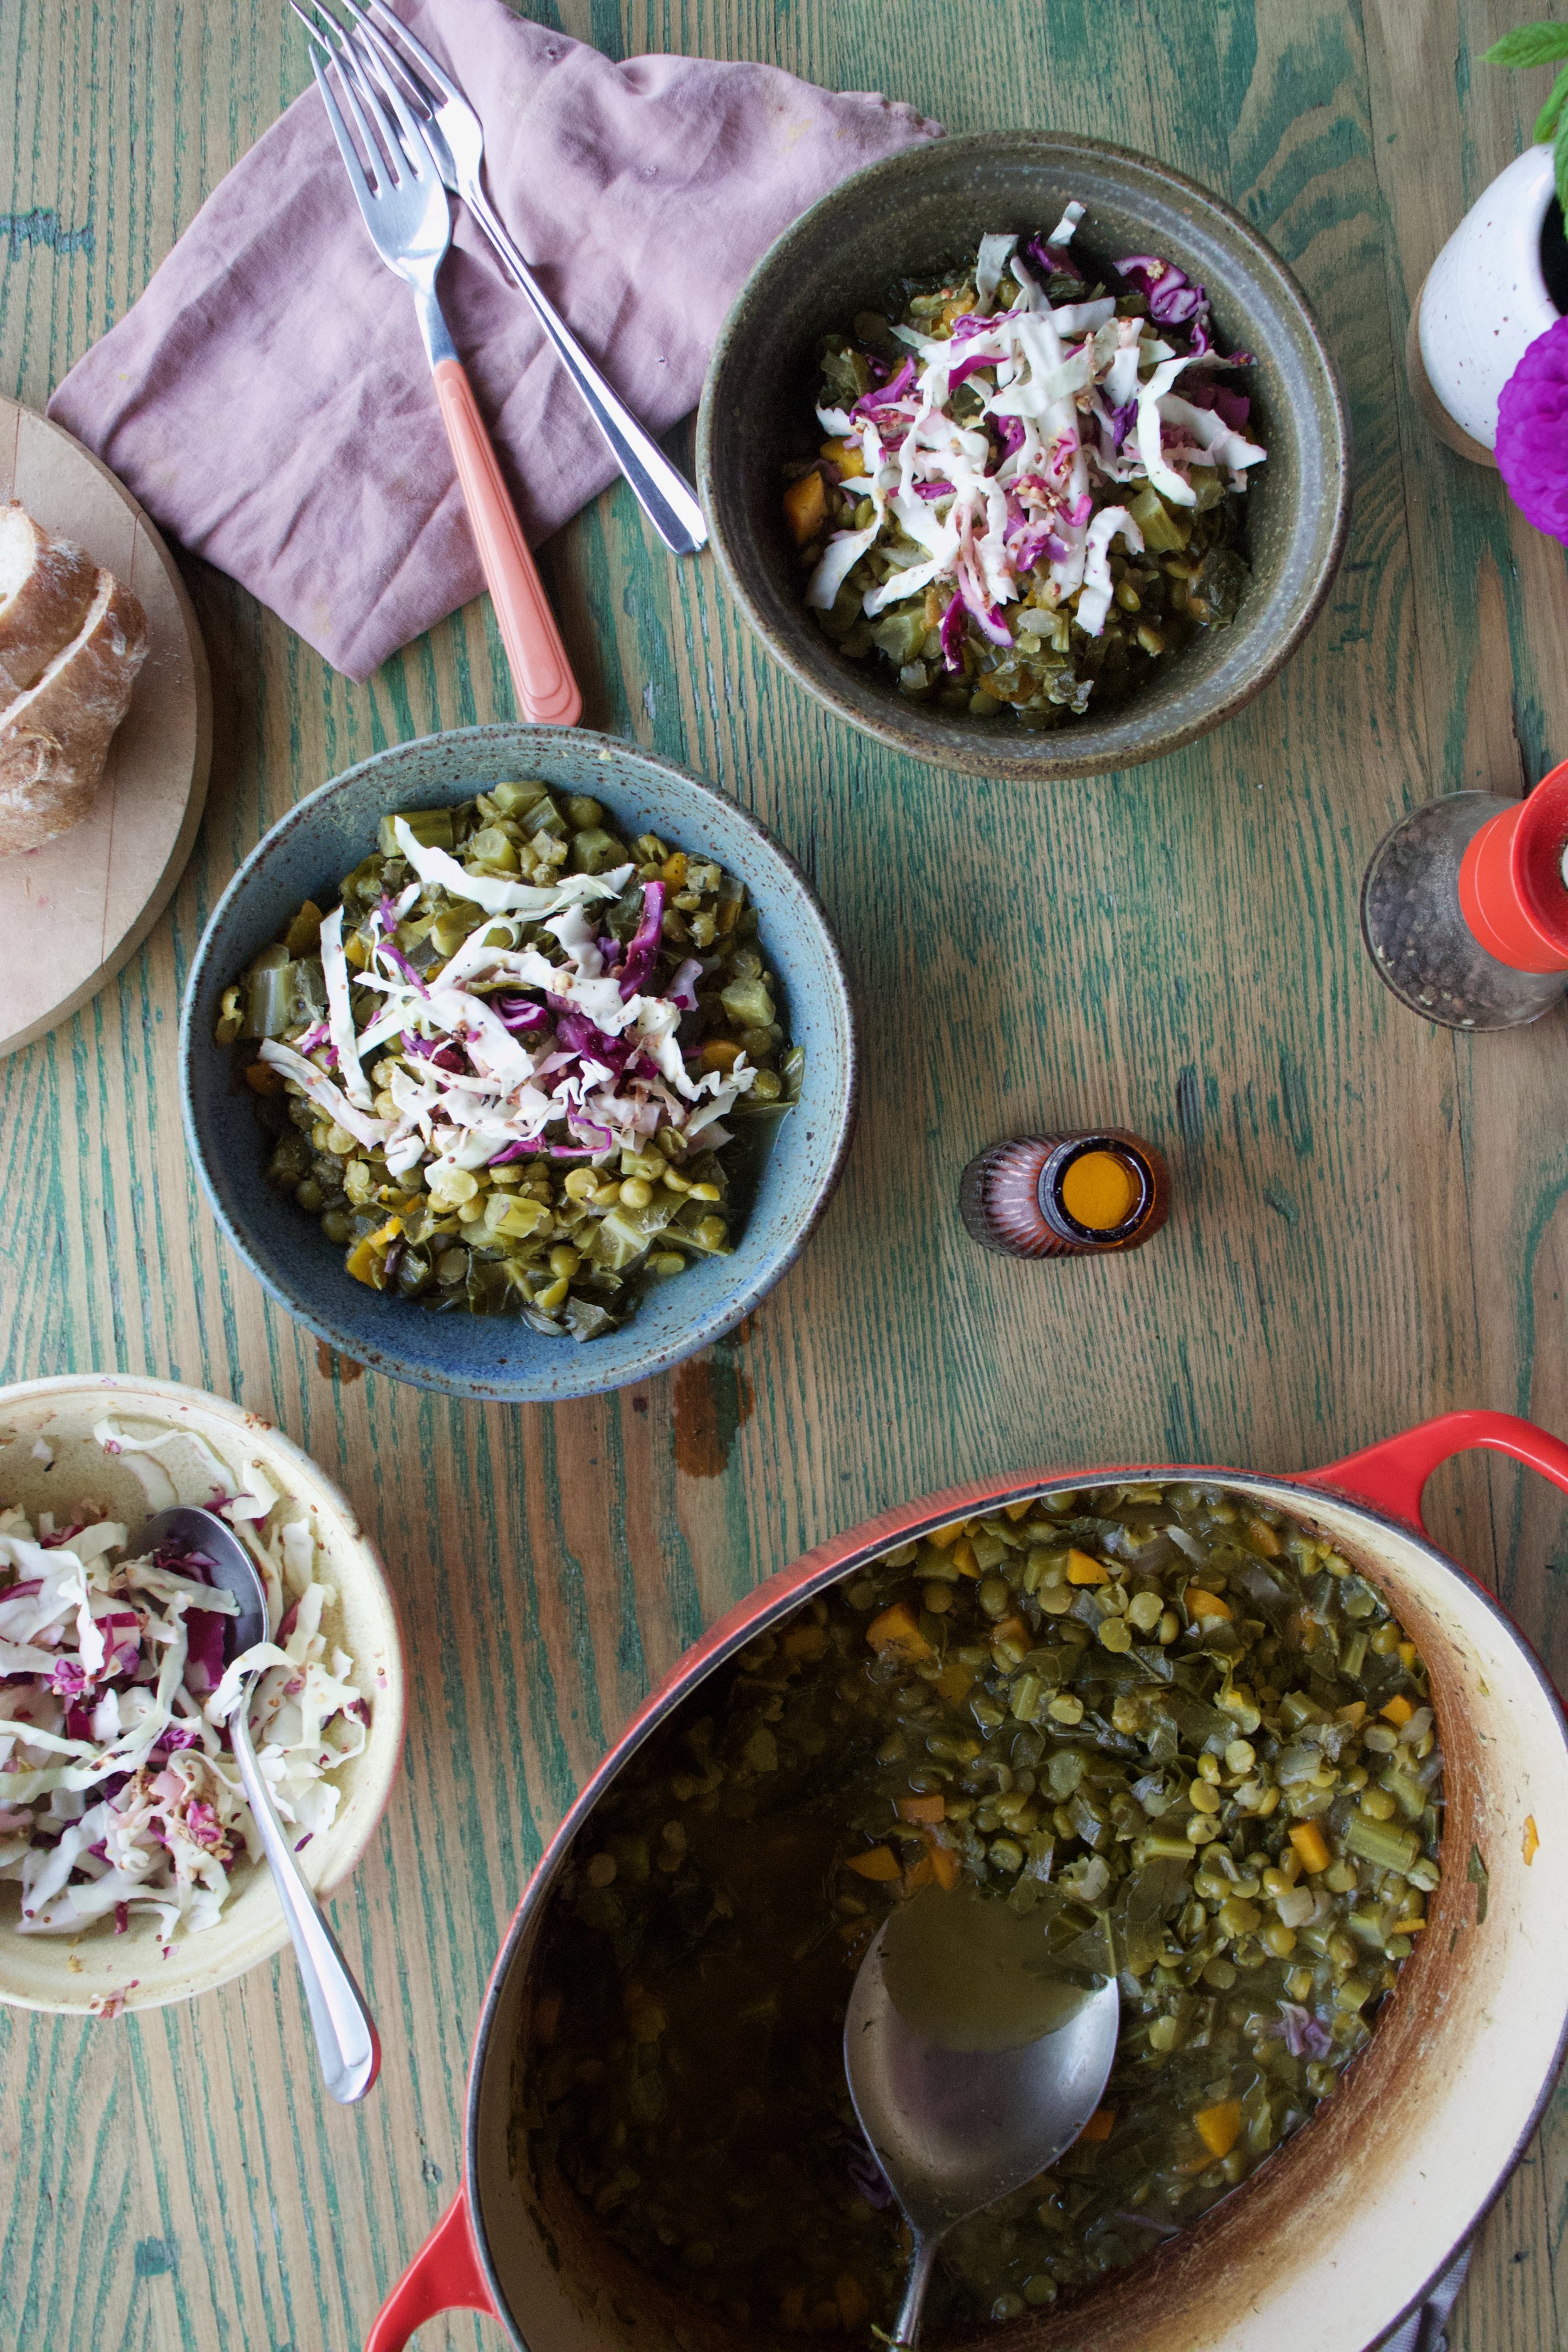
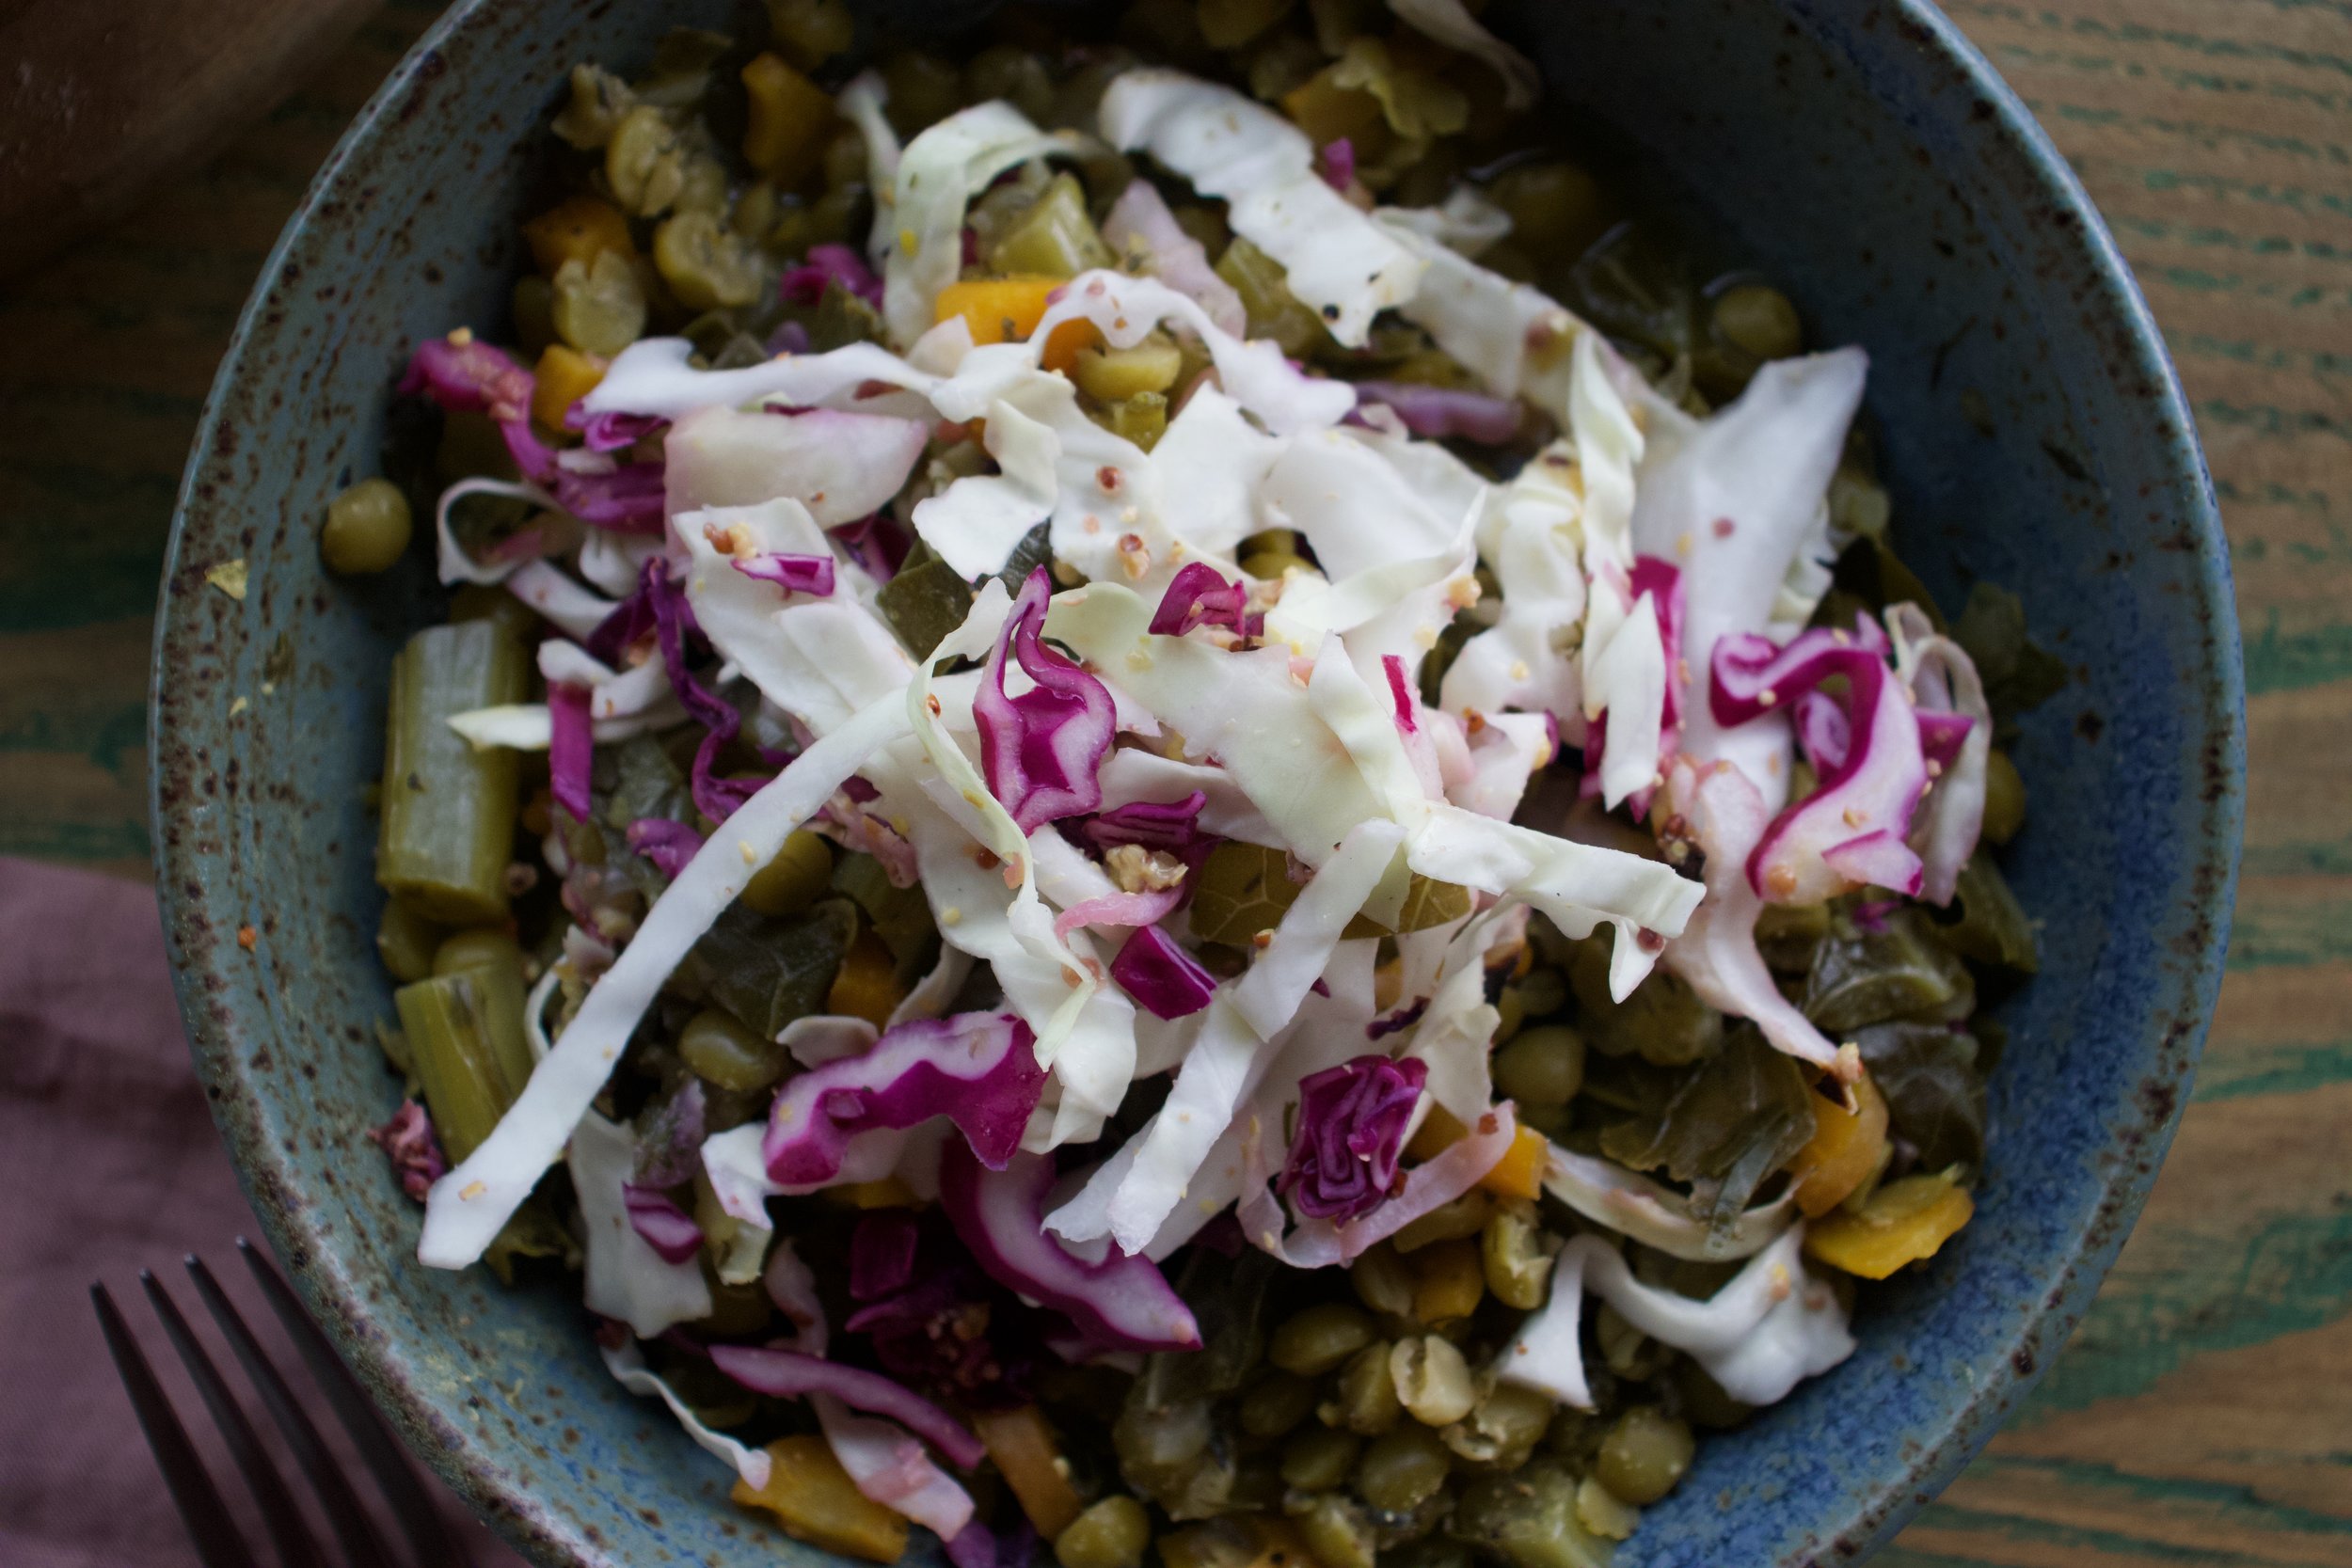
Split peas and collard greens. Topped off with mustardy cabbage slaw. Can’t wait to make this again this weekend!

To the spit pas and collard greens!

IMG_0779.jpg

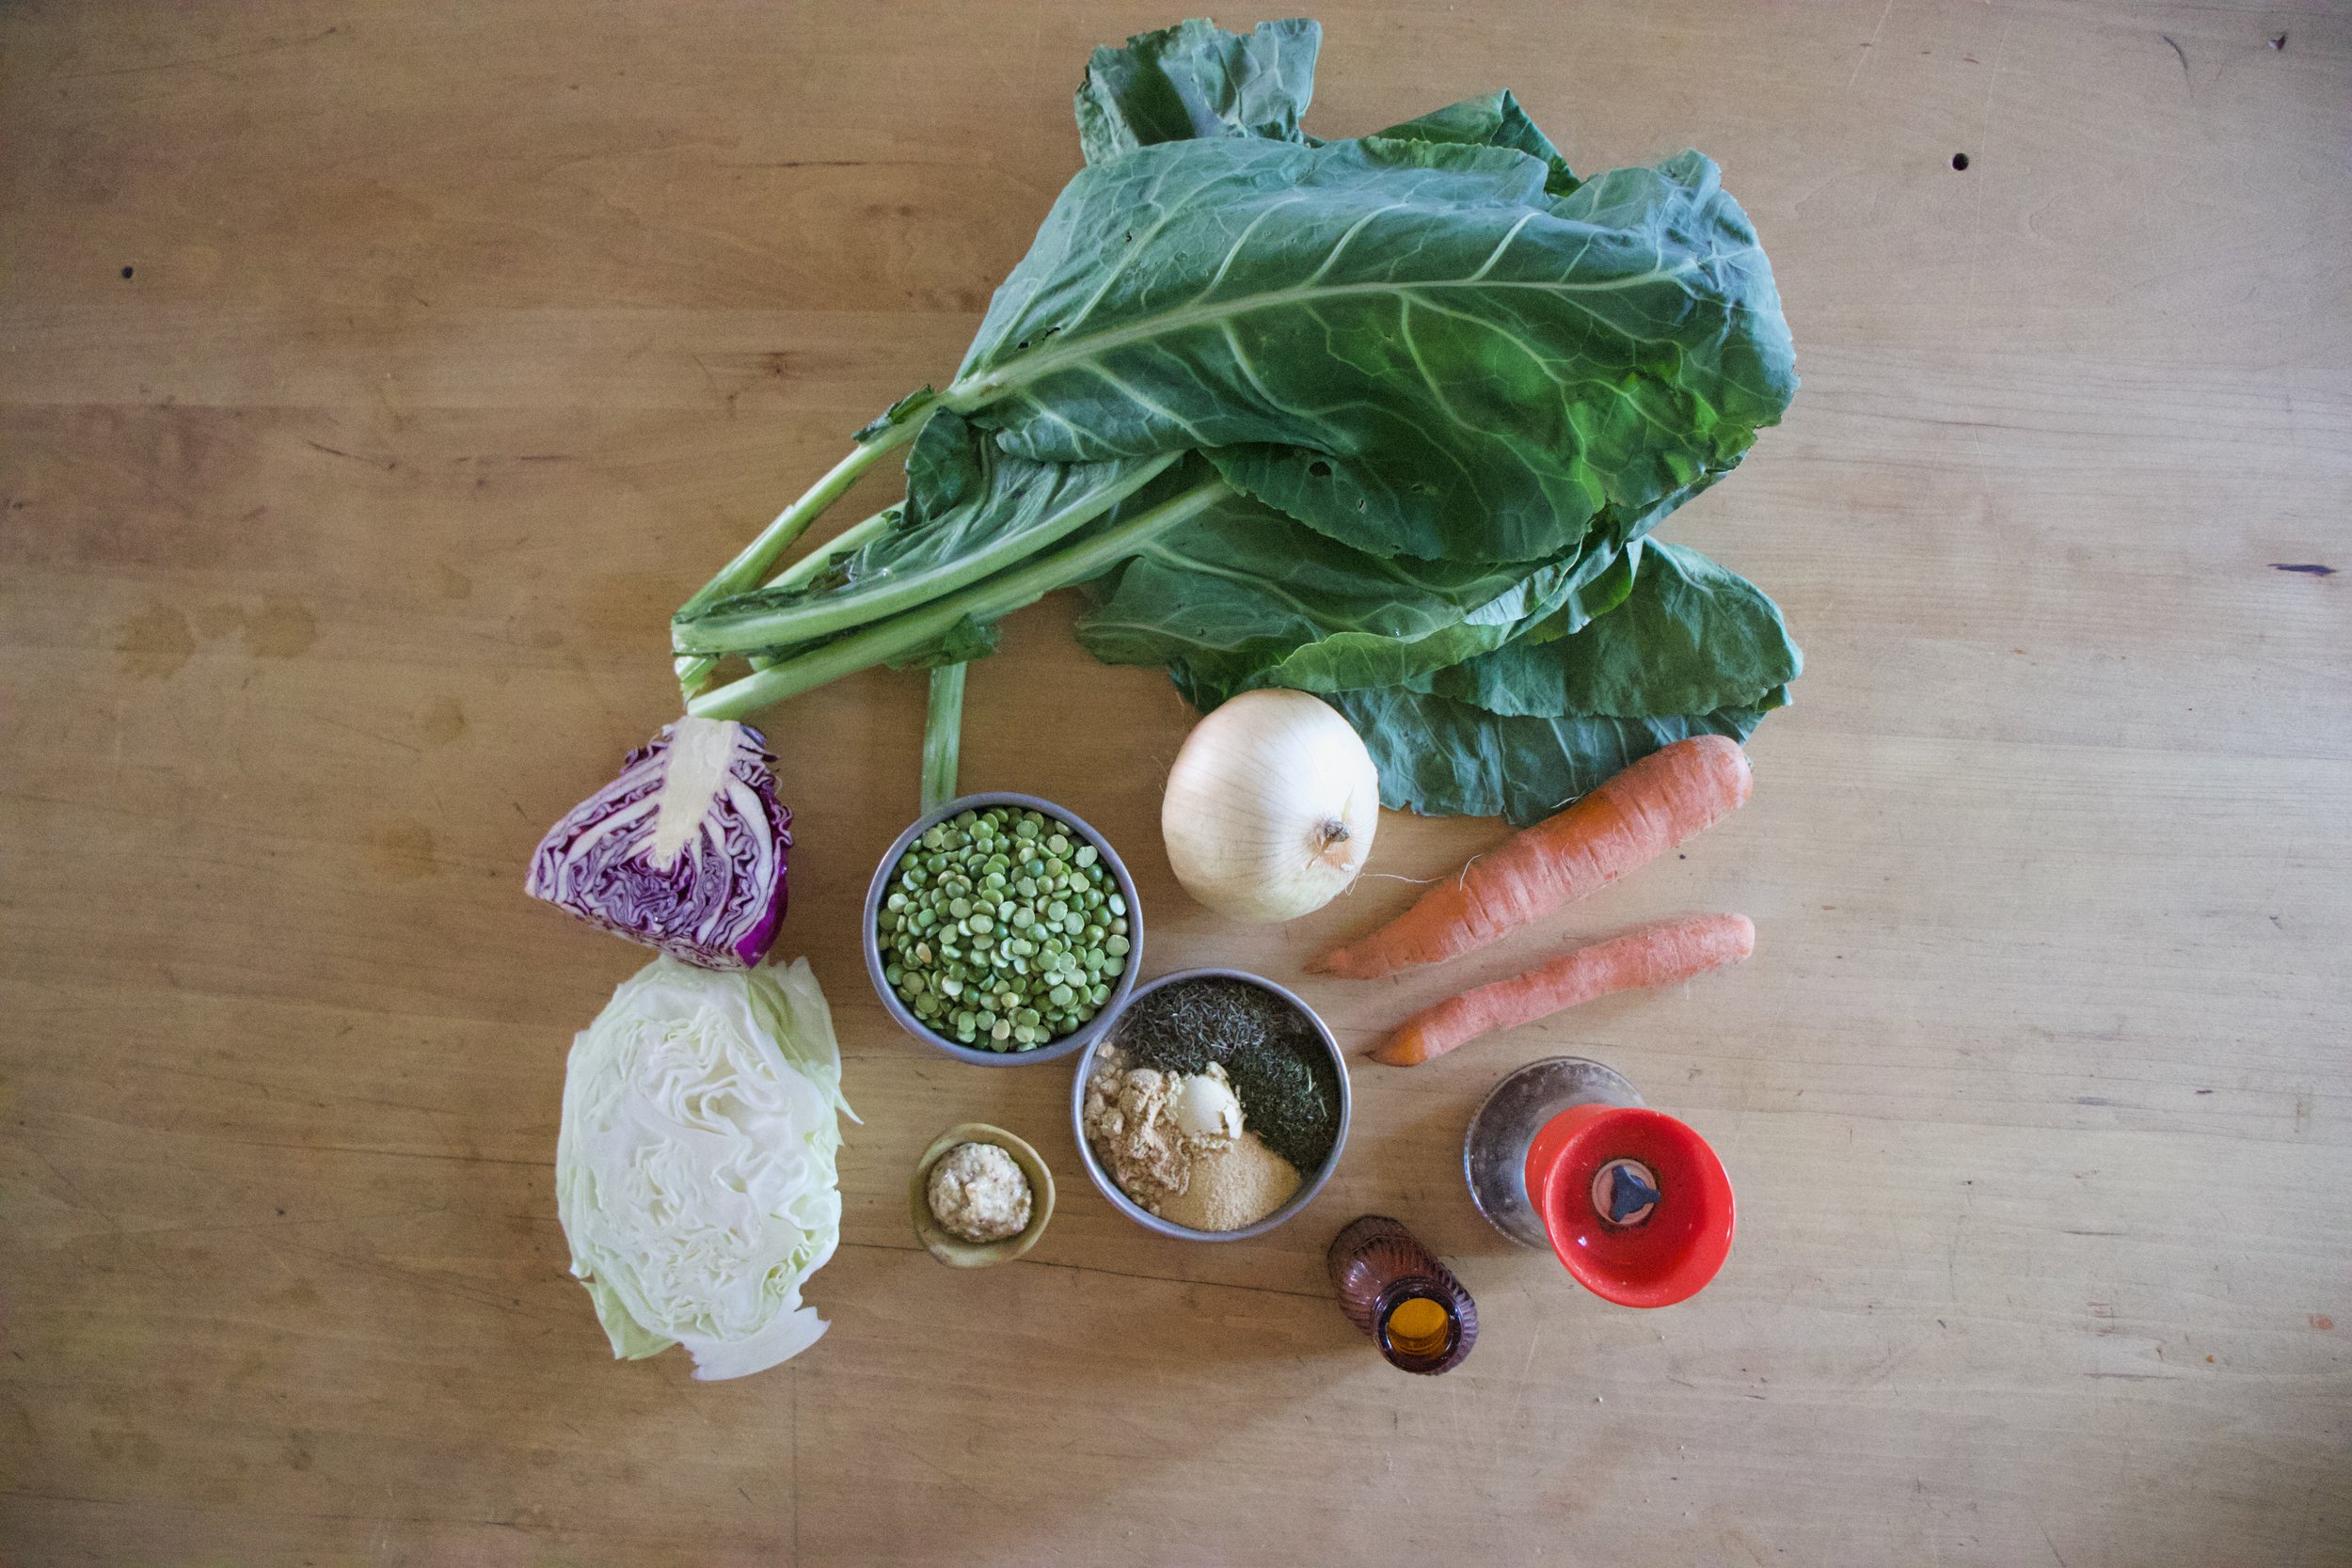
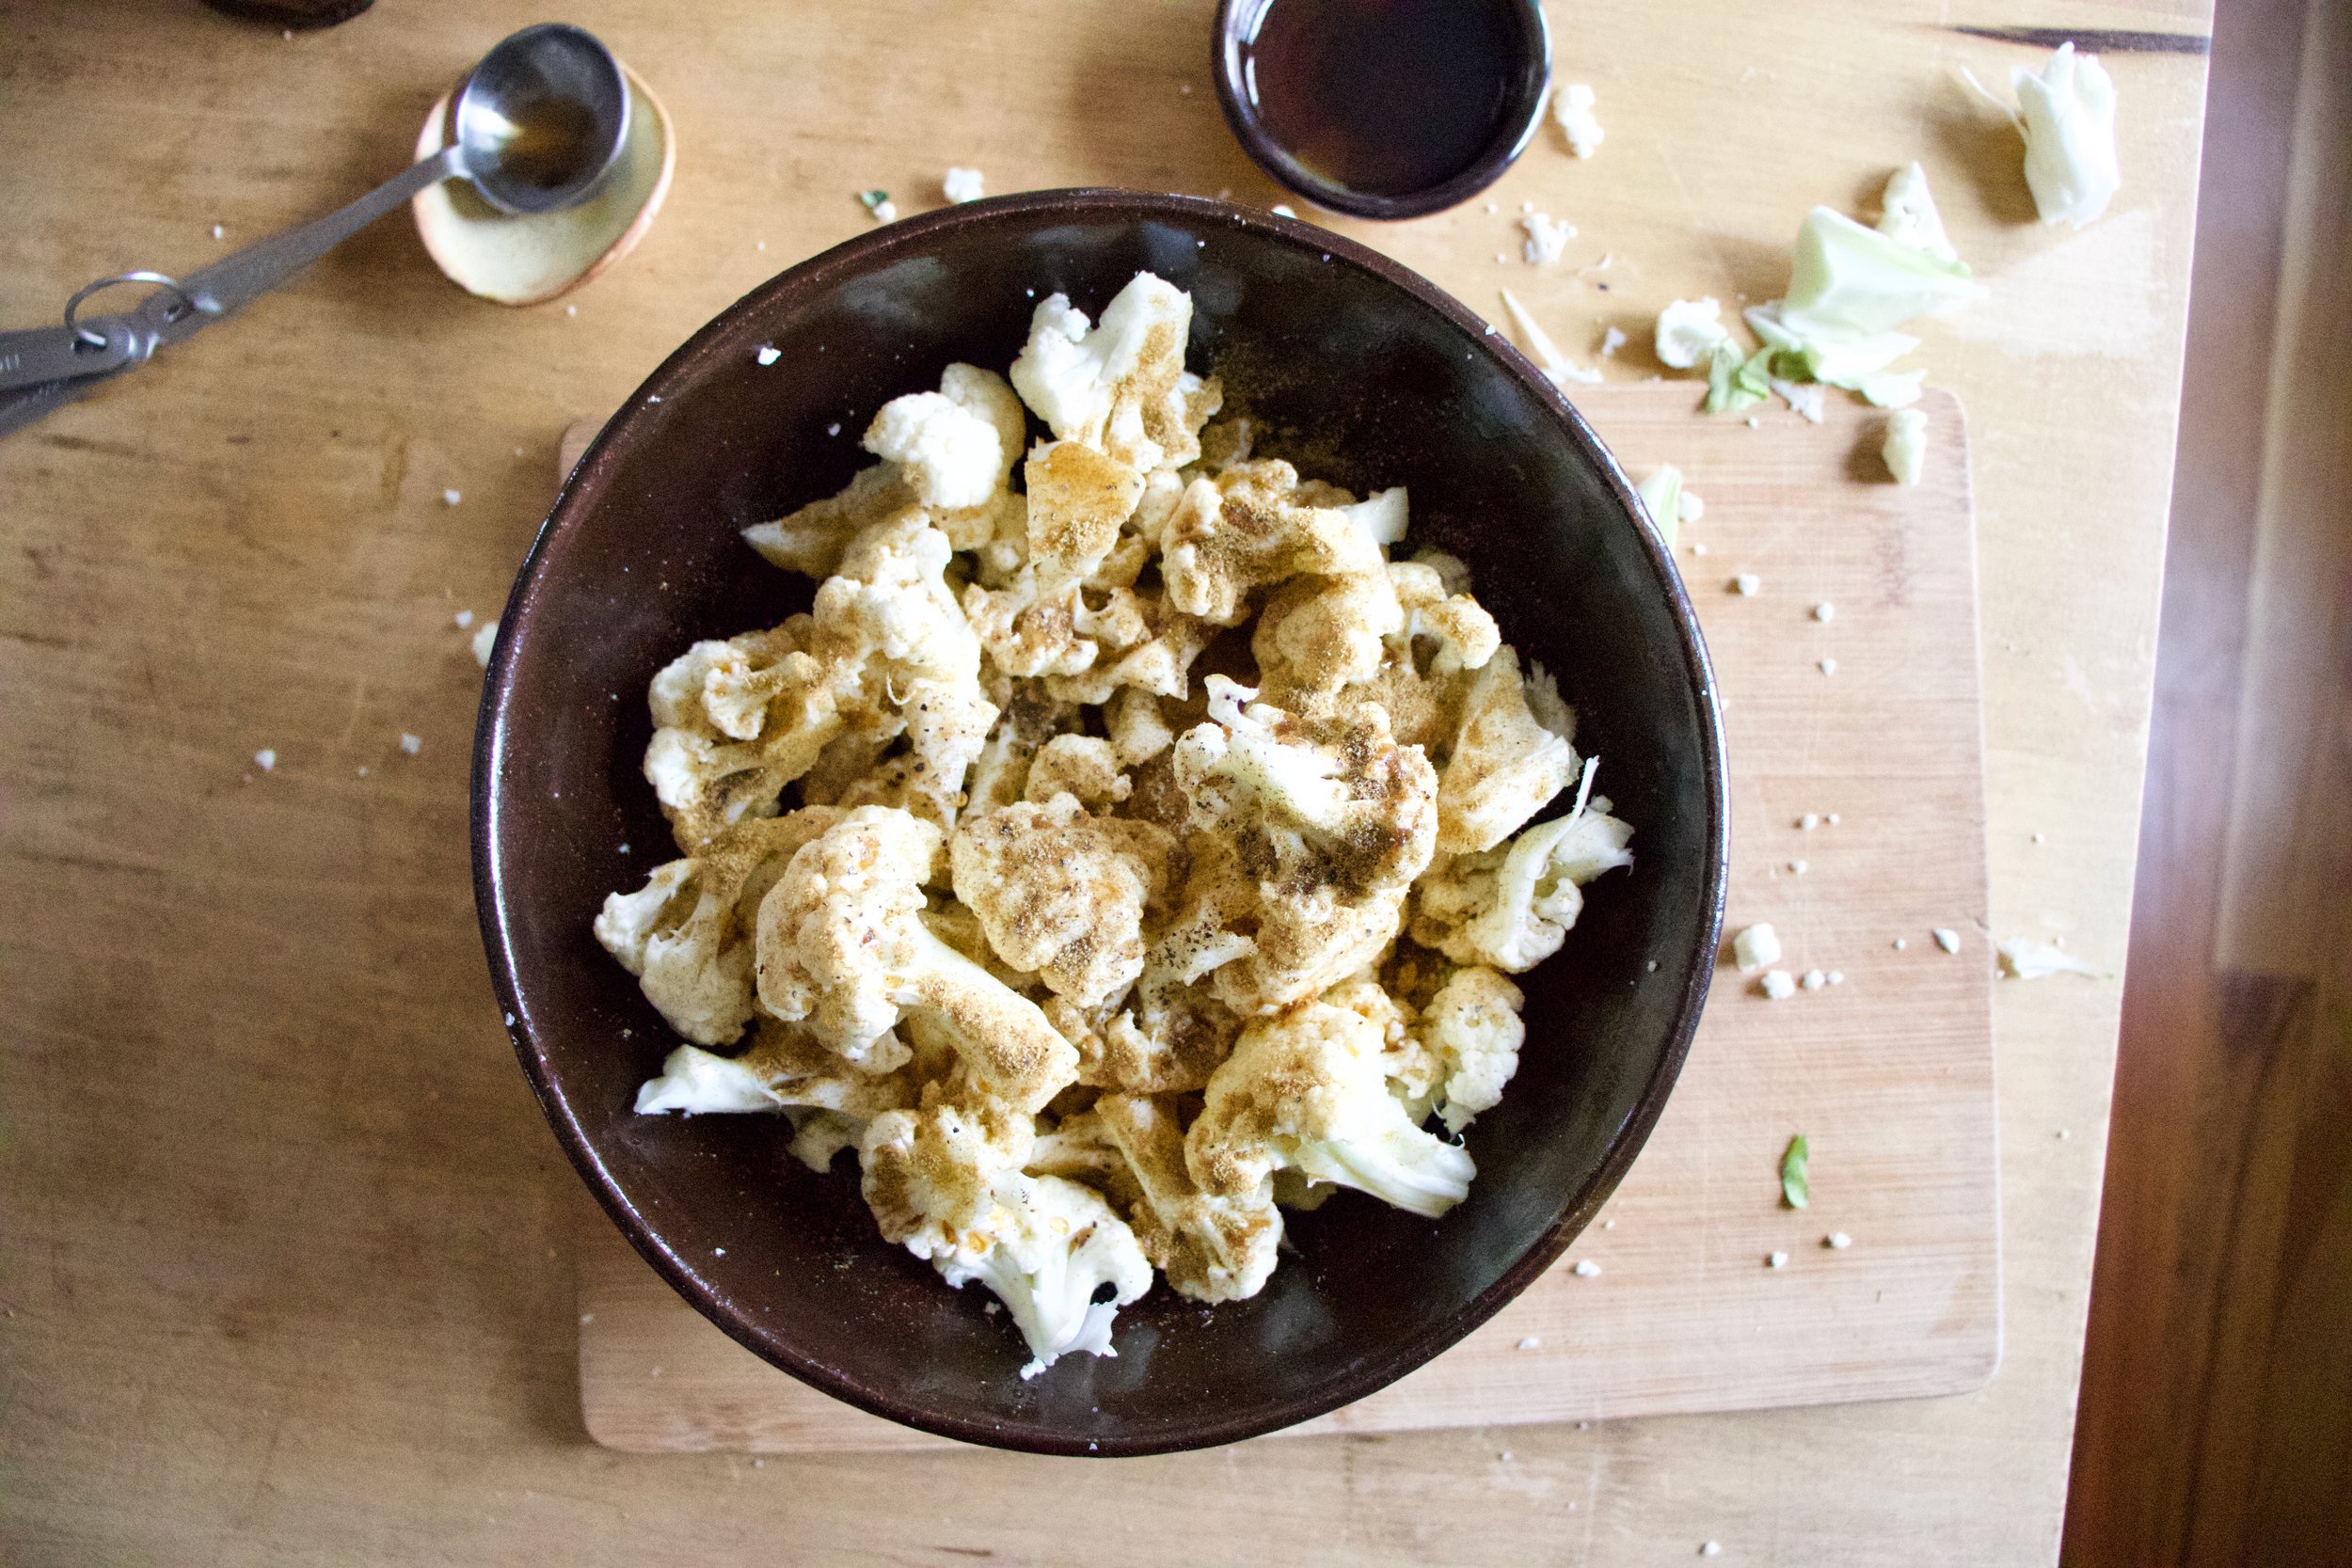
The stuff. A bunch of collard greens, some split peas, an onion, a couple carrots, some cabbage, stone ground mustard, spices which include garlic, ginger, dill, thyme, and ground mustard. And salt and pepper. And you are gonna need water too.

IMG_0787.jpg
IMG_0791.jpg

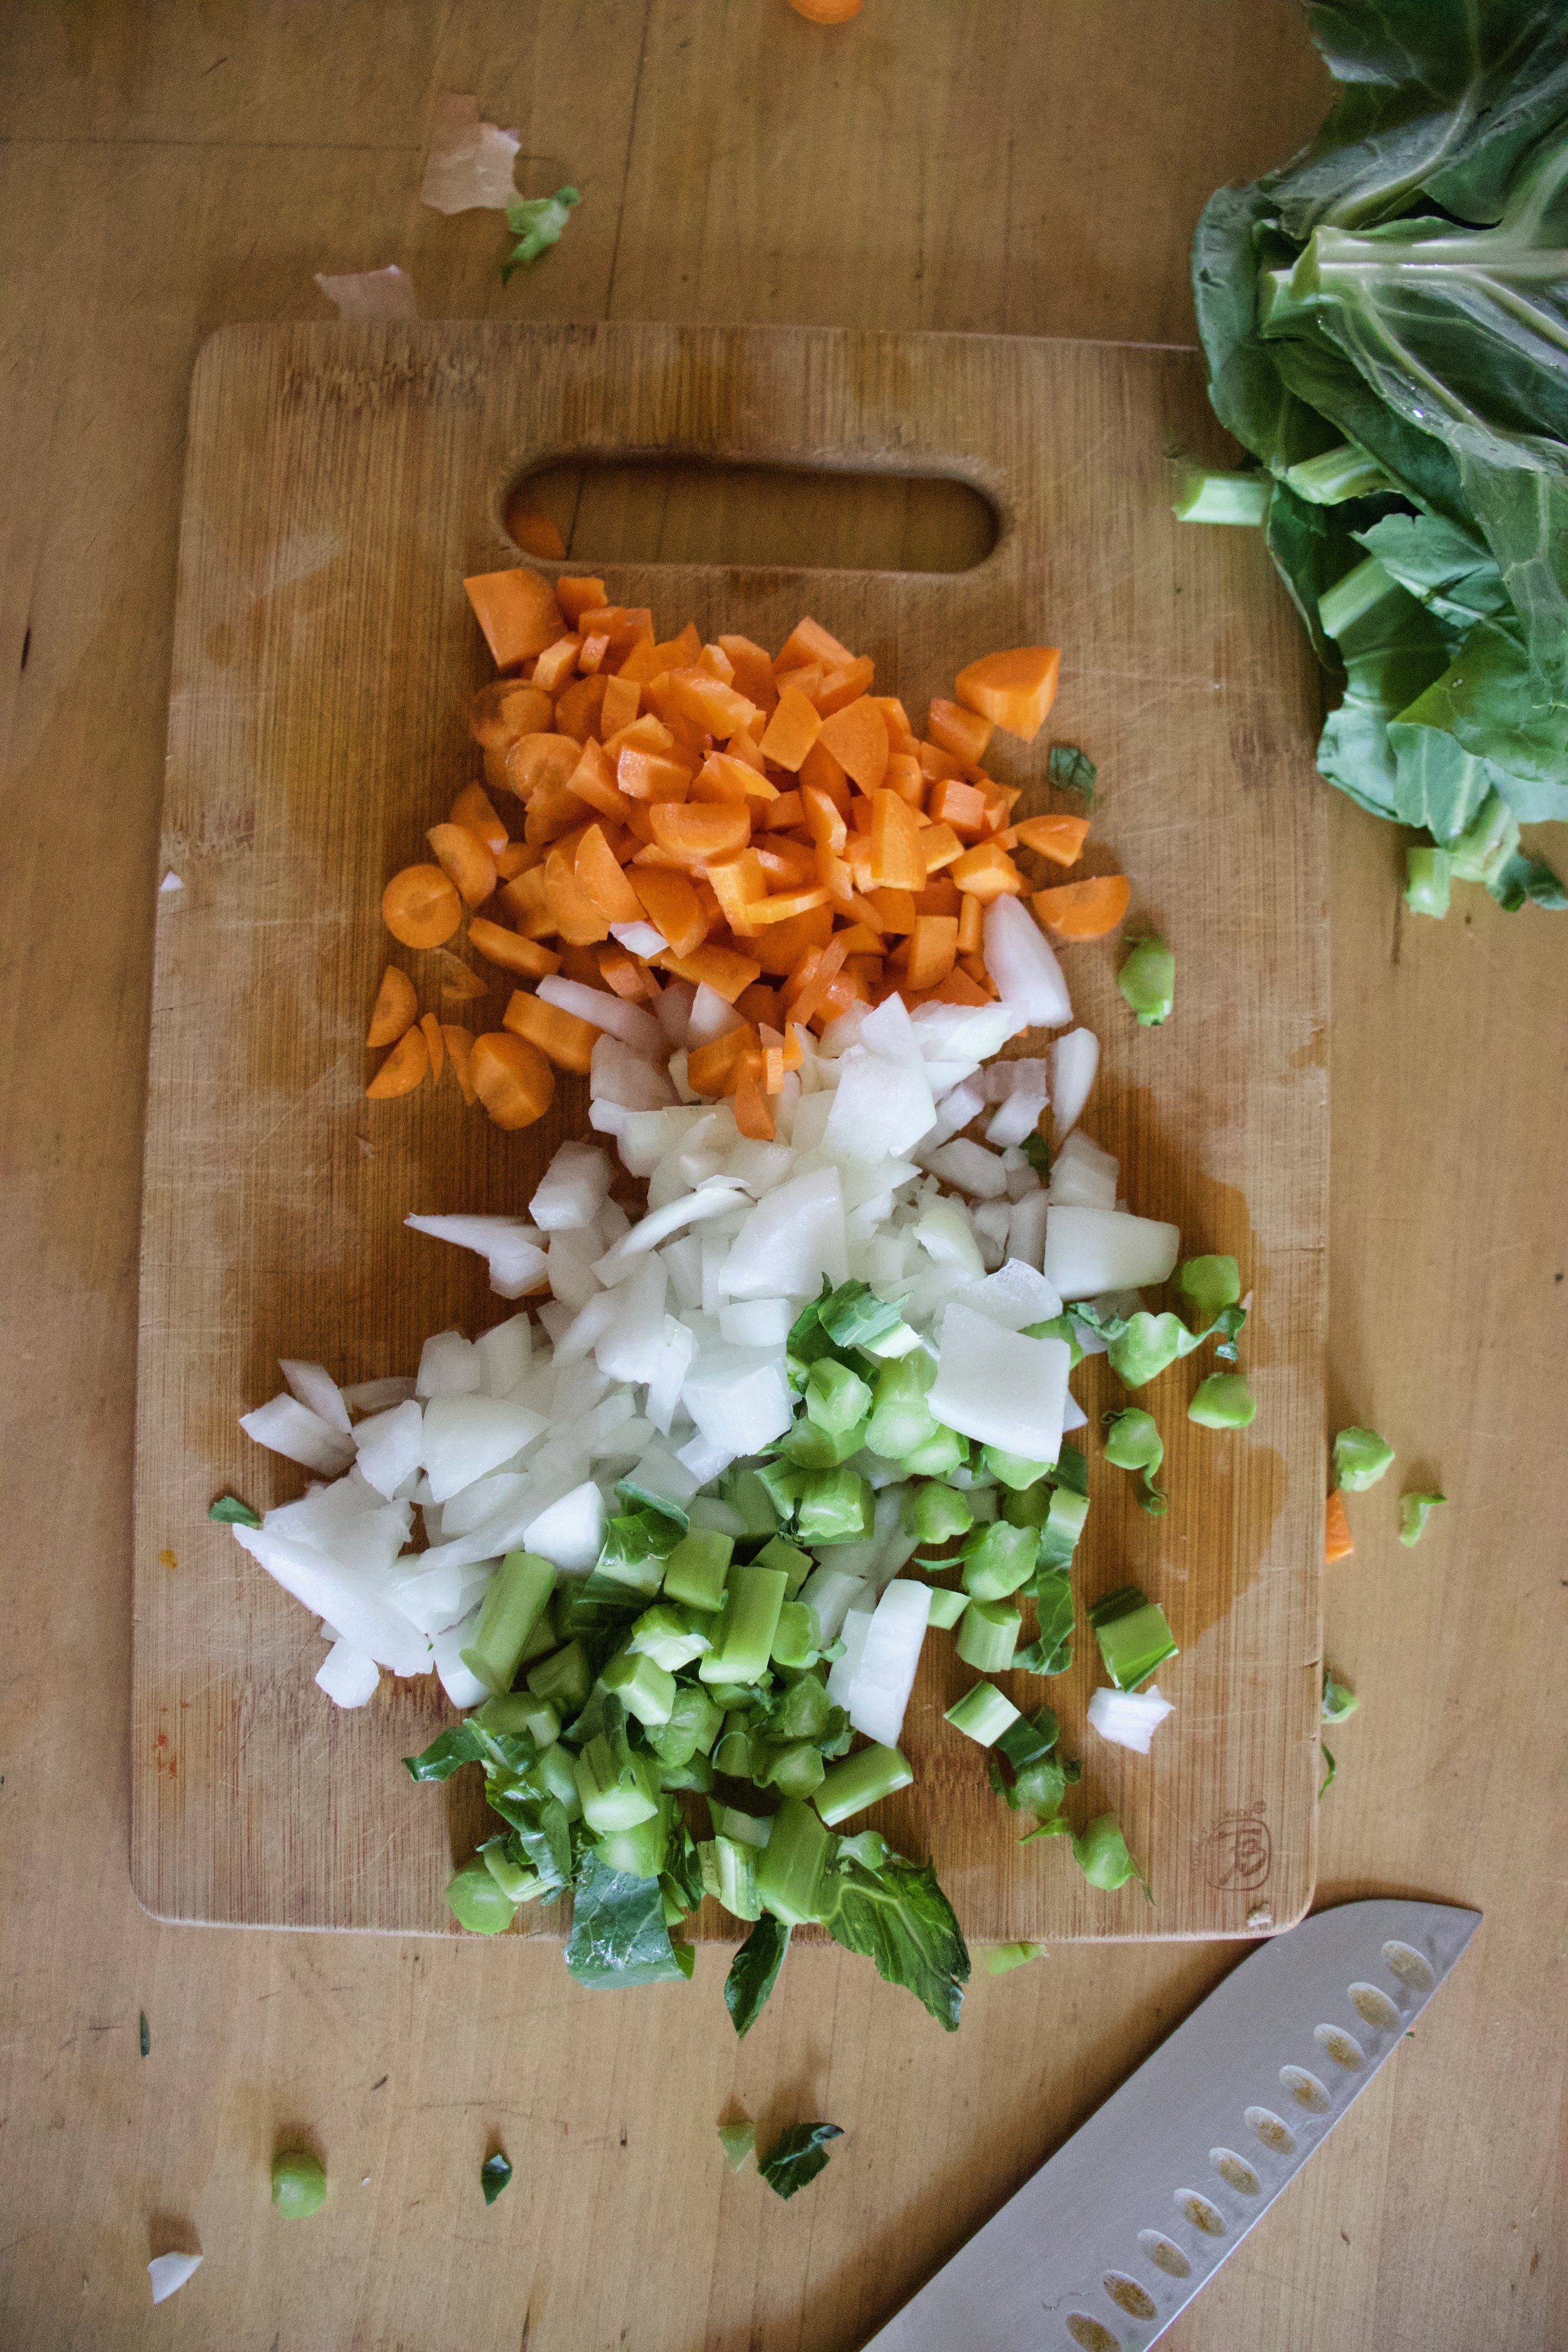
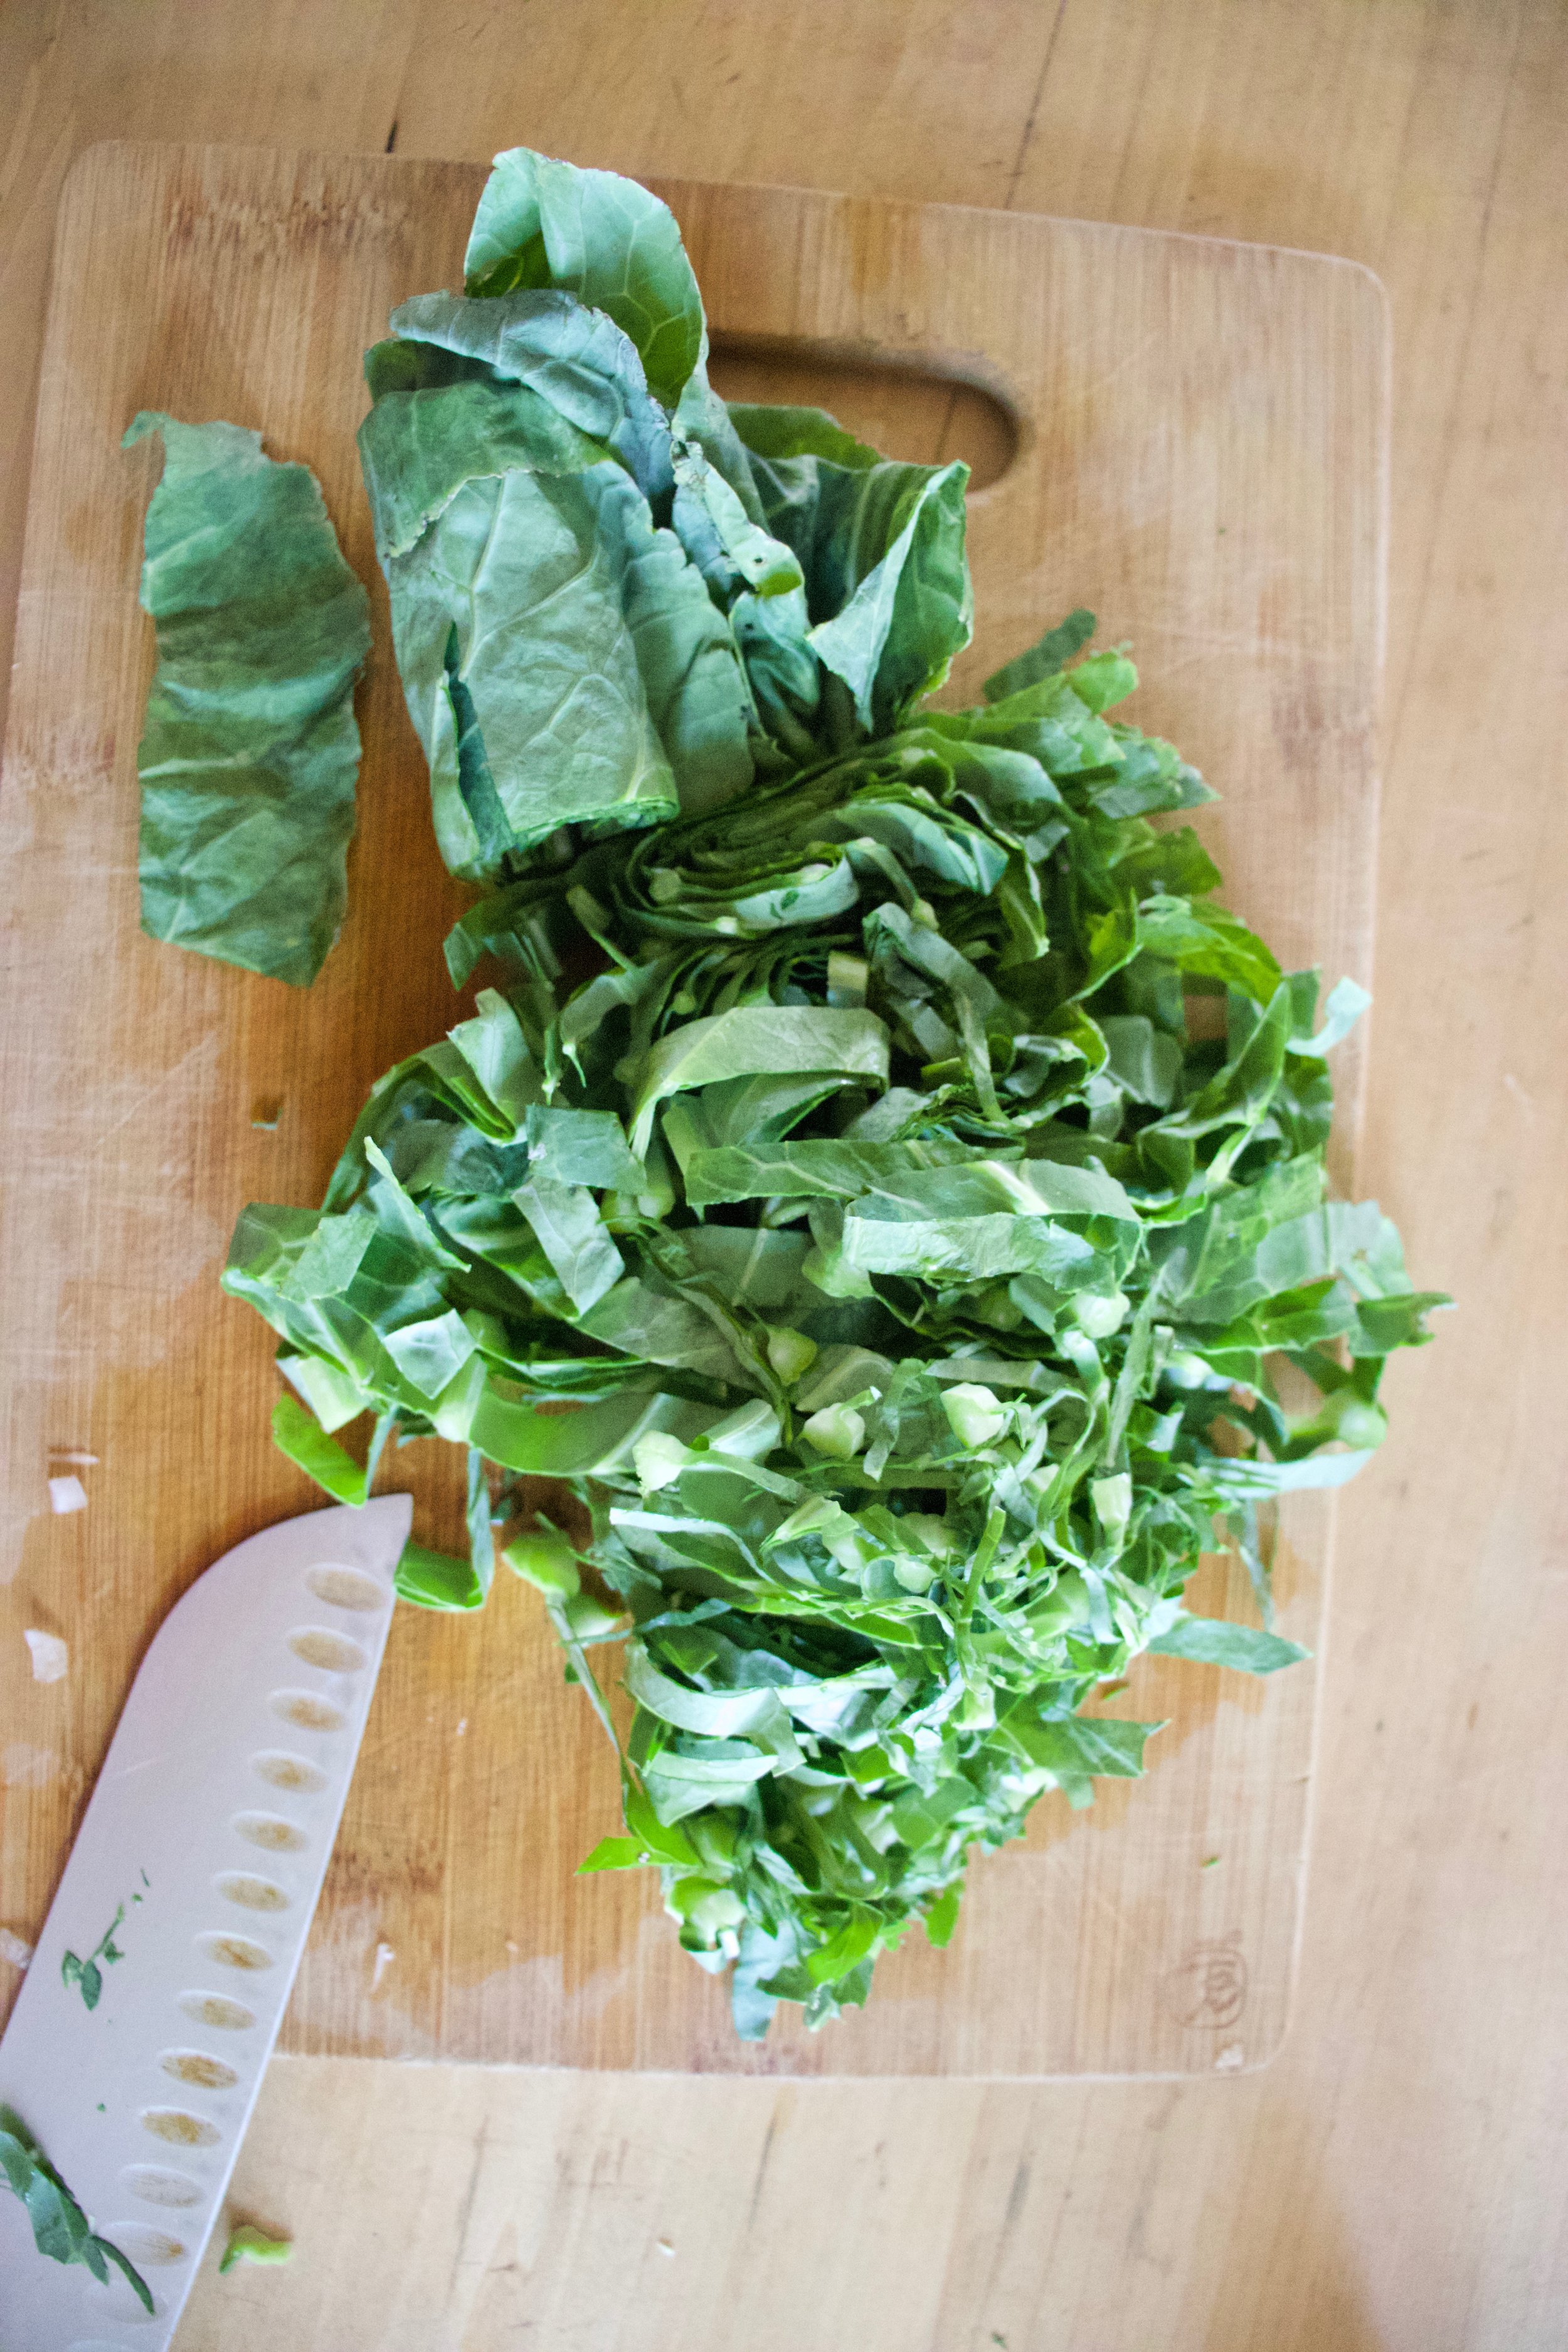
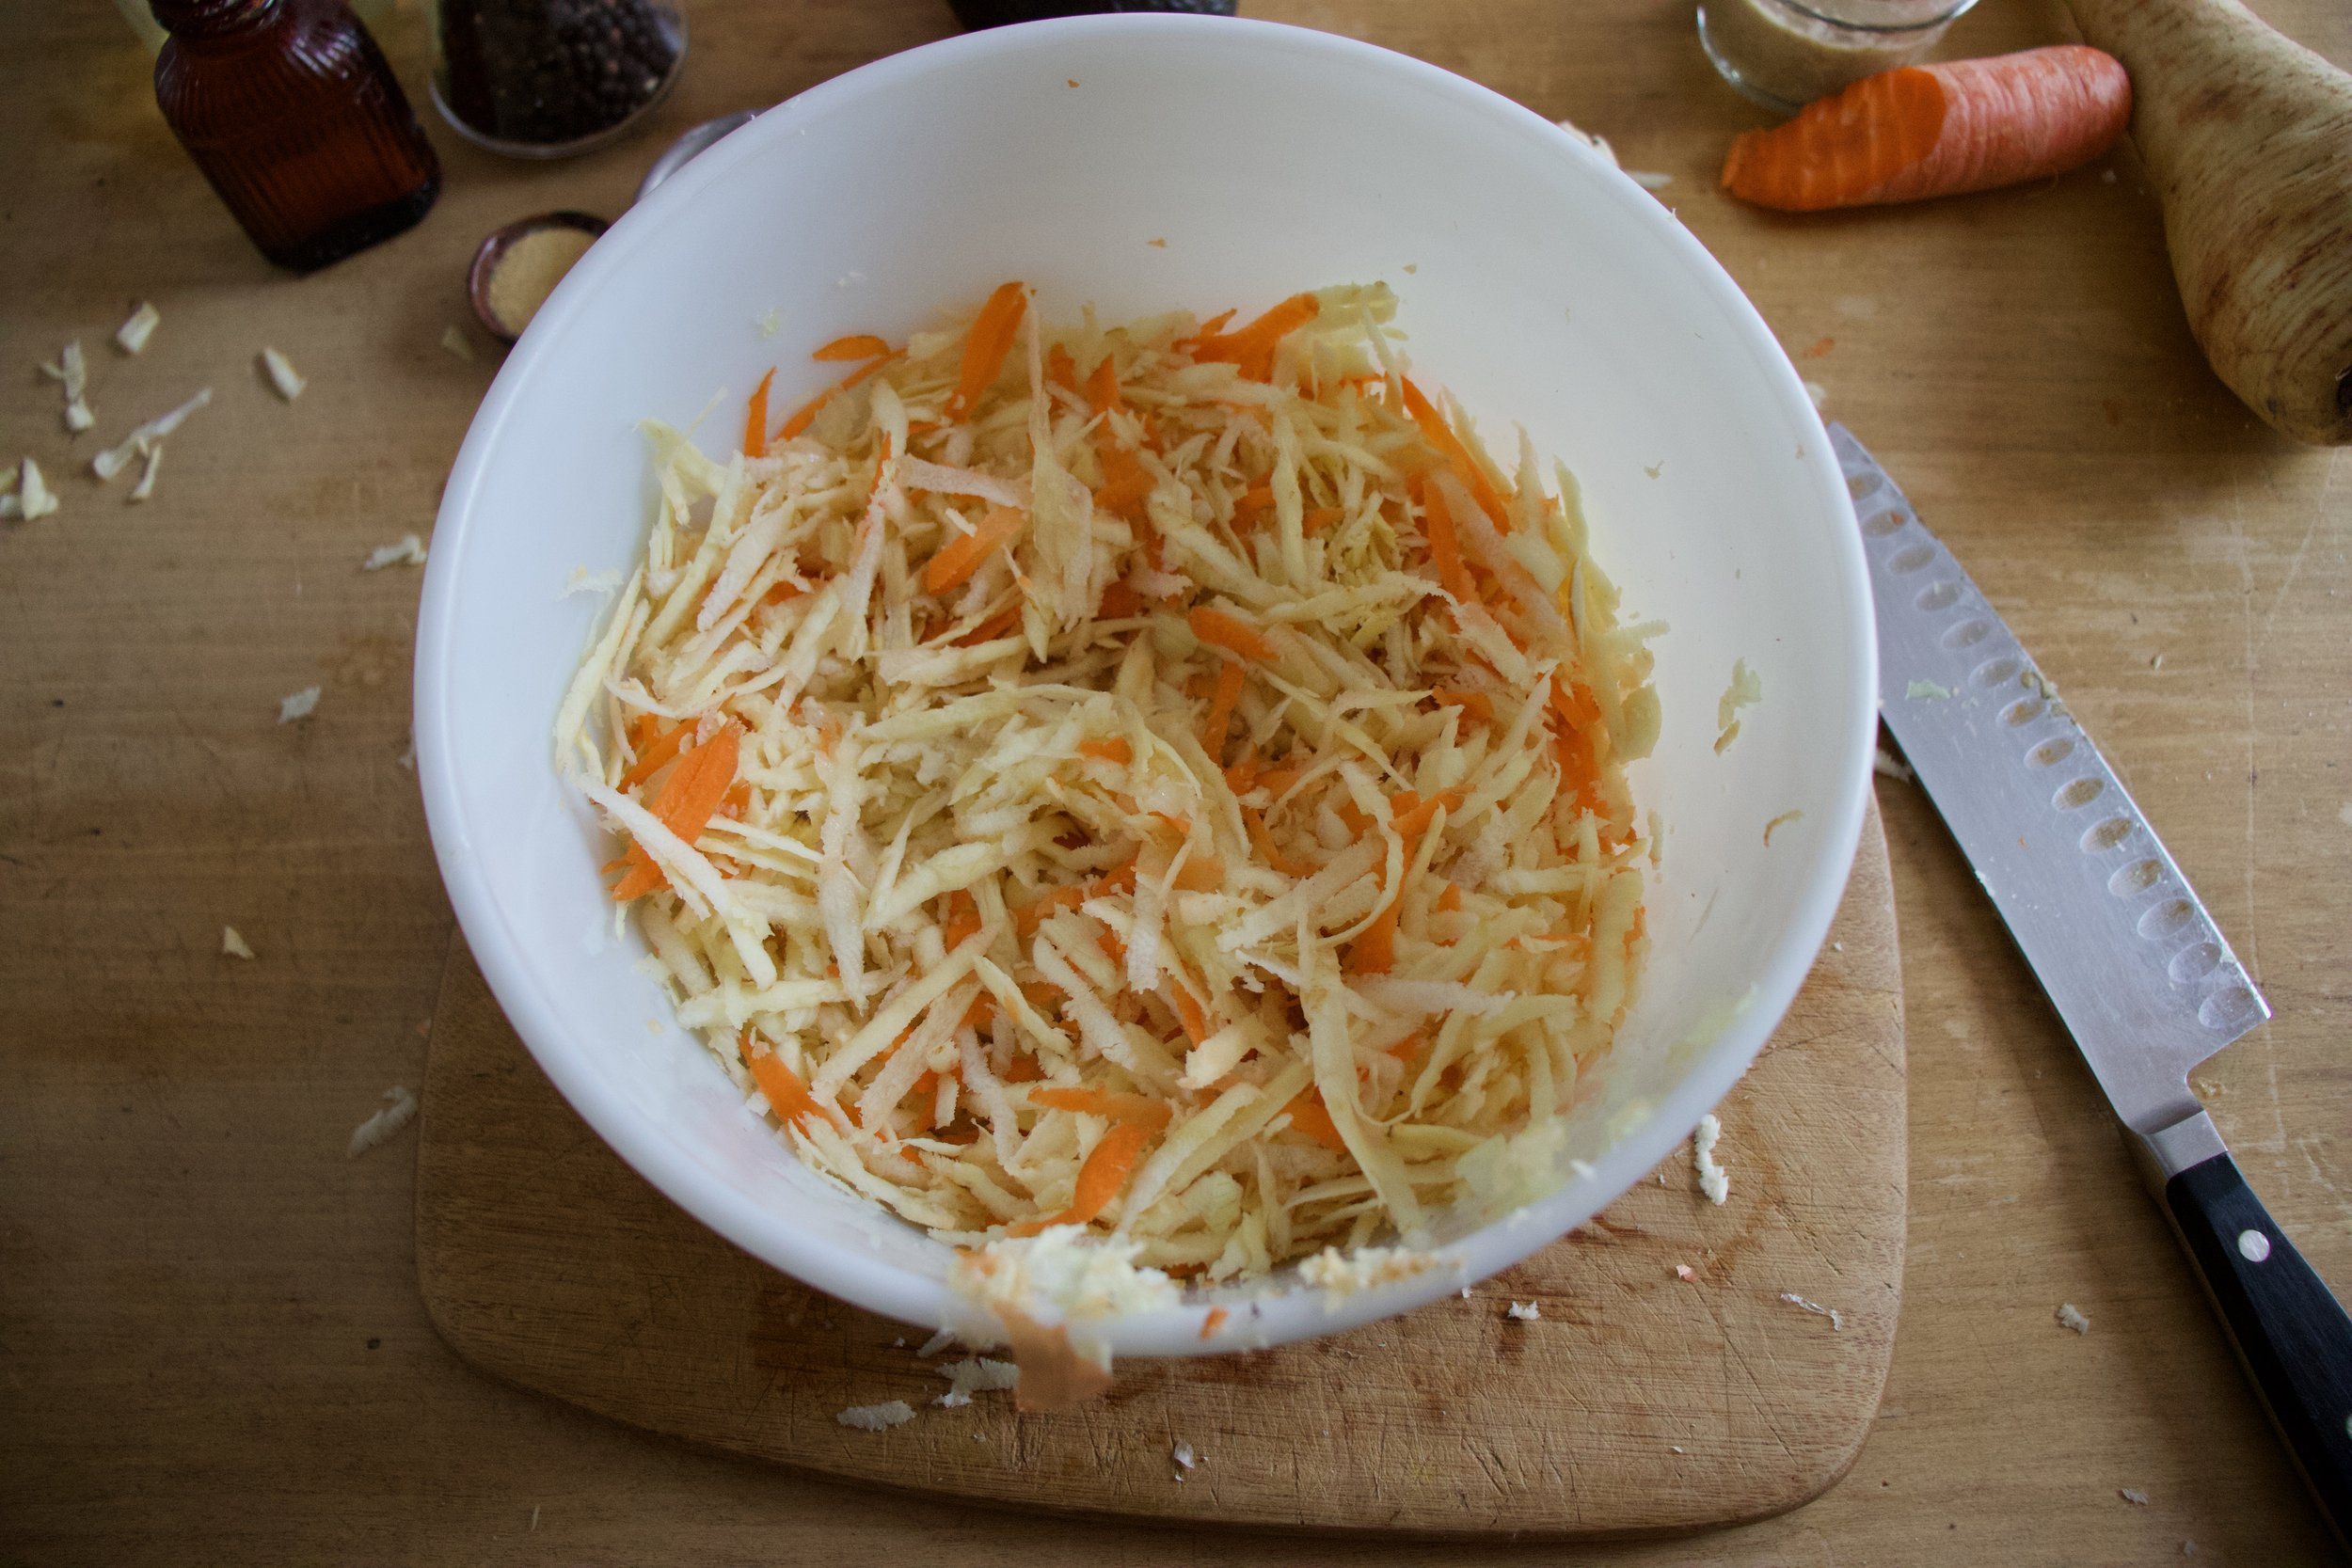
Start by removing the stems from the leaves of the collards. Then small dice up the carrots, the onion and the stems. Grab the collard leaves, roll them up together, then slice then into thin ribbons.

IMG_0796.jpg

All that stuff you just cut up now gets tossed into big pot, along with all the spices.

IMG_0807.jpg

Add in the dried peas and water. Lots and lots of water. Bring pot to boil, then reduce heat to low and loosely cover pot. Cook foe 45-50 minutes or so.

IMG_0811.jpg

While the peas and greens are cooking, shred up some cabbage.

IMG_0814.jpg
IMG_0817.jpg

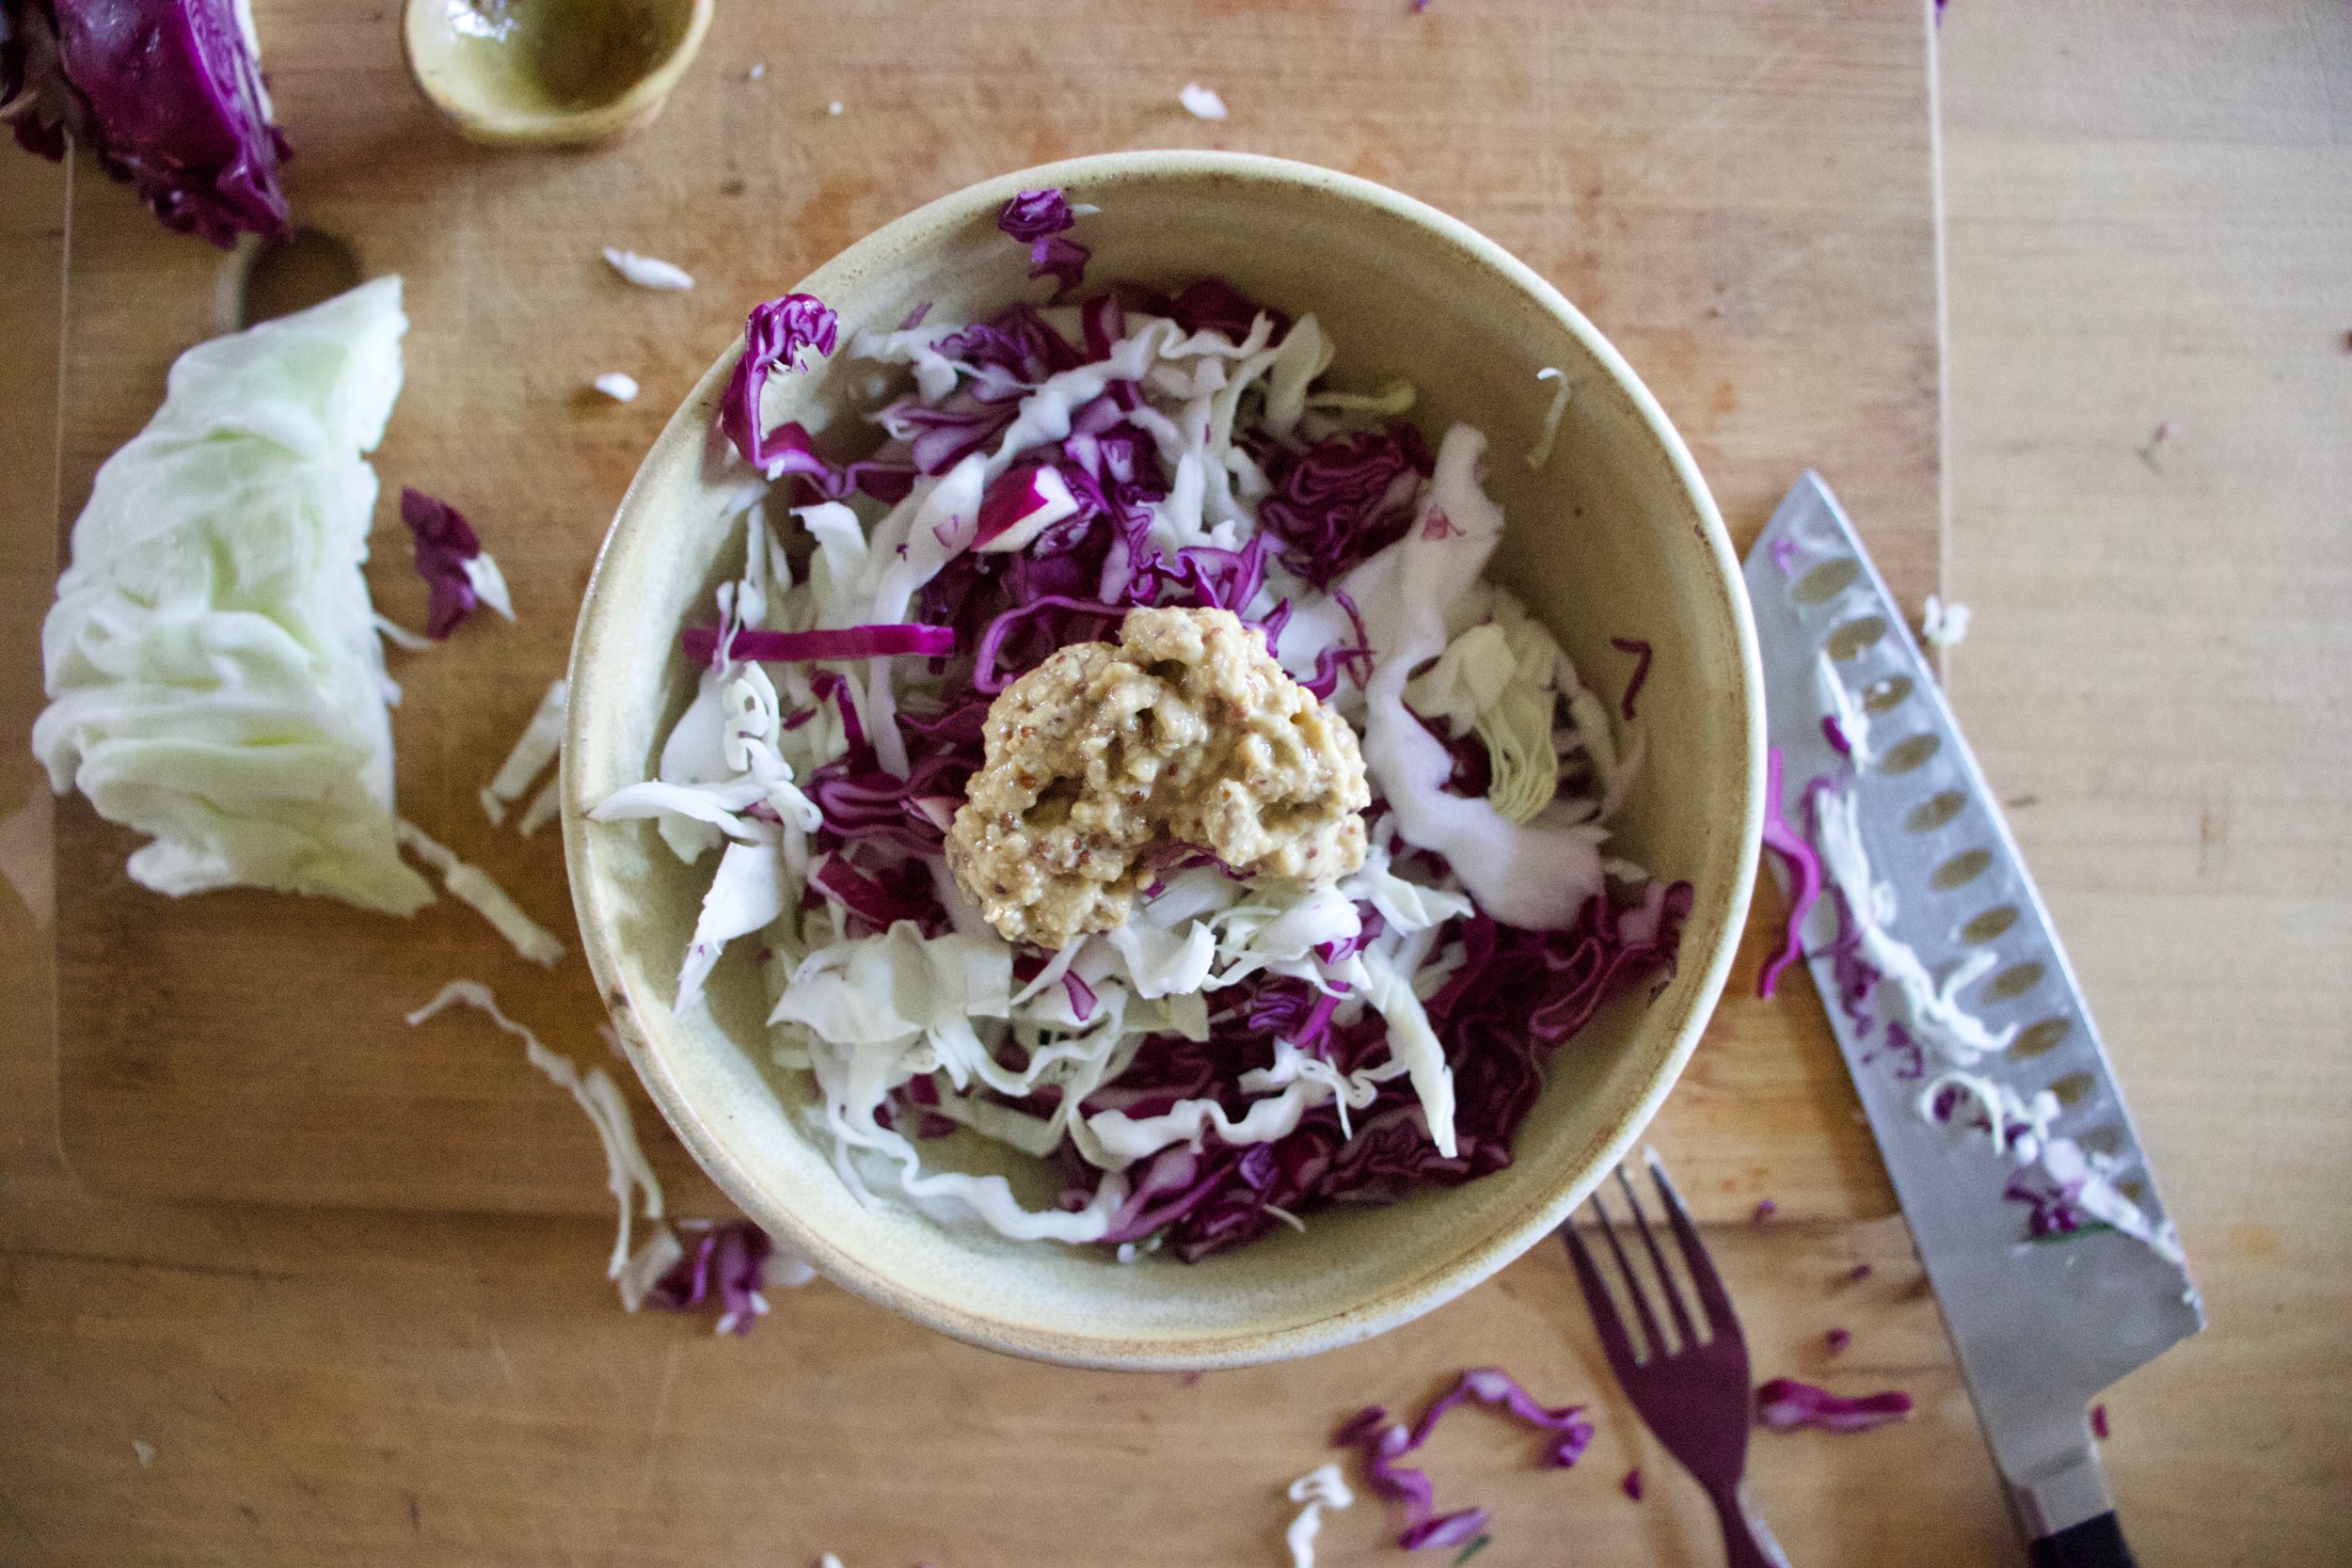
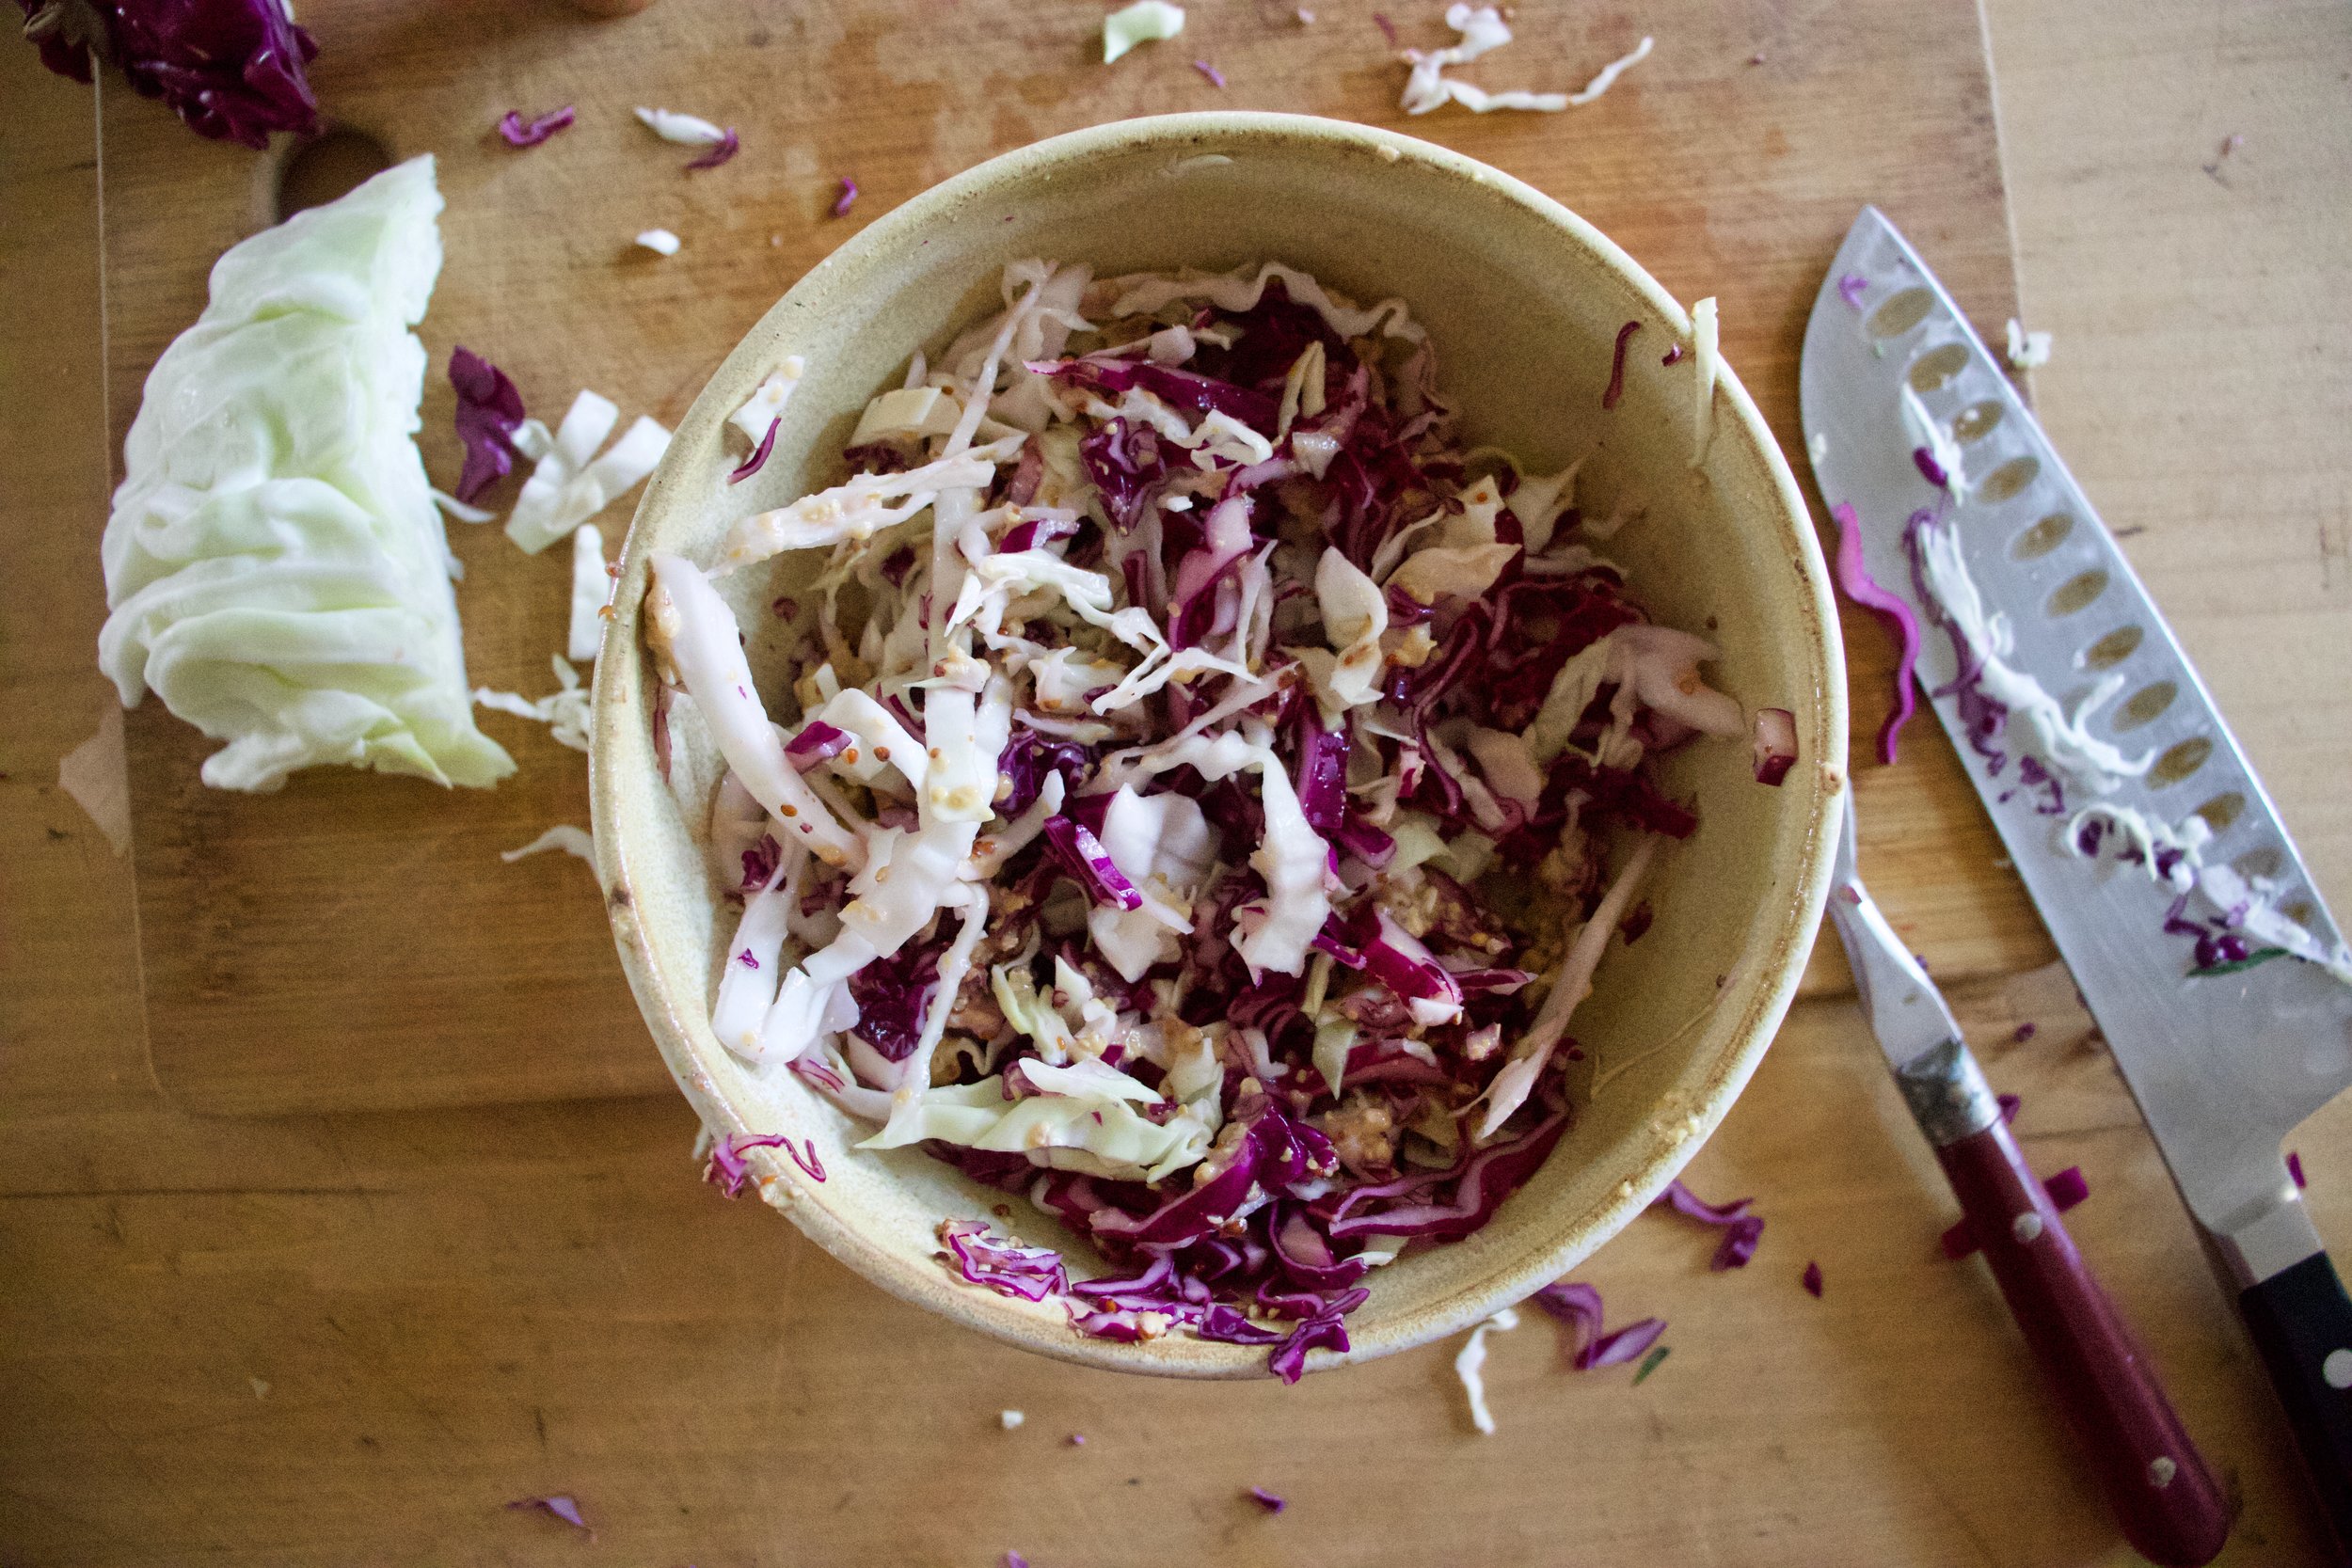
Add a good dollop or two of some good stone ground or Dijon mustard and mix.

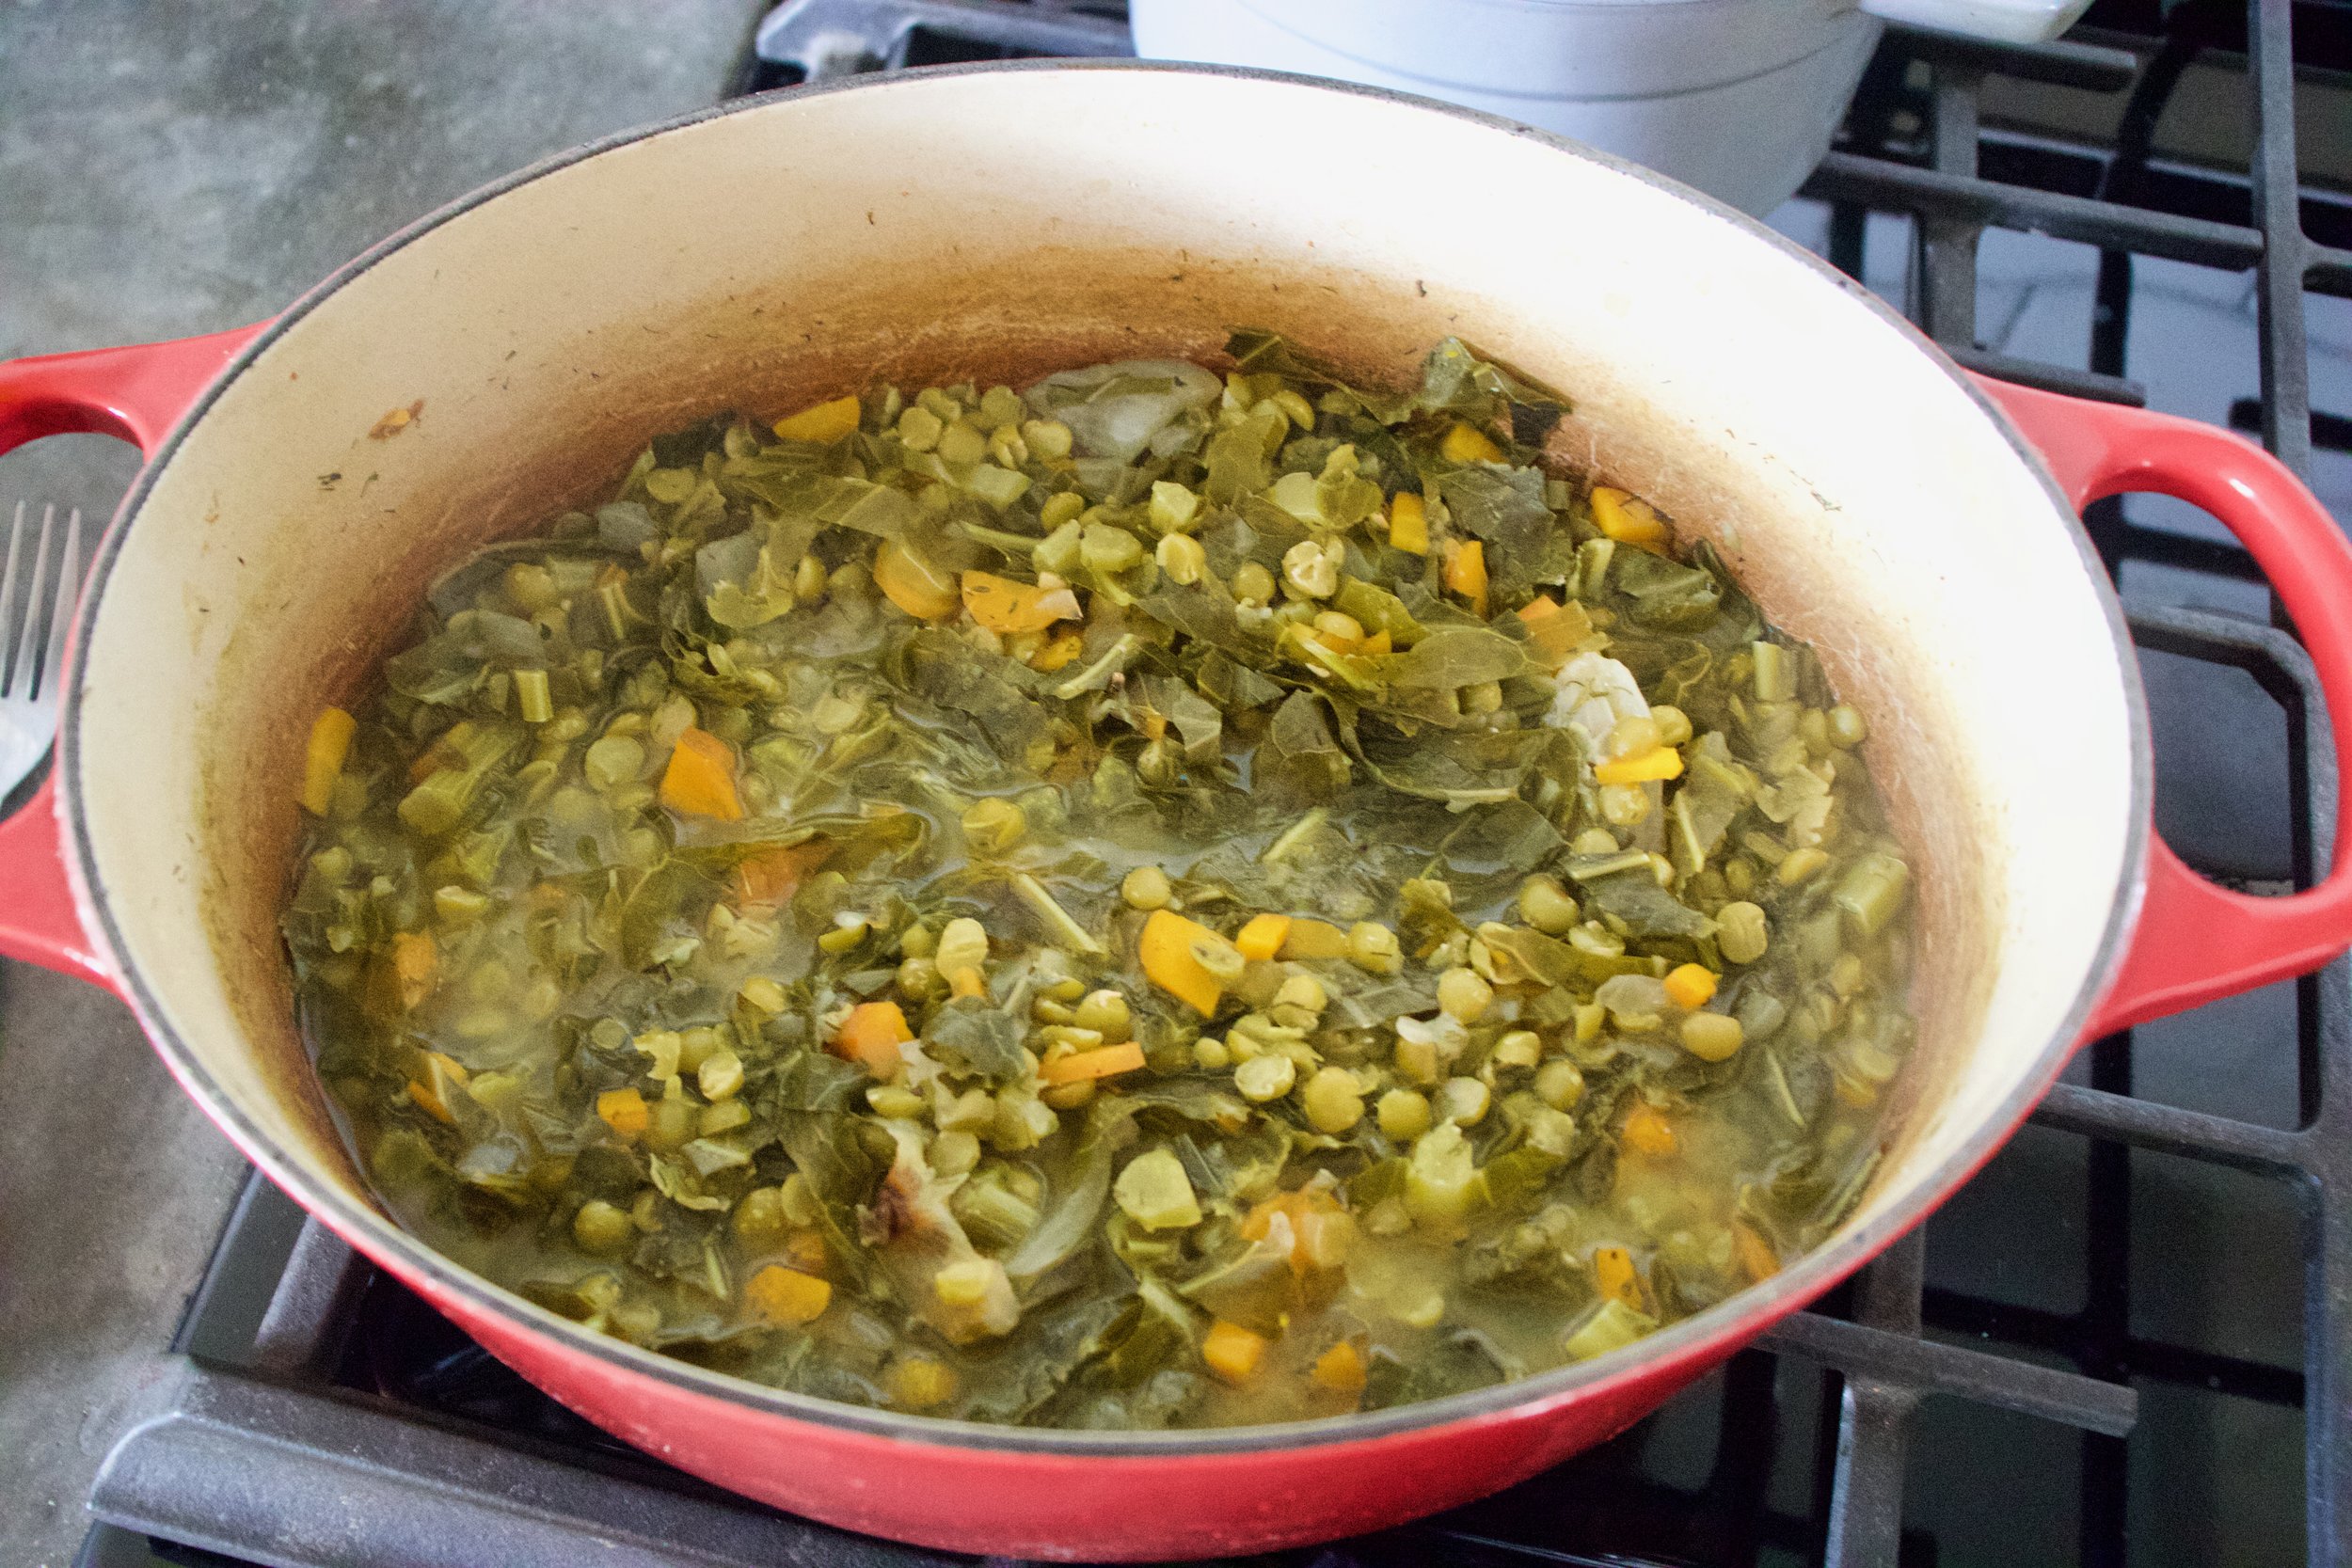
Cooked until the split peas are tender and starting to fall apart. Taste and season with salt and pepper.

IMG_1006.jpg

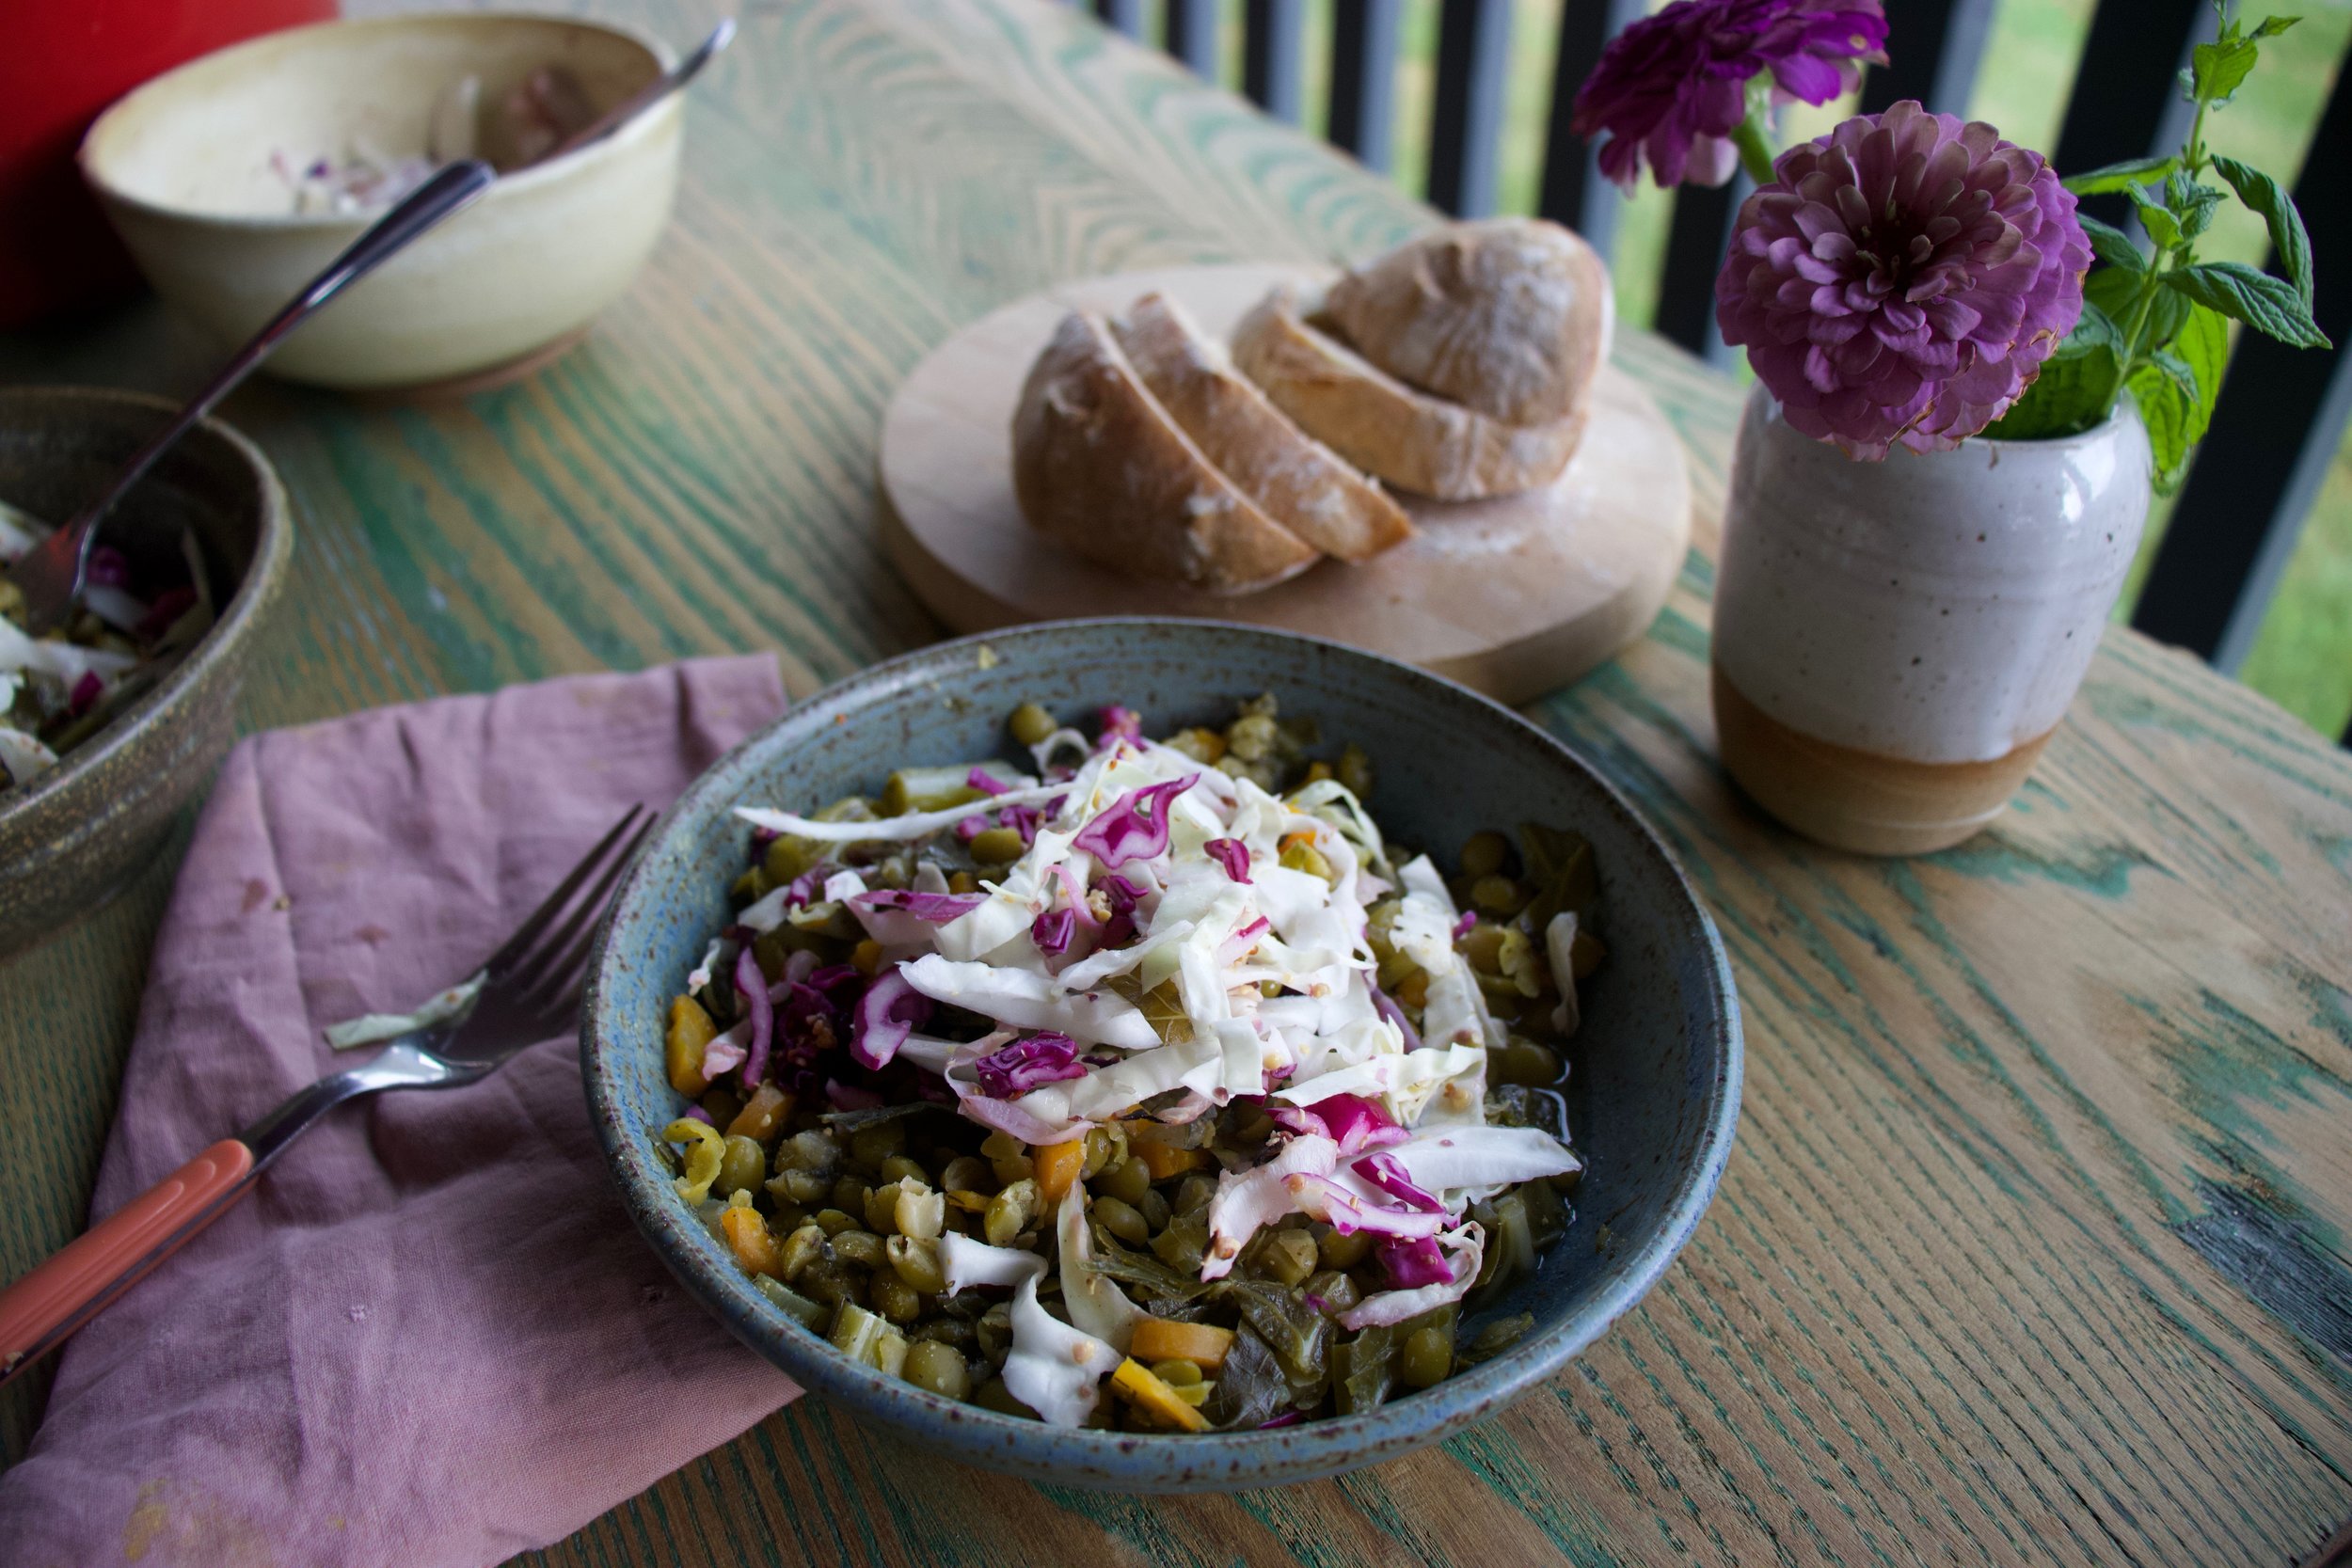
And then you eat. A big bowl full of the slpit peas and greens, topped with some mustardy cabbage slaw.

This is good food. Really freaking good.

-C


Split Peas and Collard Greens with Mustardy Cabbage Slaw

serves 4-6 folks

  • 2 cups dried split peas

  • 8-9 cups water

  • 1 large onion

  • 2 carrots

  • 1 bunch collard greens (about 6-7large leaves)

  • 1 teaspoon garlic powder

  • 1 teaspoon ginger powder

  • 1 tablespoon dill

  • 1 tablespoon thyme

  • 1 teaspoon ground mustard

  • salt and pepper

  • 2-3 tabespppms Dijon or stone ground mustard

  • 1/2 head of cabbage (red and or green)

Start by removing the stems from the collards. Grab the carrots and onion and dice them up small, along with the stems. Then take the leaves of the greens and stack and roll them up together. Slice the roll into thin ribbons. Place all of it, carrots onions stems, and greens, into large pot, along with all the spices, (don’t add any salt until the end) and stick o the stove. Add in the split peas and 8 cups of water. Bring pot to a boil, then reduce to low and place a loose lid on pot. Let cook for 45 minutes to an hour, or until the spit peas are tender and just about to fall apart. If you think you might need to add more water to cook the peas through, then add another cup.

Once cooked, season with salt pepper to taste.

For the cabbage slaw,which you can make right after your start the peas, just shred up cabbage and mix it together with the mustard and set aside.

And once the split peas and collard greens are all cooked, scoop into bowls, top with some of the cabbage slaw, and eat to your face.

In dinner, grain free, pulses, soups/stews/chilis, Vegan, Vegetables Tags Split Peas And Collard Greens, collard greens, vegan, pulses, cabbage, plant based, healthy, clean eating, 1 pot meal, easy, protein, dinner, stew, grain free, mustard cabbage slaw, slaw
Comment

Chili Lime Chickpea Flour Crackers

July 27, 2019 Colleen Stem
IMG_0580.jpg
IMG_0602.jpg

We have officially kicked off our summer camping adventures. And with camping comes all the greatness of all the things, including camping food.

Recently a friend asked me what it is that we do for camp food. So I told her. Camp food is basically aways the same and consists of a big pot of spiced warm lentils or split peas (both cook really fast and have lots of protein), a shredded summer squash in the summer, or pumpkin in the colder months, maybe fresh tomatoes or a bunch of kale to chop and mix in, and a side of cut up carrots, cucumbers, green beens or whatever else I have.. Then I'll bring a hunk of bread for the mr to eat and me, usually a small head of cabbage to squirt mustard on and crunch into. (Always have the mustard on hand.) And I bring apples to snack on too, but that usually it. (Sometime I’ll back a desert for the mr. If I am feeling nice.)

She was a little taken aback. Said when she (and basically everyone in the world, which I disagreed with) goes camping it is bags of chips, cookies, meat, and everything and anything that she (they) wanted. Basically that camp food was junk food and that she though we were weirdos. But cool weirdos so you know.

So our camp food… not like many others. But honestly it is everything that I want to eat and I love it so whatever whatever. As for the mr, he is happy with the food and when he is not, he brings along something else, but that rarely happens because my lentils be so good. HA!

But she got me thinking that I should have a few more snack options beside cut up carrots and apples. So that is why I made crackers. These chickpea chili lime, freaking amazing crackers. Because crackers are a very appropriate snack food, and these crackers in particular are even greater because they are made with the goodness of chickpea flour which is packed full of protein and is well received after a day of hiking or other fun outdoor camping activities. And how can you go wrong with chili lime? Well i’ll tell you, you really can’t

So the plan was to make a batch, eat a few, save the rest for this camping weekend. But guess what? I have to make another batch. They didn’t make it. We ate them all. (not sorry) At least I know we will be liking our new camping snack addition well and right.

So if you like crackers, camping or elsewhere, you should really gives these a go. They will not disappoint.

Now to the crackers!

IMG_0509.jpg

The stuff. Chickpea flour, chili powder, a lime, a little baking powder, olive oil, salt and pepper, and water.

IMG_0517.jpg
IMG_0523.jpg

Combine the flour, zest of the lime, half the chili powder and half the salt, and the baking powder and some pepper in a bowl. Mix until completely combined then add in the oil, water and the juice of the lime.

Mix until dough forms. It might feel a little sticky, if that is the case, just mix other tablespoon of chickpea flour.

Knead dough on a well chickpea floured surface for a good minute until the dough is a even consistency then let it sit for a few minutes to rest. Once rested, cut dough into 2-3 pieces because working smaller is easier.

IMG_0551.jpg
IMG_0555.jpg

Roll out your first piece of dough about 1/8 inch thick. (Again, make sure to really flour your work surface and rolling pin.) Mix salt and chili powder together and sprinkle on top. Cut out your crackers (squares are nice but triangles would be nice too) then poke each cracker with a fork.

IMG_0558.jpg

Up close and personal.

IMG_0564.jpg
IMG_0565.jpg

Crackers on a baking sheet before baking and after baking looking all crackery and delicious. And yeah, they shrink a bit.

And lastly, cool the crackers on a cooling rack. They will crisp up a even more. Then it’s all you.

Ready to eat whenever you make the move. You can pack them away for later or place these delicious crackers in a very pretty bowl and eat them away. Or both.

A cracker win!

-C


Chili Lime Chickpea Flour Crackers

make 75 crackers

  • 1 1/2 cups chick pea flour plus about 1/3 more for dusting and rolling

  • 1/2 teaspoon baking powder

  • 1 tablespoon olive oil

  • 1/3 cup room temp water

  • 1 teaspoon chili powder split in half

  • 1 lime

  • 1 teaspoon salt split in half

  • 1/2 teaspoon fresh crackers pepper

Preheat oven to 350.

In a bowl combine the chick pea flour, baking soda, pepper, 1/2 teaspoon chili powder, and half a 1/2 teaspoon salt. Mix until evenly incorporated. Add in oil, the juice of the lime, and and water and mix until a dough forms. Dump dough onto counter and knead until completely uniform in texture. Add more flour if the dough is really sticky. Set dough aside for a few minutes to rest.

To make the crackers, really dust the counter with chickpea flour. Cut the dough into 2-3 pieces and roll1 piece out at a time to about an1/8 inch thin. Again, really flour the surface and rolling pin or else the dough will stick Once rolled, combine the remaining chili powder and salt and sprinkle the top with it. And then cut the crackers. Take a knife of bench scrapper or pizza cattier and cut the dough into inch long strips vertically, then diagonally. Poke each cracker with a fork then gently place them onto a baking sheet. Repeat with remaining dough.

Bake crackers for 15-20 minutes or until a nice deep golden brown. Remove from oven and let cool on a wire rack.

And then eat.

Store uneaten crackers in an airtight container for about a week.

In Vegan, snack, pulses, grain free, Gluten Free, Dairy Free, crackers and chips, beans Tags Chili Lime Chickpea Flour Crackers, gluten free, grain free, vegan, camp, cracker, snack, chili lime, pulses, protein, beans, dairy free, quick and easy, chick pea flour, gram flour, besem flour
Comment

Basic Socca

May 11, 2019 Colleen Stem
IMG_8294.jpg
IMG_8315.jpg

I am obsessed. For real. That might seem like a strong statement for a feeling about a food, but right now, it is truth. I spend more time then I want to admit thinking and drooling over Socca, which is, to those who do not know, the most basic chickpea flour pancake-y bread thing. Chickpea flour, water and salt. Cooked fast under the broiler in a screaming hot skillet. That is it. And it is amazing. Depending on how you make it, it can be creamy and soft or more cracker like with some crisp crunch to it. Either way, it is just so freaking good. Of course, what I am dreaming about regarding it is not just plan basic socca (which I have made 3 times in the past 3 days) but different flavored soccas (I have experimented with lot of seasoning, and they are all A+) with all sorts of different topping and using it in all sorts of different ways. But for now, I wanted to keep basic so we all know how good simplicity is. We will go from here.

There is no stopping me. There is no stopping the socca.

Now to my new favorite food, the socca.

IMG_8234.jpg
IMG_8238 2.jpg
IMG_8240 2.jpg

Chickpea flour, salt and water. That is it. Mix it all up.

IMG_8252.jpg

Batter all smooth and now in need of a rest. Half an hour or up to a day of rest is good.

IMG_8261.jpg

Now to cook the socca. You need to use something oven safe like cast iron. The trick here is to preheat the skillet while you are preheating the oven. Crank oven to 450 with the skillet in oven and once the oven reaches temp, turn oven over to a high broil. Let the skillet get really hot for another minute or two then remove skillet from oven (carefully!!!) and give it a splash of oil. Don’t preheat the skillet with oil in it or else it will start to smoke and get gross.

IMG_8266.jpg

Now that you got a nice hot and oiled skillet, grab the rested batter and pour half of it in. Tilt skillet around to coat bottom then stick skillet back into oven under broiler and cook for 4-8minutes. ( It depends on your broilers strength and your preference for blisters)

Out from the broiler. Cooked and slightly blistered. I went easy on this one. The next one got a few more blisters.

2 soccas, one a little thicker then the other. One a little more blistered then the other. Both in my belly.

So many Soccas to come.

So. many. Soccas.

-C


Basic Socca

makes two 10 inch soccas

  • 1 cup chickpea flour

  • 1 cup room temperature water

  • 1/2 teaspoon salt

  • olive oil for pan

Mix chickpea flour, salt and water together into a bowl until smooth. Let mixture rest for at least half an hour or up to a day.

When ready to make the socca, preheat oven to 450 with a 10 inch oven safe skillet (I used cast iron but any oven safe dish would work) in oven.

Once oven reaches temp, turn oven over to broil and place skillet under it for a minute to really heat the skillet. Carefully, with oven mitts, remove hot skillet from oven and brush or pour a smidge of oil into the hot skillet to coat bottom. Pour in half the batter and tilt around until bottom is coated then place skillet back into oven under broiler and cook for 4 -8 minutes or until the socca starts to blister. (it kind of depends on your broiler so keep a close eye on it) Remove from oven and slip socca onto cutting board. Sprinkle with salt and pepper. Drizzle with olive oil if you like. Then all you do is cut and eat.

Left over socca can be stored in fridge and reheated in oven or toaster.

Note. IF you want a slightly thicker socca, use a 8 inch skillet. For a thiner, more cracker like socca, pour in 1/3 of the batter at a time (you will end up with 3 instead of 2)

In 5 ingerdients or less, appetizers, biscuits and such, bread, Dairy Free, grain free, Gluten Free, pulses, beans, Vegan, snack, side dish Tags Socca, Chickpea flour, gram flour, besem flour, pulses, protein, vegan, gluten free, dairy free, crepe, wrap, bread, tortilla, crust, simple, easy, sweet or savory, beans, Italian
Comment

Roasted Maple Cumin Cauliflower with Tahini

February 16, 2019 Colleen Stem
IMG_5476 2.jpg

Nothing here but a mere craving, the fact that I had a fresh head of cauliflower, and I really wanted tahini. TA DA. I made exactly what I wanted and it was so so sooooo good. Maple Cumin is one of those super A+++ taste pairings and anything roasted cover in tahini is basically going to be a win so I had no fear when making this dish that it was going to be anything but fanatic.

And of course I was right. It was so freaking good, like now I am going to make it again and again because I don’t want make cauliflower any other way ever or at least until I get sick of it or of roasted vegetables. But that probably won’t happen for a while.

So if you like cauliflower and tahini and amazingness, here, make this.

To the cauliflower

The stuff. A head of cauliflower, tahini, maple syrup, cumin powder, red wine vinegar, salt and pepper, and olive oil.

IMG_5385.jpg
IMG_5396.jpg

Break or cu the head of cauliflower up into florets and toss with a little oil, the maple and cumin, and a little salt and pepper.

IMG_5397.jpg

Scatter on a baking sheet and stuff it into a hot oven.

IMG_5425.jpg

Meanwhile mix tahini with vinegar, salt and pepper, and enough warm water to thin out.

Roasted all nice and crisp and delightful.

And now you gather up all that cauliflower and cover with all the tahini you want. Grab a bowl, or just eat off baking sheet, and get to it.

And there is no shame in eating a whole head of cauliflower because hey, its cauliflower.

-C


Roasted Maple Cumin Cauliflower with Tahini

Makes a meal for one or a side for a few

  • a head of cauliflower

  • 3 teaspoons cumin

  • 2 tablespoons maple syrup

  • olive oil

  • 3 tablespoons tahini

  • 2 tablespoons red wine vinegar

  • 2-3 tablespoons warm water

  • salt and pepper

Preheat oven to 450

Break or cut the cauliflower into medium sized florets. Place in a bowl and drizzle with a teaspoon or so olive oil and toss around. Drizzle in maple, add in the cumin, and a pinch of salt and pepper. Toss until coated then dump the cauliflower onto a baking sheet. Place in hot oven for 25-30 minutes or until roasted to your liking.

While that’s roasting, mix up the tahini, vinegar, and a pinch of salt and pepper. Add in warm water until the mixture is a drizzlable consistency.

Once cauliflower is out of oven, cover with tahini.

Now eat.

There will be no left overs so don’t worry about it.

In dinner, Gluten Free, grain free, quick and easy, side dish, Vegan, Vegetables, snack Tags Roasted Maple Cumin Cauliflower with Tahini, vegan, cauliflower, plant based, maple cumin, tahini, roasted, vegetables, side dish, main dish, gluten free, grain free, dairy free, whole food, simple, easy
Comment

Parsnip Fritters

February 2, 2019 Colleen Stem
IMG_5053.jpg
IMG_5061.jpg
IMG_4970.jpg

Fritters are no joke. You can just about turn anything into a fritter and almost all of the time it will taste pretty good. Parsnips are no exception. Tasting the way parsnips do, straight up without any extra spices, these fritters will hit the spot if you are on the lookout for a fritter for your fritter seeking self.

And what if you are not sure you like parsnips or fritters for that matter. Stop right here. You probably do and just don’t know it yet. I guess the only way you will really know is to make a batch. Then you can tell me all about how you love parsnips and will now be making fritters for every meal every day for the next week.

To the frittering.

IMG_4902.jpg

The stuff. Parsnips (I only needed one because mine are humongous) a carrot, an onion,. some garlic powder. a little oat flour, a flax egg, and some olive oil. Also if you want to serve with avocado mash (which tastes great together), well grab one and a lemon too.

Start being shredding the parsnip, carrot, and half the onion into a big bow. Chop up the other half of onion into small bits. I do this because grating onion only turns the onion into a juice and I like the little bits if onion in my fritter.

Shredded and mixed. And pretty too.

IMG_4926.jpg

Add in the garlic powder, a little salt and pepper, the flax egg, and the oat flour.

Mixed and ready for the cooking.

IMG_4950.jpg

A medium hot frying pan with a little olive oil is what you need. Make medium sized flattish patties and cook until nice and golden brown.

IMG_4959.jpg

Flip and cook the other side just the same.

IMG_4966.jpg

Fritters are done and could be eaten now too, but I like to stick them on a baking sheet and into the oven for 10 minutes or so to really crisp them up.

If you want to serve with avocado, just mash half of one up with a pinch of salt and juice of lemon.

IMG_5027.jpg

And that is that. Out of the oven, onto a plate, and into the mouth.

Enjoy

-C


Parsnip Fritters

makes about 9 fritters

  • 1-3 parsnips, depending on size (about 2 1/2 cups shredded)

  • 1 carrot

  • a medium sized onion

  • 1/3 cup oat flour

  • 1 flax egg (3 tablespoons warm water and 1 tablespoon ground flax seed)

  • 1 teaspoon graduated or powdered garlic

  • salt and pepper

  • oil (any kind you like)

  • An avocado and a lemon (optional)

Preheat oven to 400

Shred the parsnips, carrot and half the onion into a large bowl. Mince the second half of onion and mix into the shredded. Add a pinch of salt and pepper, the flax egg, and the oat flour and mix until evenly incorporated. Grab a flying pan, add a little olive oil, and place on medium high heat. Once pan is hot, scoop about 1/4 cup of the mixture into pan, trying o keep it compacted. Let it cook for a few minutes then with a spatulaf gently tamp it down. Flip and let the other side cook until golden brown. Once they are cooked, they can be eaten, but I like to place them into the oven for about 10 minutes to cook and crisp up a little more.

Once done, serve anyway you like, but mashed up avocado with lemon is fantastic. Tahini would also rock.

Eat and if you by chance have any left over (but you wont) they can be placed in fridge and reheated later (or eaten cold)

In Vegetables, Vegan, quick and easy, grain free, Gluten Free Tags Parsnips, Parsnip Fritters, Fritters, Pancakes, latkes, vegan, egg free, gluten free, plant based, flax egg, dinner, quick and easy, root vegetables, grain free, dairy free
Comment
← Newer Posts Older Posts →
 

https://thelovelycrazy.squarespace.com/config#/|/about/

Me. Food Maker.Food eater. Woo HOO!

STEM+NODE  SMALL BATCH AND ONE OF A KIND POTTERY

stem+node ceramics


____________________

Subscribe

GET NEW POSTS IN YO EMAIL

You are AWESOME!!!


@thelovelycrazy 2014-2021